• Welcome to the Community Forums at HiveWire 3D! Please note that the user name you choose for our forum will be displayed to the public. Our store was closed as January 4, 2021. You can find HiveWire 3D and Lisa's Botanicals products, as well as many of our Contributing Artists, at Renderosity. This thread lists where many are now selling their products. Renderosity is generously putting products which were purchased at HiveWire 3D and are now sold at their store into customer accounts by gifting them. This is not an overnight process so please be patient, if you have already emailed them about this. If you have NOT emailed them, please see the 2nd post in this thread for instructions on what you need to do

New all-star Poser-only figure released!

Faery_Light

Dances with Bees
Contributing Artist
Hmm, well if there's a way. :)
I mixed my models up somehow because I knew it was Poser...lol.
Most Poser people come with a few sets of clothes.
 

Ken1171

Esteemed
Contributing Artist
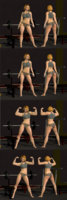
Now back to the LaFemme topology, I did some sculpting on the base resolution to see what I can get with the Morphing Tool without HD morphs. This sculpt is similar to my "Body Type-2", and I could get the general shapes and volumes, albeit with some definition losses. The sculpt doesn't look good on base definition, so this render uses 2 subdivision levels.

I think it looks Ok, but the Dawn version has more definition without subdivisions. There are some artifacts on the sides of the hip caused by the shape going to a direction that doesn't match the topology, but maybe I could clean it up if I worked on it some more.

I suppose this proves the point where sculpting on Dawn is easier than it is with LF. I would need to add at least 1 (or 2?) more subdivision level to get this sculpt to the same level of the Dawn version, meaning it would have to be a HD morph. Otherwise I ran out of geometry trying to bring out the details, and certainly had to fight the grid-like topology.

It can be done, but Poser doesn't handle these many subdivisions well when it comes to sculpting performance with the Morphing Tool. Performance drags with just a single subdivision, so 2 would probably not be very productive. Maybe this would require zBrush, because it can handle many levels of subdivisions before it affects sculpting performance.

This is a good example of why topology is important on a base figure meant for others to create upon. It's the typical thing consumers won't care about (they don't have to), but vendors do because it affects their work. From this experiment, it has become clear to me that LF was designed to be worked with subdivisions.

Nonetheless, the "Body Type-2" shape is already recognizable from sculpting on base resolution, as long as we render with the default 2 levels of subdivision. Otherwise it looks blocky and jagged. Personally, I have always liked low poly models, but in this case I expected more from the topology.

Sculpt.jpg
 

Ken1171

Esteemed
Contributing Artist
Hmm, well if there's a way. :)
I mixed my models up somehow because I knew it was Poser...lol.
Most Poser people come with a few sets of clothes.

I know, right? LOL My LF also remains naked, so I still have no renders to show of her. I was also surprised how the base figure came with no clothing at all. Not even underwear or a simple bikini. We have to buy those separately. I wonder if this is a sign that making conforming clothing for LF is tough because of the many JCMs? I will eventually find out. :)
 

Miss B

Drawing Life 1 Pixel at a Time
CV-BEE
I just picked up a cute little dynamic dress Karth made, and it's on sale. ;)

What I really want for her is shoes, but Gabe's will have to wait, as they're NOT on sale.
 

Miss B

Drawing Life 1 Pixel at a Time
CV-BEE
I don't know about that, as I've never tried it. I have better luck with hair for other characters, especially those by Biscuits, than I do with clothing and shoes. I really need to play in the Fitting Room.
 

Ken1171

Esteemed
Contributing Artist
I have applied the clothing refitting method I've mentioned above to convert V4's "Bad Girl" outfit to LaFemme, complete with shoes and gloves. This is how it came out, straight from Fitting Room's raw rigging. No joint/JCM adjustments or cleanup at all. Hair is also from V4. Rendered in Supefly.

Have to say the LF fitting results are way better than I expected - nothing spiking out of jumping out of place when posed. Even the gloves fit quite nicely, considering how picky gloves rigging can be. I have used the provided "clothing" developer rig version of the figure to project the weights, and I've got really good results, especially on the pelvis and hands. One could say this is the equivalent of DS clones for weight maps projection, and LF has the best I've seen so far - not only for weights projection, but also for pose-correcting JCMs. Ok, this is a very simple outfit. I will have to test on other outfits to know for sure, but so far it's pretty good. :)

This render is using LF default materials, and I wasn't happy about the eye shaders. I had to tweak them until they rendered Ok in SF. The default body skin shaders are using the Poser Surface root, with the pesky Alternate Diffuse channel. I have disconnected them all for this render. Fortunately, there are PBR shaders as well, and they render eyes much better in SF. I should had used them instead! LOL

BadGirlLF_1024.jpg
 

Miss B

Drawing Life 1 Pixel at a Time
CV-BEE
Not bad at all Ken. Now if I could just learn how to use the Fitting Room, I'd have a good many outfits I could convert. ;)

Anyway, I did play with a new Dyn Short Dress Karth has at Renderosity, which I just picked up yesterday. I didn't take the time to disconnect LaFemme's Specular nodes, which I hate for SF renders, though I'm not that crazy about them for FF renders either.

LaFemme-2.jpg
 

Ken1171

Esteemed
Contributing Artist
Cloth looks natural and realistic with dynamics. If SMS could make dynamic cloth faster, I bet it would become mainstream over the community. But if we keep dynamics to a minimum, it can be reasonably fast, unless the mesh is very poly heavy.

I actually only use the Fitting Room after making the refitting manually using translations, rotations, scaling, and a bit of Morphing Tool. When used this way, one could compare the Fitting Room to external programs like "Auto Conform". I prefer to refit manually because I have more control over volume and distortions.
 

Miss B

Drawing Life 1 Pixel at a Time
CV-BEE
I actually only use the Fitting Room after making the refitting manually using translations, rotations, scaling, and a bit of Morphing Tool.
Yes the Morphing Tool is something I have to get better at. I have used it on a number of occasions with good results, and then I tried it the other day, and it went wonky, so I still have to learn when to use what, and at what settings.
 

RobZhena

Adventurous
I'm only a hobbyist, but I found La Femme's topology workable for this project: Muscle Me for La Femme. You get a base body shape “Muscles” and flex morphs designed to work with the base body shape, although you can apply them to the figure without it. The flex morphs are: Biceps Flex, Thighs Flex. Calves Flex, Bicep Flex left, and Bicep Flex Right. This is based entirely on photo references and no knowledge of actual anatomy. If you want the proper behavior of the tricyclelat (not an actual muscle) or whatever, you can add a half million polys with Blackhearted's HD morphs. If you want La Femme to quickly punch somebody through a wall at standard definition, here you go. The images attached here show the muscle body morph at the top, dialed to full and half strength, and the flex morphs applied to full and half strength at the bottom. No hair, clothes, or gyms are included.


Touching on other issues raised in this thread, I use many of the much richer array of figures available in Poser, including Dawn and Dusk; we are not in the Genesis X trap. That said, G3 and G8 get some great outfits and hair. With the fitting and setup rooms, both are available for all of my Poser figures. DAZ's price points are pure, ephemeral fiction. I'm always able to buy something I want for very little if I wait a couple of months and watch the sales.
 

Attachments

  • Muscle Me Image for Rendo.jpg
    Muscle Me Image for Rendo.jpg
    135.4 KB · Views: 168

Ken1171

Esteemed
Contributing Artist
@RobZhena Great job, Rob! It looks pretty nice! ^___^

Yes the Morphing Tool is something I have to get better at. I have used it on a number of occasions with good results, and then I tried it the other day, and it went wonky, so I still have to learn when to use what, and at what settings.

I had a wonky first experience with the Morphing Tool, but that was before it got some improvements. One of the quirks is that the movement precision is controlled by the brush "Magnitude". The larger the value, the larger the motion, but the lower the precision. This is a key element to master it. If you need more precision, just lower the magnitude.

One issue with Poser in general is that vertexes can only be selected if there are no obstacles between the camera and the object you want to manipulate. You cannot touch vertices that are obstructed by other geometry. This can be a serious problem when painting weight maps, when creating dynamic groups, or when using the Morphing Tool.

SMS has recommended using the wireframe preview when editing weight or vertexes, because it allows reaching vertices hidden behind other geometries. However, this is only half-true. There is a 50-50 chance you will be able to reach those vertices - or not. I have worked with SMS to iron out this quirk, but to no avail. They couldn't fix it.

An example of that is when a shirt button gets inside the shirt after applying a morph or cloth conversion. The Morphing Tool cannot reach the button with the shirt in front. You also cannot select anything from the backside of the geometry. In these cases, we can filter selection in the Morphing Tool to only select the button material, so the shirt is ignored. But if a pocket gets inside the shirt and has no separate material, you're out of luck.

Those are the kinds of things that are useful to know when working with weights and vertices in Poser.
 

Miss B

Drawing Life 1 Pixel at a Time
CV-BEE
Actually Ken, your comment about the Magnitude setting might just be the issue I was having, so I will be playing with that setting for sure.
 

Ken1171

Esteemed
Contributing Artist
It was the problem I was having with the Morphing Tool. I didn't know there was a relationship between brush precision and the magnitude value. In spite of the name, Magnitude controls the speed in which the vertices are moved. The smaller the speed, the more precision you get. Use a larger Magnitude value when making broad strokes, and smaller when you need precise control over small movements. This is a key element!
 

Ken1171

Esteemed
Contributing Artist
It's like a mini zBrush inside of Poser! That's my favorite stuff along with magnets. ^____^
 

Miss B

Drawing Life 1 Pixel at a Time
CV-BEE
I've never gotten into magnets, though I know that's what Joe uses for setting up his Hair Conversion presets.
 

Ken1171

Esteemed
Contributing Artist
Remember V4, the most beloved and commercially successful figure ever was rigged with magnets? That was the response after Mil3 figures came loaded with JCMs, which discouraged CAs from supporting them. Mil4 figures came completely JCM-free, and they remain popular to this date, even when they don't pose so well. CAs no longer had to worry about JCMs when creating conforming clothes for Mil4 figures, where people could simply "magnetize" the clothing with one click.

I still use magnets to create hair posing morphs, to make clothing fit other clothing, to create clothing fitting variations, and to change body shapes. More recently, Nerd3D has shown us in a free webinar how to rig and animate hair strands dynamically (real-time) using magnets. The applications are endless.
 

Miss B

Drawing Life 1 Pixel at a Time
CV-BEE
Oh, I know. I have to remember to uncheck the Show Defomers in the Hierarchy Editor every time I load up V4.
 
Top