• Welcome to the Community Forums at HiveWire 3D! Please note that the user name you choose for our forum will be displayed to the public. Our store was closed as January 4, 2021. You can find HiveWire 3D and Lisa's Botanicals products, as well as many of our Contributing Artists, at Renderosity. This thread lists where many are now selling their products. Renderosity is generously putting products which were purchased at HiveWire 3D and are now sold at their store into customer accounts by gifting them. This is not an overnight process so please be patient, if you have already emailed them about this. If you have NOT emailed them, please see the 2nd post in this thread for instructions on what you need to do

My rather infrequent, and possibly apocryphal, 'books project'.

3dcheapskate

Busy Bee
Looking through those valueParms in the previous post I'm fairly sure it's just a case of cutting-and-pasting and then replacing all 'book_1'/'Book1' with 'book_n'/'BookN'

Maybe I'll be do that tomorrow - it's getting to the time of evening when mistakes and errors take the reins :oops:

(Also maybe reduce the sensitivity of the translate and rotate dials?)
 

3dcheapskate

Busy Bee
I couldn't resist...

...and it was even easier than I thought. BookStack4 Test23.zip attached which contains BookStack4 test23.cr2 and BookStack4 test23.obj in a folder structure, along with the original paperback alternate geometry. I've also just realized that I'm not including the texture map, so I've uploaded that to this post separately - it's one of those released with my 64 book row/stack prop freebies a few years ago.

3.JPG

2.JPG

1.JPG
 

Attachments

  • BookStack4 Test23.zip
    21.9 KB · Views: 32
  • BookRowB-UV1-Texture01.jpg
    BookRowB-UV1-Texture01.jpg
    290.9 KB · Views: 42

KageRyu

Lost Mad Soul
Contributing Artist
Oooh, The Kiddies Pop-Up Necronomicon, I need a copy of that. Do you have an etsy shop for that?
 

3dcheapskate

Busy Bee
Unfortunately not - I 'donated' my final copy to a bunch of annoying trick-or-treaters a few years ago... never saw them again... mwa-ha-ha!

However, you should probably try this and this - and maybe look at this...
 

3dcheapskate

Busy Bee
Just noticed that the 64-book texture map is an early one - "Koo!" by Moss Film (halfway up the right side) has the title overwritten. No matter.

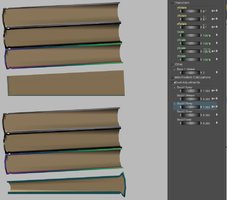
What is of some import is that I've just created an upside down hardback alternate geometry. The screenshot below shows two BookStack4 test24 figures with Book1 using an altGeom - paperback for the upper stack, flipped hardback for the lower. I set Splay and Plump adjustments for both to +1.

Since the 8 vertex paperback has no morphs the morph pat of the Plump does nothing, but the ERC yTran of the book above it does work. Since the Splay is not a morph, just a yScale and zRot of the book_1 bone, it appears to work fine. The gap between the paperback and the book above it is down to the lack of a Plump morph for the paperback.

For the flipped hardback the Plump driven yTran of the book above works as it should, but it seems to have used the morph target for the UNflipped hardback which moves the front cover (which is now at the bottom for the flipped book) upwards.
plump.JPG


Splay just drives the yScale and zRot of the book itself, but since the spine is now on the right the combination changes the thickness of the spine side. Not really a showstopper but I can't really see an automatic way to correct it.
splay.JPG


Anyway...
It would appear that the Plump MT (and the others) are applied to the flipped hardback because it has the same number of vertices, whereas the paperback hasn't - that supposition should be easy to check (BLRender's book suggests it's down to "mysterious inner workings" - last paragraph on p112). If that is the reason then I could simply add a bit of extra dummy mesh to the flipped hardback to avoid that and create any necessary MTs
On the plus side, if MTs are applied to any alTGeom meshes which have the same vertex count, then I can create identical hardback meshes with different UV mappings and I won't need to create loads more of the MTs. :D
 

Attachments

  • altgeomSplay+Plump.JPG
    altgeomSplay+Plump.JPG
    61.3 KB · Views: 33

3dcheapskate

Busy Bee
I realized that one way I could make the Splay cause the zRot to be in the opposite direction but only for a specific altGeom was to use a key/value set with the geomChan dial driving it. The geomChan is on the left and will be an integer value 0 (default hardback), 1 (paperback), or 2 (flipped hardback). I can simply create a valueOpKey valueParm that gives 1 for altgeom 0 or 1, and -1 for altgeom 2. I then multiply whatever valueParm I need to by putting this 'SplayMultiplier' into a valueOpTimes section.
geom.JPG
mult.JPG


However, although the value of 'SplayMultiplier' definitely worked as hoped in Poser, it seemed to have no effect when I used it as a multiplier as below - it seemed as if it was always +1 even though I could see on the parameters tab that it was -1 when I had altGeom 2 selected.
hmm.JPG


I think it's most likely me doing some sloppy cut-and-pasting, or...

...perhaps it was my muse pointing me at a really obvious solution - if, as mentioned in post #85 above, having alternate geometries with exactly the same mesh (same number of vertices) but different UV mappings means that the MTs I already have can be used for them, then why not simply do a remapping of the mesh that flips the book ? I'll have to give that a try.
 

KageRyu

Lost Mad Soul
Contributing Artist
@3dcheapskate I am very familiar with the works of Chaosium. I have many of their publications from the late 80's and early 90's related to the Mythos (as well as a lot of Elric, Stormbringer, Hawkmoon, Ringworld, and assorted other RPGs and supplements, and general non-RPG background books). Though not as many as I would like. I regret I never got one of their Cthulhu Plushies. I can not remember if it was Chaosium or another publisher that published A is for Azathoth.

You have done a lot of work on this and made a lot of progress. It is very generous of you to offer all of this freely.
 

3dcheapskate

Busy Bee
All I recall about Chaosium is their logo and RuneQuest. I hadn't realized that Call Of Cthulhu was one of their games (although I probably did know that a long time ago).

I find that when I'm working on an idea posting my ongoing progress on a forum is good in several ways, the clincher being that when I do inevitably get bored I know that everything I did is all in one place, making it easier to pick things up again a year or more later... like I did back in post #54.
 

3dcheapskate

Busy Bee
Anyway, I've now recreated the morphing paperback from post #37 as an alternate geometry - just created the mesh in Blender, exported as an OBJ, manually added this OBJ as a new altGeom for book1 in my BookStack4 test24.cr2 (not yet uploaded), loaded the freshly cooked MTs in Poser (after selecting the new variant), did a bit of testing to see what works and what still needs work, and resaved the cr2.

Capture.JPG


The paperback Plump morph clearly needs to drive the yTran of book2 in the same way that the hardback one does, but I think adding a separate master 'Plump' dial for book1 is the best way to do this - that can drive both the hardback and paperback book1 Plump morphs, and also the book2 yTran. The separate hardback/paperback Plump morph dials can then be hidden, leaving only the master Plump dial for book1 visible for the user to twiddle, and that should work seamlessly with the altGeom swapping.

There are separate Twist and Shear morphs for hardback and paperback so master 'Shear' and 'Twist' dials to drive just those makes sense too.

Splay and Oblique don't have any associated morphs (I accidentally created and loaded an unnecessary 'PB Splay' morph here) so they should be master dials visible to the user.

The 'PB SpineTilt' morph is only for the paperback, so no master dial needed there.

- - - - - - - -

It would appear that my muse had the best solution for the upside-down books (last paragraph of post #86: a few tests indicate that yes, it is the number of vertices in an altgeom mesh that decide whether a morph is applied to it, so having alternate geometries with exactly the same mesh but different UV mappings means that the MTs I already have can be used for them). So I simply create a new OBJ using the same hardback mesh but with the UV mapping flipped and use that as an altGeom. I can do the same for the paperback too - probably best to use a consistent order, say:

0 Hardback 88v (default geometry)
1 Upside down hardback 88v
2 Hardback 88v (default geometry) - alternate UV mapping
3 Upside down hardback 88v - alternate UV mapping
4 Hardback 60v
5 Upside down hardback 50v
6 Hardback 60v - alternate UV mapping
7 Upside down hardback 50v - alternate UV mapping
8 Paperback
9 Upside down paperback
8 Paperback - alternate UV mapping
9 Upside down paperback - alternate UV mapping

- The 88v and 60v refer to the curved spine and flat spine hardback meshes respectively - see point (3) in post #2. Yes, I do think it's worth the extra work of using two different hardback meshes!
- The default UV mapping will be my 64 books on one texture image, and the alternate mapping will probably be something like in posts #44 and 45. The default mapping will use 1 mat zone "BookMap64" (possibly 2 - BookMap64Covers and BookMap64Pages?), while the alternate mapping will use 1 (book) or 2 (cover and pages) mat zones per book.

- - - - - -

On another note, I'd never heard of Picryl before, but it seems to have a fair number of public domain book and magazine cover images (useful search phrases "dust jacket", "cover spine back", "weird tales covers", etc)
 

3dcheapskate

Busy Bee
Speaking of UV mapping I went back and looked at my original rethink over on the DAZ forums that took me from the awkward and wasteful 41 books per image to 64 books per image. I was amazed at how well one of the ideas worked.
1fdf2f03905915e10966fd53e469ea.jpg

The Sep 2018 render below uses the texture above

f92815ba18da8eb1af9087cd3cf578.jpg


Unfortunately I decided for the 64 book mapping to map the front and back covers to the same tiny rectangle because I didn't fancy creating front and back covers for 64 books, even tiny ones, and decided that the covers would simply be a plain colour similar to that of the spine.

I've downloaded four Dashiell Hammett dustjackets from Picryl to use as a test...
 

3dcheapskate

Busy Bee
BookStack4 test24c.zip attached.

Book1 (the bottom one)is the only one I've done any work on. It now has more alternate geometries - three different meshes, each with two UV mappings default and inverted. The dials under 'Book Adjustments' are the ones you should twiddle - they drive the relevant morph dials for each of the three book meshes (which are in the 'collapsed Slaved...' dial groups in the screenshot below - don't twiddle those).

Zip also include my latest Blender file.

Capture.JPG
 

Attachments

  • BookStack4 test24c.zip
    481.6 KB · Views: 31

3dcheapskate

Busy Bee
Getting close now - BookStack4 test25.zip attached, containing my full test folder structure with two figures BookStack4 test25.cr2 and BookStack4 test25 x2.cr2, 20 alternate geometry files, a scene file BookStack4 test25.pz3, the same old BookRowB-UV1-Texture01.jpg texture map - plus the Blender file BookStack4 test25.blend.

The 8 book stack should be the same in the second cr2 and pz3 as it was just a test of saving two 4 book stacks with one parented to the other. It looks good to me...

1.jpg


2.jpg


3.jpg


Still to do:
- I think I still need to change the new valueParms in books 2, 3, and 4 to targetGeoms so they'll save to pose files (I still need to check that).
- Hide all the slaved dials. Also hide the xRot and zRot of each book as these are controlled via valueParm maths from the Splay and Oblique dials.
- Maybe write a script to randomize the books. Far less work than adding yet more dials with lots of slaving!
 

Attachments

  • BookStack4 test25.zip
    712.8 KB · Views: 27

3dcheapskate

Busy Bee
You can't see from the renders in the previous post, but there's full 360° yRotation of each book (for Book1 you need to use the Body rotation). Flipping the book upside down is done with alternate geometries.

4.jpg


And I've done another mapping based on Jim Farris (Xaa's) book freebie, currently only an OBJ. I modified the public domain dustjacket image here to suit, imported the OBJ into Poser, applied the image and duplicated the book a few times as a test

5.jpg
 

3dcheapskate

Busy Bee
Progress with the script.

Attached zip contains just two files, no folder structure - the latest BookStack4 test26c.cr2 and my first stab at the randomizer script RandomizeBookStack26c.py (peril sensitive sunglasses advised if you want to look at the code ;o) )

Here's three stacks, one atop t'other, each parented to 'TopOfStack' of the one below. The script checks for this and automatically randomizes all such stacked stacks.

The script allows you to select, in a limited way, which things to randomize. This first one is just geometries, morphs/adjustments, and ±10° yRotation

Render 4.jpg

Render 5.jpg

Render 6.jpg


This second one also randomized translations and scalings

Render 1.jpg

Render 2.jpg

Render 3.jpg


I've spotted a few oddities while randomizing, such as gaps opening up in the stack and books intersecting, both of which appear to have Scale and/or yScale as contributing factors, but I haven't looked into it, just noticed something.
 

Attachments

  • RandomizeBookStack26c.zip
    28.1 KB · Views: 14

3dcheapskate

Busy Bee
A bit more progress - BookStack4 test26f.zip attached, just the test26f CR2 and PY files.

A few notes.

- Fixed script erroneously using twist min/max for yRot
- Corrected limits for Book2 adjustments in CR2
- Script now offers full/reduced limits for book dimensions (scaling)

Potential problems I've spotted:
- Top vertices of flat hardback are at 0.007, 0.014, etc - should be slightly lower as per HBC + PB. Would need to modify the altgeoms and MTs for the flat hardback, delete the existing MTs from the CR2 and redo them.
- 'Zero Figure' resets all scales to 100%, but I need xScale at 167.5% for the cover ratio to work.
- Gaps appearing between books seems to be when the Scale/yScale of the lower book is small - possibly just hitting the (forced limits) Min Value I've set for the yTran of the book above ?
- Slanted white line on some books in the renders - possibly a UV mapping error ?

Render 11.jpg
 

Attachments

  • BookStack4 test26f.zip
    29 KB · Views: 15

3dcheapskate

Busy Bee
BookStack4 test26i.zip attached this time, just the test26i CR2 and PY files.

I've added master dials 'Book size', 'Book thickness', and 'Cover proportions' which drive Scale, yScale, and xScale respectively Default value is 1 for each of them, giving a default sized book.

Capture.JPG


I thought that changing 'Cover height-width ratio' (default value 1.675) to 'Cover proportions' (default value 1) would get around that 'zero figure setting all scales to 100%' problem I mentioned in the last post, but it now does this - default bookstack as loaded on the right, after 'zero figure' on the left (and in the parameters tab). It appears that 'zero figure' has set the three new dials to their minimum values, which makes sense but isn't what I was expecting. I'll probably just include a note about this plus a pose or script to reset the figure to defaults. Although I thought there was (but can't find) a way to reset the figure to its initial values, rather than 'zeroing' it ?

zeroed v default.JPG


I think I now want to hide the yTran dial and forget about allowing the user to add gaps in the stack, and replace yRotate, xTran and zTran with 'Rotate', 'Nudge sideways', and 'Nudge lengthwise' master dials, enabling me to hide all the standard 'Transform' dials for each book bone.

I still have to look at the yScale -ve limit and the two things driving it - 'Book thickness' and, from the book below, 'Plump'. The latter's a 'deltadd' while the former's a 'times' and I'm fairly sure this is wrong.

I also think that reducing the limits for book positions (xTran,zTran) and dimensions (Scale, yScale, xScale) to 25% of their current range is a good idea - I also use the 25% option for those in the script as the full 100% range option gives ridiculous results.
 

Attachments

  • BookStack4 test26i.zip
    29.4 KB · Views: 24

3dcheapskate

Busy Bee
I'm now happy with the limits I've got set for each master dial and I've removed the full range/25% range options from the script.
So one morezip attached, test26k - just the CR2 and PY files again.

Each stack in the image below is 64 books, 16 figures

Capture.JPG
 

Attachments

  • BooStack4 test26k.zip
    29.8 KB · Views: 14

KageRyu

Lost Mad Soul
Contributing Artist
....
- 'Zero Figure' resets all scales to 100%, but I need xScale at 167.5% for the cover ratio to work.
Ok, going back a few posts here.
Could you not edit the CR2/PP2 to set the Minimum value for xScale to 167.5% - wouldn't this restrict zeroing the figure to restrict it to that value?
 

3dcheapskate

Busy Bee
Yes, that would do what you say - zeroing the figure seems to set all targetGeom dials (valueParm dials are untouched) to 0 provided 0 is within their min/max range limits, otherwise it sets them to whichever limit is closest to zero.

However, I wanted xScale to be able to go down to around 50%... setting the mimimum limit of xScale to 167.5% also means that the value of the dial can never go below 167.5%, so yes, you're correct, but no, it isn't any help.

It's no longer a problem as I'll recommend not using 'zero figure' and provide a 'reset' pose (and/or script) instead - I think a script would be better because the pose would apply to a single figure, just four books, and if you have a stack of several figures you'd have to apply the pose to each separately which is a pain.

I've also now confirmed that in Poser 11 valueParm dials still aren't saved in pose files, so changing valueParms to targetGeoms as mentioned earlier is still the easiest workaround.

Another thing I tried with the three 64 book/16 figure stacks in my previous post - once set up as required, simply export as an OBJ, reimport that OBJ and save as a prop. It worked beautifully... except for one thing...
 

3dcheapskate

Busy Bee
...only four book textures are used in the prop, and they repeat. In the stacked figure I'm able to set the 'BOOK_0_TO_31' node to a different value for each figure to avoid this repetition.
 
Top