• Welcome to the Community Forums at HiveWire 3D! Please note that the user name you choose for our forum will be displayed to the public. Our store was closed as January 4, 2021. You can find HiveWire 3D and Lisa's Botanicals products, as well as many of our Contributing Artists, at Renderosity. This thread lists where many are now selling their products. Renderosity is generously putting products which were purchased at HiveWire 3D and are now sold at their store into customer accounts by gifting them. This is not an overnight process so please be patient, if you have already emailed them about this. If you have NOT emailed them, please see the 2nd post in this thread for instructions on what you need to do

My rather infrequent, and possibly apocryphal, 'books project'.

3dcheapskate

Busy Bee
And I've also started looking at making larger bookstack figures using the BookStack4 as a base. I've started on a BookStack8 just to see if I can remember the process...
 

3dcheapskate

Busy Bee
Just a backup of where I've got to with the single book prop. It's just the Blender file* plus the exported OBJ and MTL for each base mesh, the UV template for each base mesh (my mapping is a slightly tweaked version of that in posts #44 and 45 earlier)

Since Jim Farris' mapping is for an opening book it doesn't have page ends, so I simply mapped those to the full UV square with the pages running vertically - that's what the textures in post #139 are for. I haven't done the Xaa mapping of the flat hardback or paperback yet.

I've also attached a few texture maps that I'm playing with. Adobe Mick is from post #45 and I played with that in Gimp to try and create a bump map for indented the lettering and image, and a mask for doing something with the gold - neither of those work too well. The Renaissance Overlord is a gimp edit of the one I used back in post #35 (I don't think I ever posted the original texture map here, although I know it's uploaded on one or two of my DAZ topics).

I've also started creating a gimp template for adding creases and wear and tear - you can see a bit of that on The Renaissance Overlord.


*this started as a copy of the Blender file for the BookStack4, from which I simply deleted all the book 2, 3, and 4 meshes - the base meshes and morph target meshes are exactly the same as book 1 of the BookStack4. I had to create new morphs for Splay and Oblique since I ended up using joint parameters for those in the BookStack4, and obviously I redid the UV mapping of the base meshes - I didn't bother about changing the UV mapping of the MTs as I don't export either materials or UVs for those
 

Attachments

  • BookMap01 test 01.zip
    163 KB · Views: 7
  • Adobe Mick Texture.jpg
    Adobe Mick Texture.jpg
    204.6 KB · Views: 7
  • Adobe Mick Bump.jpg
    Adobe Mick Bump.jpg
    180.1 KB · Views: 7
  • Adobe Mick mask.jpg
    Adobe Mick mask.jpg
    84.8 KB · Views: 6
  • The Renaissance Overlord (BookMap1).jpg
    The Renaissance Overlord (BookMap1).jpg
    196.6 KB · Views: 5

3dcheapskate

Busy Bee
For the single paperback prop what I'm doing at present is simply importing each base mesh into Poser, loading all the relevant morph targets, applying a texture, and playing with it to see what mistakes I've made and waht I need to do in Poser. I've got a few incorrect material zone names, but other than that it's all looking quite good.

In Poser I'll need to set limits on each morph, probably ±1 as per the BookStack4 figure. Keeping the morph names the same as the BookStack4 figure seems sensible. And as there's no tricksy ERC I should probably create the PP2s from Poser 6. The 'Nudge' and 'Rotate' book adjustments from the BookStack4 aren't really appropriate for this prop, so I just leave the standard translate/rotate transforms visible. Scaling is another matter, as individual book textures are intended to be for specific size (or more accurately, aspect ratio) books. In the stack I used 'Book size', 'Book thickness' and 'Cover proportions', but from the note on the top left of the Adobe Mick texture I was definitely thinking in terms of 'Height (cm)', 'Width (cm)' and 'Spine (cm)', which would control the scaling dials via simple (hopefully Poser 6 compatible) ERC.

I've attached four textures for the Xaa mapping that I created from the following public domain images at picryl. The original photos had a fair bit of curvature (see the horizontal lines on the back covers) which I couldn't find an easy way to fix in GIMP - I recall a spline/warping tool that would do this but I guess I was imagining it:
 

Attachments

  • xaa5.jpg
    xaa5.jpg
    55.1 KB · Views: 6
  • xaa2.jpg
    xaa2.jpg
    54.5 KB · Views: 4
  • xaa3.jpg
    xaa3.jpg
    72.3 KB · Views: 5
  • xaa4.jpg
    xaa4.jpg
    58 KB · Views: 7

3dcheapskate

Busy Bee
The UV maps I'm using are already in the zip a couple of posts back, but I'll post them here too for easy reference. It's much easier to create a texture for Xaa's mapping than mine as you just need to have a rectangular cover, spine and back cover which you scale and paste into the appropriate part of the template, which reminds me - I need to do a colour-coded template with the size of each area to help.

For the Xaa mapping the black is the book cover. The red and green are my mapping for the page ends - top end on the left, open side in the middle, bottom end on the right.
 

Attachments

  • HBc1 UV01 3DC.png
    HBc1 UV01 3DC.png
    5.1 KB · Views: 7
  • HBf1 UV01 3DC.png
    HBf1 UV01 3DC.png
    5.1 KB · Views: 5
  • PB1 UV01 3DC.png
    PB1 UV01 3DC.png
    7.5 KB · Views: 5
  • HBc1 UV01 Xaa.png
    HBc1 UV01 Xaa.png
    6.4 KB · Views: 8

3dcheapskate

Busy Bee
Just a couple of test renders. The first was using the bump and mask for Adobe Mick - it's showing some promise, but was taking a really long time

Capture2.JPG


The second and third were suggested by the fact that those dustjackets from picryl include the wraparound bits that hold the dustjacket to the book...
Capture3.JPG

Capture.JPG
 

3dcheapskate

Busy Bee
Working out the best way to approach the eight book stack (and then hopefully 16, 32, and maybe 64) is a bit more of a problem. I was hoping to simply point the CR2 to a different OBJ file (as exported from Blender, containing the first four books plus an additional four) via the two figureResFile lines.
objnames.JPG


Of course, I had to do a bit of tinkering with my Blender-exported OBJ to get the group (bone) names to match those the Poser CR2 is using (mustn't forget that turning the OBJ/prop into a figure in Poser's setup room creates a new OBJ file, and it's that, not the Blender one I imported, that the figure uses).

I'm still not certain of what's happening when I simply change the BookStack4 CR2s figureResFile lines to point at my tweaked Blender-exported eight book stack OBJ, but it seems like the first four books are okay but the four extra ones aren't. Of course, Poser has no idea what to do with them so I (think I) tried in the OBJ simply assigning them to the 'top_of_stack' bone. This didn't work. But since I was just playing around trying things that came into my head I can't be sure what I actually did and what really happened. So I definitely need to try this again in a more orderly fashion. My gut feeling is that I should simply be able to incorporate the OBJ data (v, vt, and f lines, along with a 'g top_of_stack' line) onto the end of the existing data in the Poser-created OBJ and have the extra four books appear as a monolithic block on top of book 4 of the original BookStack4. However, there's a niggle at the back of brain saying that in my Blender-exported OBJ files the groups/obects are in a different order (2, 3, 4, 1) from the Poser created OBJ (1, 2, 3, 4) so the face data (the f lines) will be using different v and vt indices) - I'm sure that's something I need to try and resolve, probably in the way/order I select the objects to export from Blender

Note to self - export the OBJ from Blender (I'm still using 2.79) using 'OBJ as OBJ groups', so that I only have to add one group to each bone in the group editor, rather than two materials (cover and pages) which is what I've been doing till now because I exported with 'OBJ as OBJ objects' and the setup room's group editor doesn't see those.
 

3dcheapskate

Busy Bee
An alternative approach for the eight book stack figure would be to simply import the Blender exported 8 book OBJ into Poser and do the setup from scratch. Of course, I could take a shortcut and, once in the setup room, load the skeleton for the BookStack4. Autogroup got things a bit wrong, so it's probably easier to group by hand (using materialsor even better, by groups if I use the 'OBJ as OBJ groups' Blender export option). Without ticking 'transfer morphs' none of the valueParm/targetGeom dials that are key to the figures functionality are in the CR2. If I do tick 'Transfer morphs' many, but not all (possibly all the targetGeoms but none of the valueParms?) of those dials are in the new CR2 but they don't do what they're supposed to. Even the morphs do nothing - on digging into the CR2 it appears that most of the deltas for the morphs are missing.

On a positive note I now find it quite easy (and not too tedious or error prone) to add new bones and set the joint parameters. What will be tedious is adding all the valueParms for the ERC, unless I can make it a simple cut-and-paste with a simple text change within the pasted text, which I think I can.
 

3dcheapskate

Busy Bee
I've got round the problem of getting started on the eight book stack.

1) Export the eight book stack from Blender as an OBJ with 'Keep vertex order' and 'Objects as OBJ groups' checked. I can't find any way to make Blender put the eight objects into the file in the order I want, but I found a way round that in Poser.

2) Import the OBJ into Poser (I'm using PP2014) and take it into the setup room. With the bone editor create a dummy chain of 8 bones - it's only the order that's important. Go straight to the group editor, select each bone in sequence and add the appropriate group from the Blender exported OBJ to it.
Clipboard_09-15-2024_01.jpg


When all four bones/books are done exit the setup room and save the newly created figure. This creates a CR2 and OBJ. This new OBJ will have things in the correct order - 1,2,3,4,5,6,7,8 instead of 5,8,7,6,2,3,4,1 (the Blender exported OBJ order) in this case. (I used WinMerge to compare this new OBJ with the one for the BookStack4 and the only differences were comments at the start and extra blocks of vertices, texture vertices, and faces after those for books 1-4, which is exactly what I want.) The CR2 contains the crappy bones

3) Edit the newly created OBJ to change the group names - e.g. 'g HBC1(88v)_hbc1(88v) bone_1' becomes 'g book_1' as per the BookStack4 OBJ. For the bone 5 to 8 group they should all be 'g top_of_stack'.

4) Delete the CR2 that was created with it - it doesn't contain anything of use.

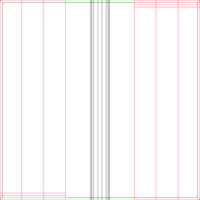
5) Take a copy of the proper BookStack4 CR2 which has all the valueParm ERC, MTs, etc for the first four books in it. Change the two 'figureResFile' lines to pick up the new OBJ. And the thing I'd forgotten/overlooked before - add a geometry handler for the top_of_stack bone - the bit in yellow in the below screenshot should be similar to the four book bones above.

tos.JPG


6) Load the new CR2 and the first four books should work as intended, while the extra four books act as one block where a fifth book would be.

7) I needed to correct the material names in the OBJ this time as I used Cover1, Pages1, Cover2, etc in Blender. But that was purely so that I could easily select all the geometry for each book in Poser's group editor - before I realized that simply using 'Ojects as OBJ groups' on the Blender export was even easier.

Now it's a case of going back into the setup room to add bones for books 5 to 8, setting up the joint parameters, adding the valueParm ERC and morph targets.

But that's enough for today.
 

3dcheapskate

Busy Bee
When I added the bones for books 5 to 8 I realized that I had no way to select the meshes for each book in order to group them to the relevant bones. I made one mistake in the last post, about editing the OBJ in step 3 - books 5-8 need to remain multi-grouped ('g top_of_stack BK5', 'g top_of_stack BK6', 'g top_of_stack BK7' and 'g top_of_stack BK8' respectively, and then after books 5-8 are assigned to new bones and the updated figure is saved, the now unnecessary group names BK5 etc can be deleted.

So I've now got a BookStack8 figure with the bones and joint parameters for books 5-8 working correctly (CR2 and OBJ in the attached zip as a precautionary backup). Once I worked out the procedure this part was very easy.

Now all I need to do is add the valueParm ERC and morph targets for books 5-8.

And after that do the same for 16, 32 and 64 book stacks. :cool:
 

Attachments

  • BookStack8 test01.zip
    40.5 KB · Views: 6

3dcheapskate

Busy Bee
The book adjustments and intermediate valueParms for all the maths are easy enough to add - just a simple cut-and-paste from book 1 and an edit to change all 'book_1' references in the pasted block to 'book_5' or whatever. All the ERC between these is working. The ERC links from the standard transforms to these are also working (e.g. yRotate to cos(yRot)). But the ERC links in the other direction, from these to the standard transforms, will have to be added one by one. That'll be the valueparm ERC sorted once that's done
intERC.JPG


Note to self: the ERC to the standard transforms
yrot - DeltaAdd
zrot - DeltaAdd
xrot - DeltaAdd
scale - Times
xsclae -Times
yscale - DeltaAdd, Times
xtran - DeltaAdd
ztran - DeltaAdd
 
Last edited:

3dcheapskate

Busy Bee
That bit was easy - all the non-morph/altgeom related ERC is now working for books 5-8.

Zipped CR2 attached, just in case I do something stupid ;)
 

Attachments

  • BookStack8 test03.zip
    28.6 KB · Views: 7

3dcheapskate

Busy Bee
All the alternate geometries are now working for the eight book stack, so just the morphs left to do - but that's enough for today.

No limits set on the standard transform dials for books 5-8 and they're not yet hidden.

Zipped test runtime attached including the CR2, base OBJ, and altGeom OBJs for books 5-8. The CR2 should pick up the altGeoms for books 1-4 from the previous BookStack4 installation, along with the texture map.
 

Attachments

  • Bookstack8 test04.zip
    76 KB · Views: 6

3dcheapskate

Busy Bee
New day - getting the MTs for the base geometries of books 5-8 working was straightforward. In Blender I just copied the MT objects for books 1-4, moved them up the required amount to match books 5-8, renamed them, exported them (no UVs/mats, objects as OBJ objects, keep vertex order, loaded the test04 figure into PP2014 selected the appropriate book with default geometry, and did Load Morph Target.

I didn't do a thorough test but it all looks good - in the screenshot below the left is the default test04 and the right has all default mesh morphs set the same. The Plump ERC for books 5-8 isn't done yet which is the reason for the gaps between them, but there are also gaps between books 1+2 and 4+5. The latter is because the Book 4 Plump ERC still drives TopOfStack (which should be easy to correct), but I'm not sure about the former - a quick dig into the CR2 should hopefuully resolve that.

pst.JPG


book2 ytran ERC...
bk2 ytran erc.JPG

book3 ytran ERC...
bk3 ytran erc.JPG


So that looks as if there's an error in the released BookStack4
 
Last edited:

3dcheapskate

Busy Bee
The error's in the yTran valueOpDeltaAdd of books 2-4: they're using the incorrect (hidden) 'MT HBc# Plump' dial instead of the correct 'Plump' dial.
 

3dcheapskate

Busy Bee
...but that will still work because the 'Plump' dial drives all three 'MT ### Plump' dials to the same value regardless of geometry selected - which is of course why when you swap geometry the correct morph is applied.

But when I was getting ready to load the MTs for the book 5-8 alternate geometries I noticed a couple of problems with the alternate geom morphs for book 1-4 (also the base geom)

For the upside down curved hardback, which uses the same base mesh and MTs as the right way up version, (and the right-way up base mesh too)something's gone awry (problem is there for each MT)
Capture.JPG


While for the other alternate geometries the morphs do nothing at all
alt2-5.JPG


I'll have to look into the OBJ files and CR2s again...
 
Last edited:

3dcheapskate

Busy Bee
Well that one was surprisingly easy (but tedious) to fix, and in a very unexpected manner. Somehow the numbDeltas line for each MT had got changed to match the base geometry, i.e. 'numbDeltas 88'. Simply changing them back to the correct values, i.e. 'numbDeltas 60' for the flat hardback MTs and 'numbDeltas 64' for the paperback MTs, fixed all the book 1-4 morphs.

I definitely didn't change those, at least not to my knowledge, so I guess it was one of the figure saves from PP2014 that messed that one up. Which makes me wonder when it'll happen again...
 

3dcheapskate

Busy Bee
Well, it's already happened again...

I've just checked the released 'Stack004 (1fig).cr2' which was the figure file I used as the starting point for this. That's all as it should be (my check was to search for every 'targetGeom MT' in the file and check the associated numbdeltas)

...except that wasn't actually the file I started with. If I remember correctly I did Edit>Restore>Figure and resaved it . But that file's okay too. So I've had a dig through the old ongoing dev CR2s (which I still have in a zip) and I can't remember what exactly I was doing - but I can say is that it first happened between 2pm and 4pm GMT (9 and 11pm my time) on Sun 15 Sep so if I check the dates and times of my posts here...

...which puts it within an hour before or after post #148 here where I was trying to work out how to get the old 4 book CR2 to work with my new 8 book obj.
 
Last edited:

3dcheapskate

Busy Bee
This is mildly irritating because I'd just finished adding all the MTs for books 5-8 and they were all working properly,so I was going to say that all I need to do now is add the the ERC for the morphs and hide the dials I don't want displayed !

I'm hoping that the problem is down to my jiggery-pokery and that once I've added the remaining ERC, saved a new CR2, and double-checked the numbDeltas it'll become a distant memory... :whistling:

...and then I spotted this...it appears that I still have a problem with the flat-spined hardback ! :rofl: (well, you have to laugh don't you... otherwise you'd go mad!)
HBF bug1.JPG
 

3dcheapskate

Busy Bee
The mesh deformation only occurs on the flat-spined right-way-up hardbacks, and it happens when the book above is rotated. So it's the post #28 problem again ! Luckily it should be an easy fix (post #29) - but not today.
Capture.JPG


And I'm happy to say that my "Well, it's already happened again..." in post #158 must've been me loading an older CR2 as the latest ones are fine. Maybe I need a break ? :D
 
Last edited:
Top