-
Welcome to the Community Forums at HiveWire 3D! Please note that the user name you choose for our forum will be displayed to the public. Our store was closed as January 4, 2021. You can find HiveWire 3D and Lisa's Botanicals products, as well as many of our Contributing Artists, at Renderosity. This thread lists where many are now selling their products. Renderosity is generously putting products which were purchased at HiveWire 3D and are now sold at their store into customer accounts by gifting them. This is not an overnight process so please be patient, if you have already emailed them about this. If you have NOT emailed them, please see the 2nd post in this thread for instructions on what you need to do
You are using an out of date browser. It may not display this or other websites correctly.
You should upgrade or use an alternative browser.
You should upgrade or use an alternative browser.
SKYLAB CHAT
- Thread starter skylab
- Start date
I've always noticed when I model something in Blender, it always needs to be resized for use in Poser. Blender models always come out huge, and lying on their sides, because its XYZ axes are different than what we're used to in Poser and DS. How many other modeling apps are similar, I'm not sure, but there are probably others which cause the same issue upon importing into Poser or DS.
Maja
Eager
Glad to see you being busy, again, Sky. Seems like you recovered well form your surgery. 
I just uploaded the Little Black Dress package for Pauline to ShareCG.
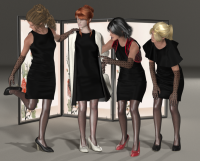
I just uploaded the Little Black Dress package for Pauline to ShareCG.

Maja
Eager
I've always noticed when I model something in Blender, it always needs to be resized for use in Poser. Blender models always come out huge, and lying on their sides, because its XYZ axes are different than what we're used to in Poser and DS. How many other modeling apps are similar, I'm not sure, but there are probably others which cause the same issue upon importing into Poser or DS.
As with any other modeler best way to achieve proper object size inside Poser is to export a reference prop or figure of Poser as wavefront object and then import it into Blender.
To export your Blender model as wavefront object for Poser in the "Export Obj" dialog of Blender choose "Z forward" and "Y up". Check "Selection only", "Apply Modifiers" (if there are), and "Keep Vertex Order". Scale 1.0.
Import the result into Poser at 100% of the original size, check "Centered" and "Make polygon normals consistent".
That works with most objects.
If needed in Poser fine adjust the size of the imported object.
Open the group editor of Poser. If there is no "all" group create a new group with the name of the object (e. g. Cup) and add all to it. Then save the result to your Poser library.
Open a new Poser scene an load the Prop you just saved.
If everything worked well you have a prop that has the size you want and will keep it even if you have "played around" with the dials and reset them.
With the group editor you can also create different material zones on objects by creating different groups and assigning materials to them. Simply click "Assign Material..." and type in the material name you want. You can also create perspective UVs for every group you created and assigned a material to. In the material room you then can assign picture files to the materials you assigned to groups in the group editor.
Hope this is helpful to you.
Yes, I always do this when exporting. It was mostly when I first started, and more for prop items rather than clothing and such, that I had a problem. The last large prop/environment I had created a few years ago was a castle, and not only was it too large for me to render in Blender, I had to reduce it to about 1/4 the size to even THINK about importing it into Poser. I should've brought V4 and/or M4 (didn't have Dawn and Dusk back then) into Blender to make sure the gateway was a good size so they didn't have their heads cut off by the portcullis. If I ever get back to finishing it, that's what I'll have to do, because the tutorial I was following didn't take any of that into consideration.As with any other modeler best way to achieve proper object size inside Poser is to export a reference prop or figure of Poser as wavefront object and then import it into Blender.
To export your Blender model as wavefront object for Poser in the "Export Obj" dialog of Blender choose "Z forward" and "Y up". Check "Selection only", "Apply Modifiers" (if there are), and "Keep Vertex Order". Scale 1.0.
Import the result into Poser at 100% of the original size, check "Centered" and "Make polygon normals consistent".
That works with most objects.
Good points Maja, thanks.If needed in Poser fine adjust the size of the imported object.
Open the group editor of Poser. If there is no "all" group create a new group with the name of the object (e. g. Cup) and add all to it. Then save the result to your Poser library.
Open a new Poser scene an load the Prop you just saved.
If everything worked well you have a prop that has the size you want and will keep it even if you have "played around" with the dials and reset them.
With the group editor you can also create different material zones on objects by creating different groups and assigning materials to them. Simply click "Assign Material..." and type in the material name you want. You can also create perspective UVs for every group you created and assigned a material to. In the material room you then can assign picture files to the materials you assigned to groups in the group editor.
Hope this is helpful to you.
Maja
Eager
Didn't use Blender for a year or so, now. Back then I created a cube in Poser at the dimensions of a Poser figure in zero pose, exported that as obj, imported it into Blender as reference object for sizing issues. Not nice to look at, but easier to export and import, and less resource consuming. Severs it's purpose for modeling furniture or buildings. For modeling clothes I used Hexagon 2.5 in the beginning. Now I have a more sophisticated software solution for "tailoring".
What took several days or even weeks to be done now gets done within hours with MD .
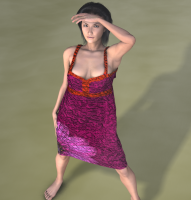
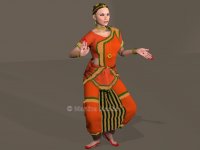
This is my very fist dress I did for Genesis using Hexagon 2.5 (one week to be done). And an Indian dancers outfit also done with Hexagon 2.5 (one month to be done).
What took several days or even weeks to be done now gets done within hours with MD .
This is my very fist dress I did for Genesis using Hexagon 2.5 (one week to be done). And an Indian dancers outfit also done with Hexagon 2.5 (one month to be done).


I tried MD3 during it's public beta, and even though I found it easy enough to create pieces of clothing, I found it hard to get any skirts or long dresses to fit other than to "stick" to the characters butt and legs. That makes it hard to bring into Blender to finalize. Also, back then MD did NOT do quads, and I don't like working with tris.
Maja
Eager
MD supports both, tris and quads, now. Is use quads for export only, because draping is better with tris in MD. I still use Hexagon to finalize what most of the time is about renaming materials, adjusting, and exporting UVs. MD5,5 has an option to export to Poser 8.6 ft figures that works perfect if you us a Collada export of a Poser figure with Poser native units to import it as Avatar into MD. It's not a cheap software. But if you do lot of clothes it enhances the workflow very much, once you took the learning curve which I don't think that it is very high.
Poser can deal with tris, also. But clothes still work better with quads in Poser.
Poser can deal with tris, also. But clothes still work better with quads in Poser.
I agree about the quads, and I guess because I had learned to create with quads over the years, I would only use tris in certain instances to make something fit better, such as on the neckline of a blouse or dress. I try pretty much to stay away from them. I can convert tris to quads in Blender, but it's supposedly much easier in Zbrush, but that's another piece of pricey software.
I have had some luck using Silo with a couple of tutorials from Fugazi over in Renderosity's store, and don't have much problem there. I leave Blender for the props and such, and because I've been using it for so long, I feel comfortable in it.
I have had some luck using Silo with a couple of tutorials from Fugazi over in Renderosity's store, and don't have much problem there. I leave Blender for the props and such, and because I've been using it for so long, I feel comfortable in it.
MD supports both, tris and quads, now. Is use quads for export only, because draping is better with tris in MD. I still use Hexagon to finalize what most of the time is about renaming materials, adjusting, and exporting UVs. MD5,5 has an option to export to Poser 8.6 ft figures that works perfect if you us a Collada export of a Poser figure with Poser native units to import it as Avatar into MD. It's not a cheap software. But if you do lot of clothes it enhances the workflow very much, once you took the learning curve which I don't think that it is very high.
Poser can deal with tris, also. But clothes still work better with quads in Poser.
Hmm, I've always just brought my avatars into MD as .obj files. May try the Collada export next time I try and new figure and see what happens.
And I agree that quads work better in Poser, even though you can do tris. I played around with tris a lot at first, because I heard they were so much better for dynamics, but that doesn't seem to be the case as much in Poser. Also, if you're ever going to pull out the morph brushes to make adjustments in Poser, quads play a lot nicer than tris.
Maja
Eager
Well now, I have my own philosophy about tris and quas. Whether tris oder quads, the higher the resolution of a mesh the more flexibility. Since not tris or quads got bended, but both got rotated around edges and vertices. Mixing of tris and quad meshes on one single figure (layered clothes) does not appear to be a good idea, at all. To do so increases the calculation time dramatically, but does not give better results. Better use subdivision option to cover up little "mistakes". Last but not least the over all impression makes the difference between a just picture and artwork. If the drapery of a blouse or dress is absolut perfect or not rather is a minor matter in the eye of the beholder. However, the artist might have another point of view.... 
Good point GG. I hadn't even considered that.Also, if you're ever going to pull out the morph brushes to make adjustments in Poser, quads play a lot nicer than tris.
Maja
Eager
Hmm, I've always just brought my avatars into MD as .obj files. May try the Collada export next time I try and new figure and see what happens.
These are the Poser Collada export settings I use for import into MD. To import into MD from the menu chose File -> Open -> Avatar.
These are the MD Wavefront Object export settings. (Current figure is Pauline, which is a 8.6 ft Poster figure.)
These are the Poser Collada export settings I use for import into MD. To import into MD from the menu chose File -> Open -> Avatar.
Thanks for the settings. I'll bookmark this for later. It definitely helps to know what boxes to check and uncheck.
Maja
Eager
This might be helpful too with custom Avatars in MD: Bounding Volumes & Arrangement Points on Custom Avatar - Marvelous Designer Help

