• Welcome to the Community Forums at HiveWire 3D! Please note that the user name you choose for our forum will be displayed to the public. Our store was closed as January 4, 2021. You can find HiveWire 3D and Lisa's Botanicals products, as well as many of our Contributing Artists, at Renderosity. This thread lists where many are now selling their products. Renderosity is generously putting products which were purchased at HiveWire 3D and are now sold at their store into customer accounts by gifting them. This is not an overnight process so please be patient, if you have already emailed them about this. If you have NOT emailed them, please see the 2nd post in this thread for instructions on what you need to do

Rendering Poser 12

MEC4D

Zbrushing through the topology
Contributing Artist
I checked exactly , the last build is 12.0.500
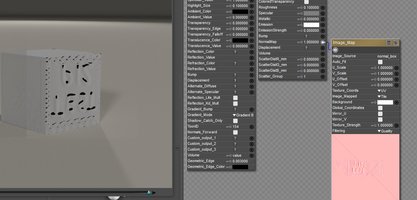
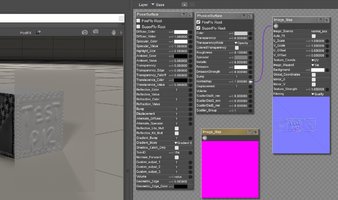
I am getting only the pink window before loading my normal map , custom Gamma or global still working ok no matter the changes
it seems like your normal maps are not loaded at all from some reason , or it is the format of the image , or something got memorized , try change the normal name and load again to check . If not working I am afraid something else is going on beyond my understanding . Or is the format of the Normal image , or maybe corrupted installation.
 

Attachments

  • Screenshot 2021-05-24 090235.jpg
    Screenshot 2021-05-24 090235.jpg
    180.8 KB · Views: 143

MEC4D

Zbrushing through the topology
Contributing Artist
everything working fine with png ... since it seems like no global bug to me , there is something else on the hand, or corrupted installation or your normal map , because I assuming it only affected normal map channel right ?
 

Doug Hunter

Busy Bee
Contributing Artist
OK, by default Substance Painter sets exports for normals in .png 16 bits.
Writing it at 8 bits makes a difference. It looks like this may be the problem.

It's late here so I'll test render this out tomorrow :)
 

MEC4D

Zbrushing through the topology
Contributing Artist
OK, by default Substance Painter sets exports for normals in .png 16 bits.
Writing it at 8 bits makes a difference. It looks like this may be the problem.

It's late here so I'll test render this out tomorrow :)
Ok no problems , but seems like you found the source of the error .
 

MEC4D

Zbrushing through the topology
Contributing Artist
Yeah that's the problem 16bits.png not accepted, it flips upside down .. problem solved
 

Attachments

  • Screenshot 2021-05-24 095214.jpg
    Screenshot 2021-05-24 095214.jpg
    154.8 KB · Views: 163

Miss B

Drawing Life 1 Pixel at a Time
CV-BEE
OK, I have to bring up my GTX 1660 ti again, as I'm finally going to be using it more often while beta testing, and although I've been aware of the Adaptive Sampling w/threshold option, what settings do folks use for it. Since I've not used it before, it's set at 0.00.

Anyone have any suggestions as to what amount I should use for it?

Oh, and my P12.0.500 has the OptiX NVIDIA GTX 1660 ti option, and I just used it to do a quick render, so they've gotten that option to be available with the latest update, or possibly an earlier update, since I hadn't done any GPU renders until now, I'm not sure when it became available.

One other thing . . . what amount do you set the Denoising at. By default it's set to 1.0 for both Exposure and Saturation, but that doesn't seem like enough, so any suggestions would be greatly appreciated.
 

Doug Hunter

Busy Bee
Contributing Artist
Good question Miss B :D

I'm currently using Poser's Ultra Adaptive (GPU) setting, without applying any Post Effects to the render.
It has the Adaptive Sampling w/threshold set to 0.002
 

Miss B

Drawing Life 1 Pixel at a Time
CV-BEE
OK, I've seen a couple examples over at Renderosity, and so far they've been 0.003 and 0.005.

Now I'm wondering what the denoising should be set to. I just tried something with it set to 5.0, and it seems OK, but I guess it would depend on how busy the scene is which is rendering.
 

Hornet3d

Wise
Good question Miss B :D

I'm currently using Poser's Ultra Adaptive (GPU) setting, without applying any Post Effects to the render.
It has the Adaptive Sampling w/threshold set to 0.002

All of the renders I have posted in the last few months are rendered using the High Adaptive (GPU) setting which loads with a default of 24 samples and a Adaptive Sampling w/threshold set to 0.005. I generally drop the samples to 4 samples and do a rest render so that I can check the lighting and sanity check the scene such as ensuring the figures are not hovering above the ground. The test render is very grainy but good enough to do the checks I am looking for and the amount of grain gives me a guide to the samples I want to apply for the real render. It usually works out the 24 samples is fine for scenes and a boost this to around 34 samples for close ups such as portraits I rarely go above this and certainly never more than 50 samples.

This may not make a lot of sense to some but it is a procedure that gives me a good balance between render quality, one I am happy with, and render time. I never use the PostFX settings in Poser but I do occasionally use the AI denoiser in Paint Shop Pro but that is only in dark scenes such as my 600 ft under render posted recently in the I Just Wanted to Post an Image Thread.
 

seachnasaigh

Energetic
...although I've been aware of the Adaptive Sampling w/threshold option, what settings do folks use for it. Since I've not used it before, it's set at 0.00.

Anyone have any suggestions as to what amount I should use for it?

P12's adaptive sampling with threshold [___] can let you use high quality settings in Superfly without a huge render time penalty. If P12 Superfly sees that a given pixel has not changed after X number of samples, it considers that pixel to be finalized, and skips it on later samples. At the beginning of a render, progress will be as slow as P11's Superfly, but after a lot of pixels have been finalized, P12 Superfly only spends its time on the tough areas of your render, and you see the rate of progress increase significantly.

At zero (0.000), adaptive sampling is disengaged, doing nothing. When a nonzero value is entered, the smaller the value, the stricter the standard for a pixel being finalized, so better quality at the cost of longer render time. The largest threshold value which succeeds in eliminating grain is what you'd want. That will take some experience and consideration of what's in the scene (mesh lighting? metals? refractive effects? low light levels?). I started making initial guesses based on how many pixels are in a bucket. For a 16-pixel bucket, 1/(16x16) = 1/256 =~ 0.0039

This scene has mesh lighting, 3D motion blur, and lots of metals, yet there is no graininess:

Mulberry despatches droids 1184x740.jpg


These were the settings I used for the Grey Havens test/promo renders:
Grey Havens render settings annotated.PNG


I found that I could set the overall Pixel Samples to 256 with little render time penalty, because most of the pixels were finalized well before reaching the previous 128 (which is itself quite high).
 

Miss B

Drawing Life 1 Pixel at a Time
CV-BEE
All of the renders I have posted in the last few months are rendered using the High Adaptive (GPU) setting which loads with a default of 24 samples and a Adaptive Sampling w/threshold set to 0.005. I generally drop the samples to 4 samples and do a rest render so that I can check the lighting and sanity check the scene such as ensuring the figures are not hovering above the ground. The test render is very grainy but good enough to do the checks I am looking for and the amount of grain gives me a guide to the samples I want to apply for the real render. It usually works out the 24 samples is fine for scenes and a boost this to around 34 samples for close ups such as portraits I rarely go above this and certainly never more than 50 samples.
Ohhhh, OK thanks Hornet. I don't usually use any of the render setups that come with Poser. I usually create my own, and I played with the Adaptive Sampling set at 0.005 yesterday because I saw some comments on the R'osity form suggesting 0.002 or 0.005. I usually use 20 samples for testing and 40 samples for final renders, so I'll probably continue with those settings. I do take into account closeup renders, as my characters usually have a nice head of hair, which takes forever to render. ;)

Now I have to decide on the setting for Denoising, because the default 1.0 is nowhere near good enough. I did try 5.0, which is better, but I'll have to see what I find is the best setting for that.
 

seachnasaigh

Energetic
Now I have to decide on the setting for Denoising, because the default 1.0 is nowhere near good enough. I did try 5.0, which is better, but I'll have to see what I find is the best setting for that.

I haven't played with the de-noiser (because I can get a clean render using adaptive sampling threshold), so I don't have any suggestions for settings for the de-noiser. De-noising tends to soften (i.e., lose) sharp detailing, so I give preference to getting a clean render via adaptive sampling threshold.
 

Miss B

Drawing Life 1 Pixel at a Time
CV-BEE
P12's adaptive sampling with threshold [___] can let you use high quality settings in Superfly without a huge render time penalty. If P12 Superfly sees that a given pixel has not changed after X number of samples, it considers that pixel to be finalized, and skips it on later samples. At the beginning of a render, progress will be as slow as P11's Superfly, but after a lot of pixels have been finalized, P12 Superfly only spends its time on the tough areas of your render, and you see the rate of progress increase significantly.

At zero (0.000), adaptive sampling is disengaged, doing nothing. When a nonzero value is entered, the smaller the value, the stricter the standard for a pixel being finalized, so better quality at the cost of longer render time. The largest threshold value which succeeds in eliminating grain is what you'd want. That will take some experience and consideration of what's in the scene (mesh lighting? metals? refractive effects? low light levels?). I started making initial guesses based on how many pixels are in a bucket. For a 16-pixel bucket, 1/(16x16) = 1/256 =~ 0.0039

This scene has mesh lighting, 3D motion blur, and lots of metals, yet there is no graininess:

View attachment 69780

These were the settings I used for the Grey Havens test/promo renders:
View attachment 69781

I found that I could set the overall Pixel Samples to 256 with little render time penalty, because most of the pixels were finalized well before reaching the previous 128 (which is itself quite high).
Thanks Seach. I saw this, I think, in one of your posts at R'osity. My focus, however, will be with my GPU. I had heard that the GTX series of GPUs can't use the OptiX NVIDIA GPU option, however, I used it yesterday, and it worked. My GPU is a GTX 1660 ti, so it's running on the same Touring system as the RTX cards, though I got this laptop 1 1/2 years ago, around the time the RTX 20xx cards were available. Now with the RTX 30xx cards, I wouldn't think them comparable.

In any case, I'll be playing with settings the next few days to see what I like best. A render I did yesterday had IDL lighting, which I don't usually use, but it's a light set that's part of a set I'm beta testing, so had to see how it would look in P12 as well as my P11.
 

Miss B

Drawing Life 1 Pixel at a Time
CV-BEE
I haven't played with the de-noiser (because I can get a clean render using adaptive sampling threshold), so I don't have any suggestions for settings for the de-noiser. De-noising tends to soften (i.e., lose) sharp detailing, so I give preference to getting a clean render via adaptive sampling threshold.
True, I've noticed that in Blender, but then I don't usually do "final" renders in Blender.
 

Doug Hunter

Busy Bee
Contributing Artist
I have just been doing some test render comparisons with Poser 12, and I am blown away by the time differences between CPU and GPU renders.

Here are two renders (both 1920x1080) - I can’t tell any real difference in the quality.
The first one was rendered using the setting that seachnasaigh listed above.​
The second one was rendered using Poser’s Ultra NonBranched (Caustic) setting.​
The difference: 3.75 hours for the CPU compared to 10 minutes for the GPU.
And the CPU ain't no slouch

Alyse602 CPU.jpg

23:56:24 - Application commands: Set render options
23:56:24 - Analytics: Recording event for Size:1920x1080
23:56:24 - Analytics: Starting timer for Render:SuperFly
23:56:45 - SuperFly: Start rendering on device AMD Ryzen 9 5950X 16-Core Processor.
03:43:21 - SuperFly: Rendering time: 13596.43 seconds.
03:43:21 - SuperFly: Rendering memory: 16835 MB.
03:43:23 - Analytics: Ending timer for Render:SuperFly


Alyse602 GPU.jpg

21:42:34 - Application commands: Set render options
21:42:34 - Analytics: Recording event for Size:1920x1080
21:42:34 - Analytics: Starting timer for Render:SuperFly
21:42:55 - SuperFly: Start rendering on device NVIDIA GeForce RTX 3090.
21:52:54 - SuperFly: Rendering time: 599.54 seconds.
21:52:54 - SuperFly: Rendering memory: 16684 MB.
21:52:56 - Analytics: Ending timer for Render:SuperFly
 
Top