• Welcome to the Community Forums at HiveWire 3D! Please note that the user name you choose for our forum will be displayed to the public. Our store was closed as January 4, 2021. You can find HiveWire 3D and Lisa's Botanicals products, as well as many of our Contributing Artists, at Renderosity. This thread lists where many are now selling their products. Renderosity is generously putting products which were purchased at HiveWire 3D and are now sold at their store into customer accounts by gifting them. This is not an overnight process so please be patient, if you have already emailed them about this. If you have NOT emailed them, please see the 2nd post in this thread for instructions on what you need to do

I have to ask...

Gadget Girl

Extraordinary
Contributing Artist
Select the drop down where the normal map slot is and select Image Editor. The individual map tiling is in there. This is the same for all of the maps, but some have more options depending on the map slot.

So I just got to trying this, and I'm not seeing what you have. I get this:

So I seem to be missing the image tiling settings. I am in DS 4.9. and so far my experience has been they moved a lot of stuff around in 4.9 that is different than their own documentations. Or is there is something else I need to do first? Thanks.
 

Lissa_xyz

I break polygons.
Hm. I guess not all shaders have it. I tried with some of the other shaders in my arsenal and it seems Iray and AoA SSS are the 2 that have those options by default. Shaders without this by default, you may have to open in shader mixer and use the tiling bricks on the normal map. I'm not too sure how to do that though, hopefully @Pendraia can shed some light on it.
 

Gadget Girl

Extraordinary
Contributing Artist
Hm. I guess not all shaders have it. I tried with some of the other shaders in my arsenal and it seems Iray and AoA SSS are the 2 that have those options by default. Shaders without this by default, you may have to open in shader mixer and use the tiling bricks on the normal map. I'm not too sure how to do that though, hopefully @Pendraia can shed some light on it.

So I found this post that seems to imply what you are doing only works in Iray. Which I thought Iray was the default, but I think for some reason I have a 3Delight shader. This might be because I started by bringing my prop from Poser into DS, but honestly the Poser material was just a defuse color and a normal map, so it was hardly complicated.

Shader Mixer by setting up separate tiler bricks.

So this seems like the way to go (at least for 3Delight and maybe I can figure out Iray later) but I'm very lost. I actually found a very long series of posts of yours (Pendraia) on the Daz forums about Shader Mixer tutorials, unfortunately most of them seem to be for the first few version in DS 3 and earlier versions of 4, and they've renamed lots of things. I did manage to add my normal map from the Surfaces tab, then bring that material into the shader mixer which game me this:


But I can't seem to figure out how to connect things up so that I can tile the normal map.
 

Pendraia

Sage
Contributing Artist
Sorry...just saw this.I'm a bit brain dead from work...just looking at your network and your tiler needs to link to your image which in this case is a normal map. I'm just having a quick play as I haven't used normals in Shader Mixer before only displacement and bump. Post more in a minute.
 

Pendraia

Sage
Contributing Artist
Okay...here is the network as I would do it. My workspace is set up to run in the opposite direction from yours. So Root bricks are on the left not right. I've included an image map for the diffuse as well with a separate tiler as I'm assuming you would need it. This is in 3Delight not Iray. I haven't played much with the Iray stuff yet.

Shaders only have what the person writing them puts in.

The basic surface menu has a tiler function but it will affect all maps. Someone showed elsewhere recently that individually tiling can be used via the surface map which I hadn't seen or known previously. Not sure if that was in this thread or not.

AoA's shader has it because it was included in the network. If it's not in the original network it won't be in the presets you make unless you go back into Shader Mixer to edit.

I've never made shaders via hand writing them like some are able to (past my level of knowledge.) but I would imagine the same holds true that unless they have tiling functions as part of the base they won't be there.

If you did a basic shader with just an image map and no tiler in Shader Mixer and apply it you will see that the other functions that you would normally see won't be there.
network for normal with tiler.jpg

Surfaces for my network
surfaces for normal network.jpg


Surfaces with a checker added to opacity...see how the opacity is now missing but you have the checker options.
checker added to opacity.jpg


Render with the checker added. You can still see the normal on it and the gaps where the black squares are used as an alpha.
checkers.jpg
 

eclark1894

Visionary
Interesting. I'm assuming there's no grout color or mortar thickness as in a Poser node? I don't see one. and can you rotate the tiles?
 

Gadget Girl

Extraordinary
Contributing Artist
Okay...here is the network as I would do it. My workspace is set up to run in the opposite direction from yours. So Root bricks are on the left not right. I've included an image map for the diffuse as well with a separate tiler as I'm assuming you would need it. This is in 3Delight not Iray. I haven't played much with the Iray stuff yet.

Thanks, I'll dig into this a little later and see what I can do. I did see something about the direction that DS goes in by default, and how to change it, so I may do that both to mimic yours, but also I think it's the opposite of Poser, so that would probably help my brain also.
 

Gadget Girl

Extraordinary
Contributing Artist
It worked! I actually kind of made sense of things. Reversing the direction definitely helped, but also at least I knew what I was looking for. Even better my original cunning plan to make my materials mostly image and normal maps so that I wouldn't have to figure out 4 different rendering engines worked to. Once I got things set up, it rendered in both 3Delight and Iray the way I wanted.
 

eclark1894

Visionary
Awww! I guess I can still use a texture pack, but I really wanted to try doing a procedural texture for both Poser and DS. I KNOW I can do it in Poser.
 

Gadget Girl

Extraordinary
Contributing Artist
Okay, I'm going to add in another DS Shader question. Things seemed to be going great as I was converting my Poser materials to DS materials. I've created both a base texture (the silk one I was doing above) that can be recolored, but then I have some image maps also for brocade looks. Anyway, for some of my brocade textures, I want to use the normal map from my silk, which required a little setup. But I want to be able to add an image map to the Diffuse. As soon as I apply the silk that I saved as a shader, I loose the place where I could add an image map:


So how do I get the little box where you can add images back?
 

Pendraia

Sage
Contributing Artist
Awww! I guess I can still use a texture pack, but I really wanted to try doing a procedural texture for both Poser and DS. I KNOW I can do it in Poser.
The tile brick in shader mixer allows for grout and altering the size but I keep thinking there was one that Daz had a video tutorial for when they first released Shader Mixer...some of the blocks have changed names since the beta though but I remember using the video to work out how to do brickwork...if I get chance I'll see if I can find the video for you.

The network I posted earlier included an image plugged into the diffuse. If you have applied a texture where you've removed the image block it won't show in the Surface tab. That's what I was talking about earlier...
 

Gadget Girl

Extraordinary
Contributing Artist
The network I posted earlier included an image plugged into the diffuse. If you have applied a texture where you've removed the image block it won't show in the Surface tab. That's what I was talking about earlier...

I think I see the conceptual problem I was having now. In Poser, all your possible connections are always there to start with, and everything ultimately connects up to the same root. Basically the 'root' is invisible in DS. You don't have wire to a master node, just create the nodes/bricks you need. I think I'm starting to get it.
 

Pendraia

Sage
Contributing Artist
Only if you apply a shader does the surface tab change and then it will change to whatever is in the shader. To get them back all you have to do apply the default DS shader.
 

Dakorillon (IMArts)

Dances with Bees
Contributing Artist
To be honest, Iray is only practical for DS users if they have Nvidia cards. Those of us who do not, Iray is not a reasonable option. I render in 3Delight ONLY. I do not have an Nvidia card, and render tests on Iray - very simple setup, single figure, one hair object, one shirt, even with an experienced Iray user guiding me on render settings - it was 22 HOURS in and wasn't even CLOSE to done." /QUOTE]

What she said. I don't do Iray at all. My computer with an Nvidia card doesn't have enough memory, so it crashes. My laptop doesn't have an Nvidia card, so even simple things take hours and still look grainy.
 

seachnasaigh

Energetic
To be honest, Iray is only practical for DS users if they have Nvidia cards. Those of us who do not, Iray is not a reasonable option. I render in 3Delight ONLY. I do not have an Nvidia card, and render tests on Iray - very simple setup, single figure, one hair object, one shirt, even with an experienced Iray user guiding me on render settings - it was 22 HOURS in and wasn't even CLOSE to done.

What she said. I don't do Iray at all. My computer with an Nvidia card doesn't have enough memory, so it crashes. My laptop doesn't have an Nvidia card, so even simple things take hours and still look grainy.

Tuck this away until the next time you buy a new computer for 3D: Don't buy a new computer. Well, don't buy a Wal-Mart special web-surfing computer or even a "high performance" gaming computer.

Some render engines use OpenCL (ATI/Radeon cards), some use CUDA (nVidia cards). Generally, you will be limited in scene complexity by the onboard VRAM of the video card(s). Often, you also lose some rendering features when rendering with GPU acceleration.

The one type of rendering which is universal and is able to exploit all of your system's RAM is CPU rendering. CPU rendering performance depends on the number of processor cores you can bring to bear multiplied by their clock speed. Clock speeds have plateaued, so the one way left to increase performance is to use more processor cores.

If you have gobs of money, just order a new professional 3D rendering workstation. If you're on a budget, then here is what has worked for me:

[_] Do not buy any 32bit computer - not enough memory capacity to be worthwhile for 3D use.

[_] Do not buy a laptop unless you absolutely need that portability; laptop chassis do not have sufficient cooling apparatus to deal with extended periods of 100% CPU load.

[_] Do not buy anything with only one Processor. I didn't say one core; I said one processor. A H/T quad core i7 is just one processor. Skip it.

[_] Shop for used enterprise-level workstations/servers which have *dual* multi-core processors. Not a dual-core processor; I'm saying *two* CPUs on the motherboard, with each CPU being H/T hex-core. That's twenty four render threads, and unlike gaming/home CPUs, Xeons won't throttle down with extended use. Search eBay using terms such as "2x X5650" or "2x X5690". These things cost $15,000-$25,000 new, but sell used for $1,200-$2,000 (workstations) and $650-$1,300 (server blades). Newegg sometimes has refurb workstations.

[_] You can also buy a server/workstation motherboard and retrofit an existing desktop (if it will take an E-ATX motherboard), or build from scratch. Buy a matched pair of used "clean pull" CPUs (eBay again), and some used registered server RAM (preferably with metal heat spreaders).

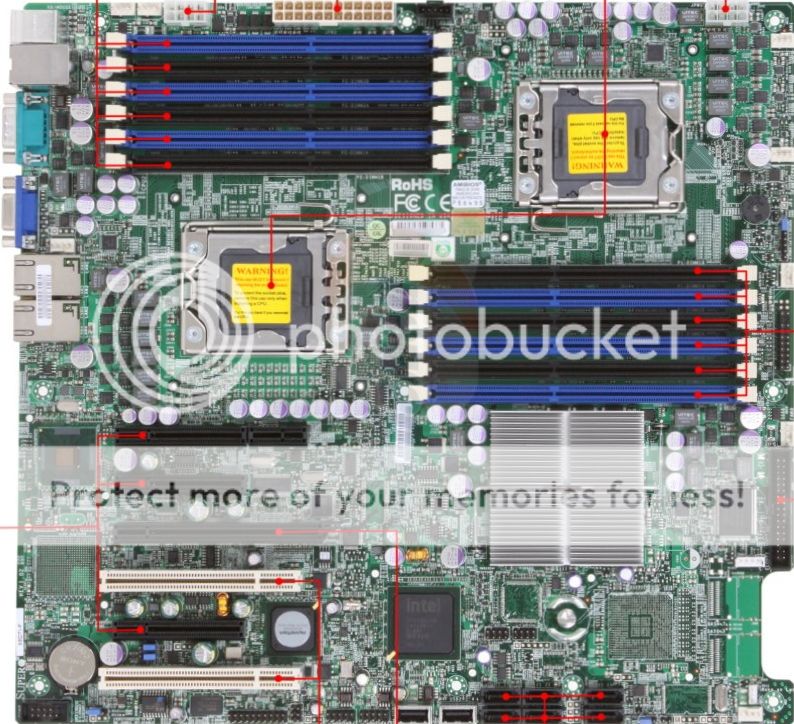
Here's an E-ATX server/workstation motherboard; notice it has *two* CPU sockets, and lots of RAM slots.


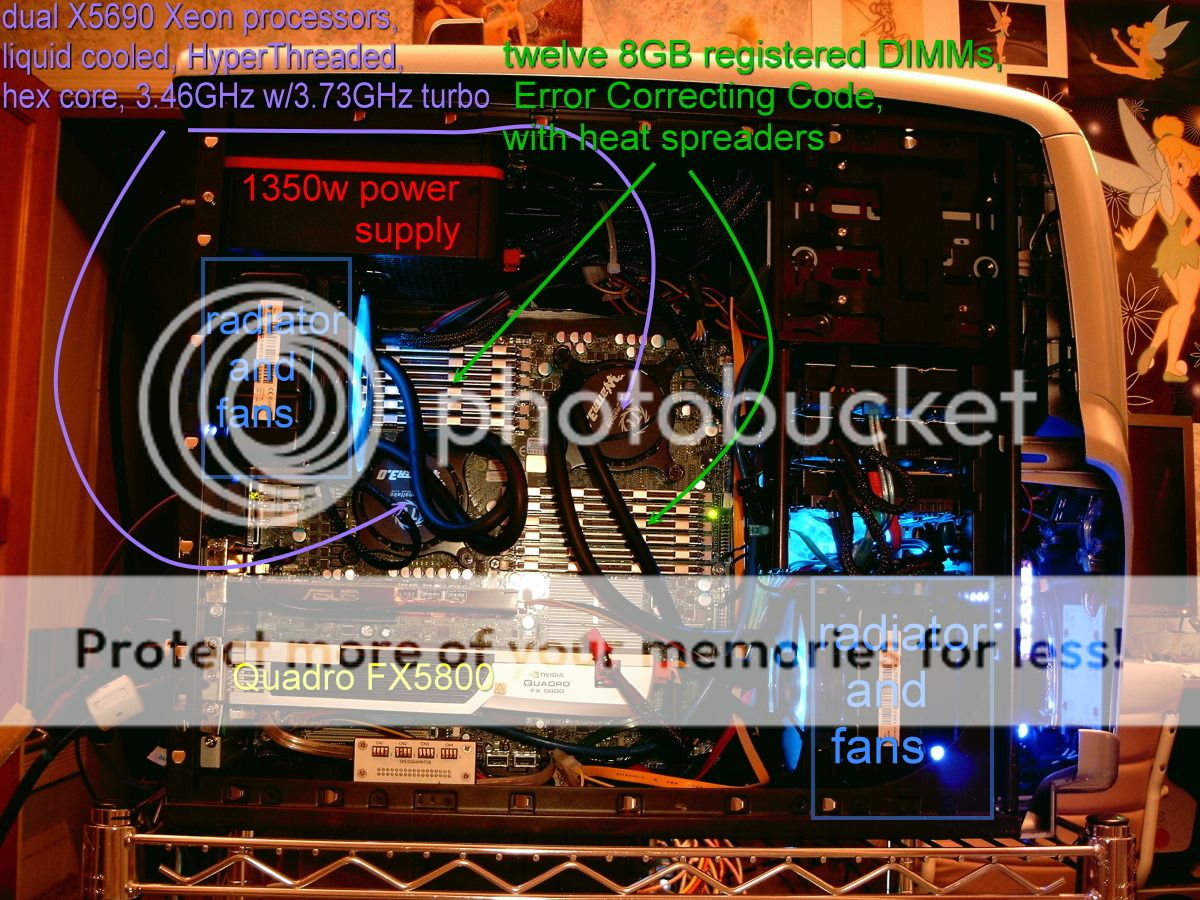
Crammed into an Alienware Aurora chassis (which has mounting posts for an E-ATX mobo!):


That's a pic of Galadriel; twenty four threads stock-clocked at 3.46GHz (and 3.73GHz turbo) supported by 96GB or RAM. Galadriel is a 2008 model, but she will embarrass a shiny new gaming computer for 3D rendering.
TinkerBell has the same processors and memory, but Tink has a (used) 12GB Titan Z GPU.

Urania has a pair of the 2.80GHz H/T hex Xeons (X5660) and 48GB of RAM; including a new hard drive, an OEM Win7Pro license, and some blue LED fans, she cost $1,260.

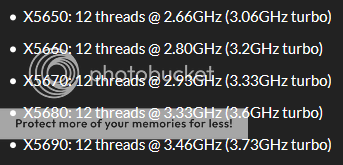
Westmere series Xeon models which I recommend based on current prices and core count x clock speed:
 
Top