• Welcome to the Community Forums at HiveWire 3D! Please note that the user name you choose for our forum will be displayed to the public. Our store was closed as January 4, 2021. You can find HiveWire 3D and Lisa's Botanicals products, as well as many of our Contributing Artists, at Renderosity. This thread lists where many are now selling their products. Renderosity is generously putting products which were purchased at HiveWire 3D and are now sold at their store into customer accounts by gifting them. This is not an overnight process so please be patient, if you have already emailed them about this. If you have NOT emailed them, please see the 2nd post in this thread for instructions on what you need to do

Can you guess what it is yet ? :)

took a breather from the tanks to play with the speakers...

speakback.jpg

..here's the 1st version of the back. Happy apart from the outside corners - they just need smoothing out.
So why the speakers ? Because I think if you look at the press photos these shapes stand out.

Obviously (for copyright/design reasons)had to make some changes from the original - -
 
Sorry... I got bored and started making Sci-Fi boxes, which in Klingon is spoken as GRRRRRRRRRRRRRRRRRRRRRRRRRR!

We'll there's some truth there :whistling:
That's the sound I've been making a lot while trying to make this bit!

Which, as you can see from some of my attempts, is proving to really tricky to do....
But I'm not giving up on this part, I will crack this...or crack up :)

Press photos of the real thing are also here if anyone has good ideas.

speakeasy.jpg
 
Sorry there's been no updates, real life has been rather brown, dealing with a death and a near death.
But pleased to say, work has restarted....paused the speakers for a bit.. here's the start on the oil tank pump. Yea I learned this type was an old one, but it seems to suit the quirkiness of this..

pump_demo.jpg


btw - slight mod on the name because of possible trademarks
 
This one was made by tracing over a photo found on google and the odd dash of the bevel command in C5.

handle_001.jpg


Obviously can't show the photo here as it's a stock one (Alamy Image ID: EM2751) and I'm using my kidneys :) But I think it's pretty close considering it took about 4 hours from start to end modelling. Though not mapped or zoned yet.

handle_002.jpg


Pinky - you left the lens cap of your mind on again.
 
Thanks! - here's tonights......gas pump has been mapped and zoned.

12.jpg


Good is...the idea of making the numbers (bottom right) a recessed section, like on the real thing, that's worked.
As always using app specific materials.
Mapping anything that needs text a lot larger.

Not good.... allowing the tech to "take over" some of the manual creative work and not the mark 1 human eyeball.
In this case, what's usually great for retroing photos, some nice software found on giveaway of the day called Grungetastic.
Plus while rendering noticed some scalped text.

But it's all fixable and you'll note the pipe needs to be made and added.
 
...and tonights....the tank with the gas girl pump.

Yea I know the real one doesn't have this kinda pump, in reality there appears to be just an upright pipe.
But it looks cool, so why not :)

Must admit the pipe on the pump looks a bit weedy, so I'm going to try and improve that.
artisticlicence.jpg
artisticlicence2.jpg
 
Good stuff.

Thanks!

I don't know these pumps but yours is looking good.

I don't know them either, as said earlier here in the UK ours are generally green metal or plastic ones.
It was only while searching that I found one tiny image showing a "gasboy" on top of one the larger tanks.

Though this version did raise an interesting bit of "artistic angst".
If someone is modelling real world locations, how "screen accurate" should it be?

It's a question that railway modellers face all the time, because model railways tend to be big.
Even a simple oval of track requires something the size of a door.
So they tend to reduce distances to make everything fit, but that creates a problem called "compression".

For example say there's 7 identical and 2 visually unique railside cabinets within 100 yards on the real thing.
On a compressed model those cabinets could be squashed together and that might not look right.
It's also problematic if that layout will be photographed, even if the photographer focus stacks their images.

Hence the modeller might only put 2 identical cabinets on their layout.
Obviously that's less of an issue for virtual 3D modellers, our "layouts" can be as big or small as we wish.
Nor do we have to be overly concerned with camera focal lengths, because we have the luxury of being able to place cameras anywhere.

But I think we still need to consider things such as composition and factors such as modelling time.
So in essence, both real world and virtual modellers are creating a "flavour" of the location.
Which is what I'm hoping to do here.

So then we're back to should extra objects be included, even if they look cool.
And that's where I struggle with this version of the tank.
So I've decided to include it as a bonus version.

The dials must have been a pain.

Fortunately not.

On some of my other models, especially ones with cockpits, I've learned to create recesses for the dial faces, then place "glass" over the top.
This way you can use larger maps/textures for each of the dial faces, rather than try to squeeze everything into a single map.
Making it look better on close ups.

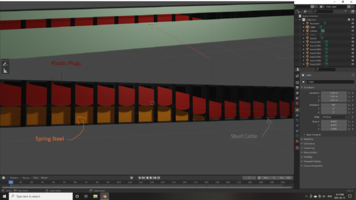
The image below shows what I mean and also how someone could model something like this with actual working dials.
Which is based literally on how mechanical dials work.
Or as some folks may recall, it was how speedometers could be "clocked":)

rotatedials.jpg
 

parkdalegardener

Adventurous
My old Dodge had a speedo you probably haven't seen in the UK. A red illuminated slide moved from left to right in 5mph increments. Every time you hit a bump your speed varied by up to 10 mph till it stopped shaking. If I didn't know better I swear the thing was liquid filled.
 

Attachments

  • Plymouth-1961-Plymouth.webp
    90.8 KB · Views: 153

parkdalegardener

Adventurous
What the heck. Your getting me remembering the old girl. The speedo was connected directly to a 1/8 in steel cable that ran from the gas peddle up through the base of the instrument cluster and around a pulley inside the gauges on the right. It pulled a piece of spring steel that was coiled behind the gauges on the left. Kind of like a big flat watch spring. The spring steel moving across lifted the little red plastic plugs so they kind of floated up and down. The slope on the sides of them was to guess at the speed between the 5 mph markers. As you let off the pedal the spring would wind back and the little plastic plugs would fall back down. Sometimes. Unless you hit a bump and then the whole mess just jumped up and down randomly. The odometer cable came from the engine block and was also a physical connection, geared similar to the setup you've shown. The sickly green colour on the gear buttons and dial faces was indeed radium. Glowed nicely at night. Didn't know how rare the old bird's (Dodge Phoenix) spedometer was till I went looking for a picture of it online.

Sorry for hijacking your thread but I am quite interested in this type of stuff.
 

Attachments

  • Speedo.png
    Speedo.png
    804.6 KB · Views: 125
Please don't apologise for 'hijacking', it's not. As well as 3D modelling, when the day job permits, I also like make things in the real world.
And it's these little details about things that can often aid that, like your image reminded me of yale lock pins.
And if nothing else what's wrong with remembering happy memories!

Like I recall the slider type of speedo on some of my dads old cars (he's still about) and how we used to spend weekends fixing them up.
Which, of course was easily achievable on something like a Triumph Herald with nothing more than a socket set, screwdrivers and a large hammer.

It's certainly more interesting than mapping and textures zones, which is why there's no images over the last few days.
 
Sorry folks, over the last few weeks real life has been intervening way too much :( Only bit of modelling I've managed is what you see tonight, well this morning, it's for something else (more on that later). But I've been given the OK to include this into this model. Not sure if this kinda wheelie bin is used in the US or not, but I figure including it would be fun.


bin002.jpg


bin001.jpg
 

Wizzard

Brilliant
Most US "dumpsters" have a split lid, and of quite angular steel. There are some of high impact plastic and single lid for recycling.
Also have hollow rails for lifting, the steel versions.....
Oh look....... butterflies....

Cheers
 
Thanks for that Wizzard, on US films I've seen some square ones.. usually when they tip the hero into a refuse truck.
Probably won't make one for this model. But will include the UK wheelie bin as an extra (non main/default) part of the set, usually because I making it and talking of which ...tonights..

castor3.jpg


..well a wheelie bin has to have wheels :) Actually a tiny proud of this bit, because it was such an a**e to make it so it feels right.
Obviously got to add the lock part.
 

Wizzard

Brilliant
Well plus side, the locks usually get broken after a years service. 8 )
The wheel came out really nice lots of potential there. 8 )

Cheers
 
Well plus side, the locks usually get broken after a years service. 8 )
A year ? I should move to the US as the ones on our communal bins are lucky to last a week :)

The wheel came out really nice lots of potential there. 8 )
Yea I keep looking at it and thinking that would make a nice Sci-Fi gribble. Something like the end sight of a steampunk gun.
Indeed always thought it would be cool to try and do some dieselpunk stuff one day.
Especially now some of the comic cons are tentatively suggesting they might be returning this year.
 
Top