Okay... so here we go. The basic overview of the Surfaces tab... understand that everything I'm about to say goes for 3Delight only. I highly doubt much of this would translate to Iray, and I have absolutely no experience with Iray, so I would not be able to teach that in any case.
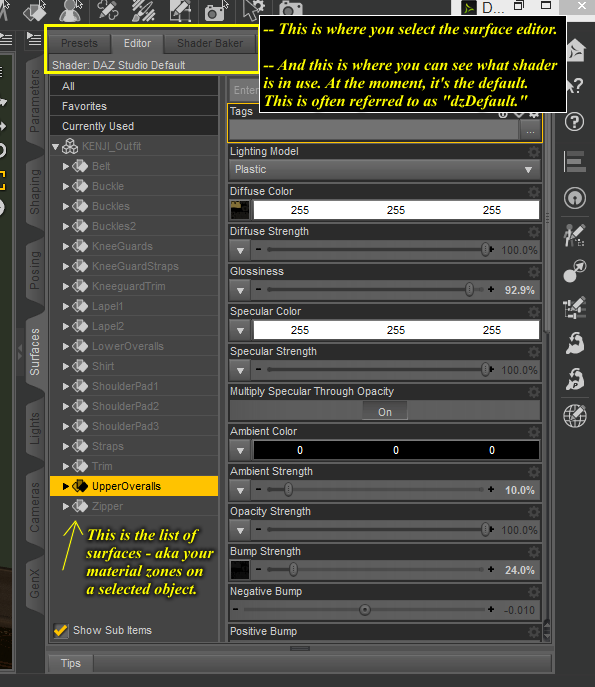
The first thing to do, once you have the Surfaces tab open, is to know where to click to bring up the editor. At the top of the Surfaces tab, look up high, just below the toolbar. There will be three buttons. "Preset," "Editor," and "Shader Baker."
You want to click on "Editor." Doing that, will then bring up something that looks like this :

Now, Shaders and Materials are two very different things in Studio. Shaders are things like dzDefault, UberSurface, AOA_Subsurface, etc. Look up where it says "Editor," and look directly underneath that. In small print, the shader currently in use on any given surface will be listed. Materials, on the other hand, are basically the collection of settings that make use of the shader. Nataani's MATs, for instance, are material settings, that use the dzDefault shader.
In the screenshot example above, it is showing the Daz Studio Default shader being in use. This is often referred to as dzDefault, as I think in prior versions it would be displayed as "dzDefault" and not "Daz Studio Default" as it shows in 4.8.
It's important to know which shader you're using, because the options are different for each type of shader. I'm only going to cover the dzDefault shader in this. Ubersurface and the AOA SSS are more advanced shaders, and I'm only just beginning to understand those two in the last few months. Besides all of that, the basic dzDefault shader is what you will see on most things that are not from Daz. The other one you will see a lot of is the SSS, but for what you're doing with the house and such, the basic shader is probably good enough to start with, especially as you're not all that familiar with the software itself yet. Keep things simple in the beginning.
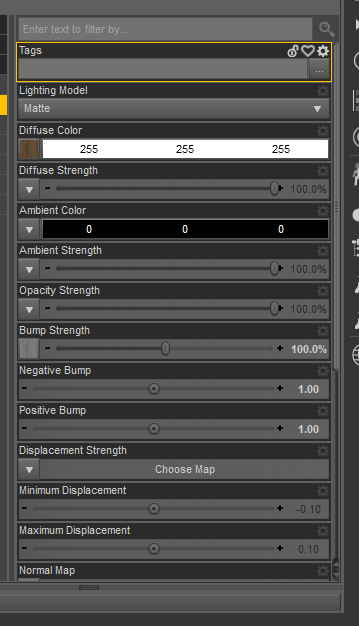
So, starting at the top and going down, I'm going to go over each of these. Most of them are self explanatory in the dzDefault shader. This is half of the material properties :

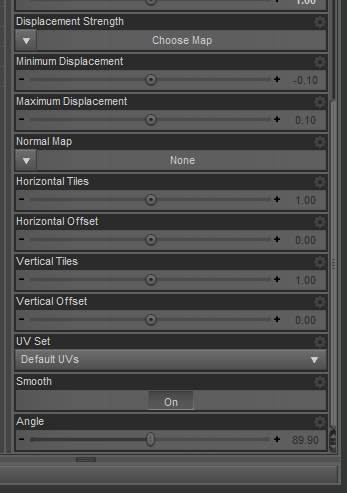
And this is the other half :

Lighting Model -
This allows you to set different lighting models. Clicking in this box, you can choose from Plastic (which is the default), Metallic, Matte, Skin, Glossy (Metallic), and Glossy (Plastic).
Plastic is fine for hard surface objects for the most part.
I have not seen a lot of use for the Metallic lighting model, as it doesn't seem to behave much differently than Plastic.
Same goes for Glossy(Metallic), and Glossy(Plastic).
Skin is basically a faked SSS intended for use with Caucasian skin textures; it will, when selected, give you two additional properties. I'll go over those later, as it does have some other helpful uses as well.
Matte is just what it sounds like. This will remove all the properties that have to do with lighting - things like specular, reflection, and refraction will go away when this lighting model is chosen, as it's meant for surfaces that you don't want reflection or specular highlights.
Diffuse Color -
This is where you choose the color of a surface/material zone. There is a square box to the left, that when you click on it, you can browse and select your texture map to assign to the surface. To choose a color, you click in the box with the RGB codes showing. In the screenshot above here, that box is white, as the surface is set for true white.
Diffuse Strength -
I know we don't use this a lot, but if you want to apply the texture map at less than 100% strength, this is the place to do that. If you click on where it gives the number value (in this screenshot, 100%), you can type in an exact value. Or, you can use the slider to adjust the value. This goes for all the sliders in Studio. In this screenshot, the box next to the slider is empty with nothing assigned, so it displays as a box with a downward pointing triangle.
The box on Diffuse Strength is where you would apply things like a dirt mask. Dirt masks are transparent PNG images that work as a sort of overlay. The effect won't be visible until the surface is rendered, but it allows for things like splatters or dirt to be overlayed on top of a texture map without having to produce an additional version of the texture. Smay uses these quite a bit, and I like them as well for some things. I've also used this field for things like applying tattoos or body paint over the top of a texture.
Glossiness -
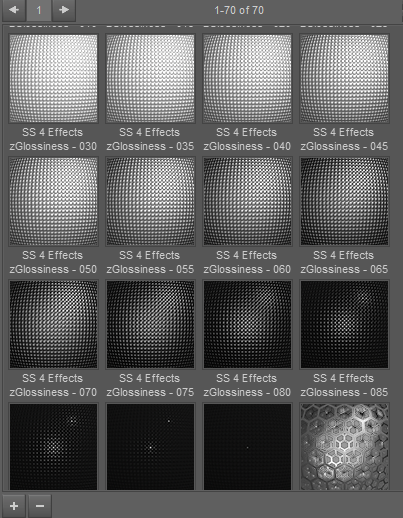
I know this isn't visible in the screenshots above, but that's because the material zone in those screen shots was using the Matte lighting model. In Poser terms, this is basically your Specular Highlight strength/size. Deni Gaka's shaders have a pretty good visual representation of what the Glossiness property does :

You can set a map in the box to the left just like with Diffuse, Bump, etc. And there is also a slider on the Glossiness property that you can use to adjust the strength of the effect.
This property will NOT be visible when using the "Matte" lighting model.
Specular Color -
Just like in Poser, this is where you would choose the specular color. If you have a Specular map, you would assign that to a selected surface in this property as well.
This property will NOT be visible when using the "Matte" lighting model.
Specular Value -
Also very much like Poser, this is where you would adjust the Specular strength up or down.
This property will NOT be visible when using the "Matte" lighting model.
Multiple Specular Through Opacity -
I'm not exactly clear on what this does specifically, but some shaders have it turned on, some shaders turn it off.
This property will NOT be visible when using the "Matte" lighting model.
Ambient Color -
This works the same as it would in Poser. Just pick the color that you want for the ambient glow.
Ambient Strength -
Also works the same as it does in Poser. Adjust the strength up or down via the slider, or type in an exact value for the strength of the ambient glow.
Opacity Strength -
This is the transparency setting in Daz Studio. Adjust the slider up or down to change the level of transparency of the selected material zone. Again, in the above screenshot, you see the box with the downward pointing arrow - that is where you would assign a transmap to a selected surface. The Opacity slider works with or without a transmap applied.
Bump Strength -
Works similar to Poser's bump settings. Assign a greyscale map in the box to the left (white triangle if nothing is assigned), and adjust the slider up or down for the strength.
Negative Bump -
This is where you set how far inward/downward you want the bump map to affect the surface. Go gently on the values with this; it's very common to only use -.10, or maybe -.25 values in both this and the Positive Bump. Some surfaces need a full 1.0 or -1.0 value, but these are pretty rare.
Positive Bump -
This is where you set how far upward/outward you want the bump map to affect a selected surface.
Displacement Strength -
Yup. This is where you assign a displacement map to a surface. Click on the box to the left with the arrow to select your map, and then a slider will appear for you to adjust the strength of the displacement effect.
Minimum/Maximum Displacement -
These two sliders work the same way as the Positive/Negative Bump sliders do, except that the affect only the displacement settings on a surface.
Normal Map -
This is where you can assign a normal map to a surface. In the dzDefault shader, you cannot control the strength of the normal map on the surface, but you can assign one here. I use normals often for skins, to avoid the clothing headaches that displacement creates.
Reflection Color -
Just like in Poser. You assign a reflection map here, as well as the color of the reflection. If you want TRUE reflections, just set the color and Stength value, and do NOT assign a map. True reflections take a little longer to render, but IMO, they look much more believable than a reflection map. I only use reflection maps for small surfaces like shirt buttons, belt buckles, or door hinges/knobs.
I do want to take a moment here to make a note regarding true reflections. I'm not sure how it works these days in Poser, but in Daz Studio, if you are using True Reflections, you have to have something for the surface to REFLECT. So if all you have in the scene is a single object, and you set your Reflection properties, you won't get a reflection. You have to have walls, other objects, or a skydome, something like that in the scene for the surface to reflect when it renders.
This property will NOT be visible when using the "Matte" lighting model.
Reflection Strength -
Also like Poser. You adjust the strength of the reflection up or down on this slider.
This property will NOT be visible when using the "Matte" lighting model.
Refraction Color -
Assign a refraction map (I would assume, based on the presence of the box/triangle) here, as well as the color of the refraction here.
This property will NOT be visible when using the "Matte" lighting model.
Refraction Strength -
Assign the strength of Refraction on this slider.
This property will NOT be visible when using the "Matte" lighting model.
Index of Refraction -
Again, I'm just not entirely sure what this does, other than it has to do with Refraction.
This property will NOT be visible when using the "Matte" lighting model.
Horizontal/Vertical Tiles -
This is where you can adjust how many times a tiling texture will tile on a surface. The default, of course, is 1.
Horizontal/Vertical Offset -
This allows you to sort of "slide" the texture alonng the horizontal or vertical axis of a surface. It might sound like a silly property to have, but it's actually very useful for many things.
UV Set -
This applies more to the Genesis figures which have multuple UV sets that they can use. If using Genesis 1, for instance, clicking in this box, I can choose to use the M4 UVs, or V5 UVs, or the Genesis 2 UVs, etc. Whatever UV sets are installed for a figure, you can choose between them here. This affects only the selected surfaces. If you want the entire Genesis 1 figure to use, say, the Kids 4 UVs, you would select ALL of the figure's material zones and then set the UV option.
Smooth -
I'm actually not sure what this does. LOL. I've tried rendering with it on and with it off, and I can't see any differences. By default, it's enabled, and I pretty much just ignore it.
Angle -
See my comment for "Smooth."
---------------------
I'm going to cover the "Skin" lighting model properties in a separate post, as I really think they're best demonstrated with a couple of example renders to show the effect.
The first thing to do, once you have the Surfaces tab open, is to know where to click to bring up the editor. At the top of the Surfaces tab, look up high, just below the toolbar. There will be three buttons. "Preset," "Editor," and "Shader Baker."
You want to click on "Editor." Doing that, will then bring up something that looks like this :
Now, Shaders and Materials are two very different things in Studio. Shaders are things like dzDefault, UberSurface, AOA_Subsurface, etc. Look up where it says "Editor," and look directly underneath that. In small print, the shader currently in use on any given surface will be listed. Materials, on the other hand, are basically the collection of settings that make use of the shader. Nataani's MATs, for instance, are material settings, that use the dzDefault shader.
In the screenshot example above, it is showing the Daz Studio Default shader being in use. This is often referred to as dzDefault, as I think in prior versions it would be displayed as "dzDefault" and not "Daz Studio Default" as it shows in 4.8.
It's important to know which shader you're using, because the options are different for each type of shader. I'm only going to cover the dzDefault shader in this. Ubersurface and the AOA SSS are more advanced shaders, and I'm only just beginning to understand those two in the last few months. Besides all of that, the basic dzDefault shader is what you will see on most things that are not from Daz. The other one you will see a lot of is the SSS, but for what you're doing with the house and such, the basic shader is probably good enough to start with, especially as you're not all that familiar with the software itself yet. Keep things simple in the beginning.
So, starting at the top and going down, I'm going to go over each of these. Most of them are self explanatory in the dzDefault shader. This is half of the material properties :
And this is the other half :
Lighting Model -
This allows you to set different lighting models. Clicking in this box, you can choose from Plastic (which is the default), Metallic, Matte, Skin, Glossy (Metallic), and Glossy (Plastic).
Plastic is fine for hard surface objects for the most part.
I have not seen a lot of use for the Metallic lighting model, as it doesn't seem to behave much differently than Plastic.
Same goes for Glossy(Metallic), and Glossy(Plastic).
Skin is basically a faked SSS intended for use with Caucasian skin textures; it will, when selected, give you two additional properties. I'll go over those later, as it does have some other helpful uses as well.
Matte is just what it sounds like. This will remove all the properties that have to do with lighting - things like specular, reflection, and refraction will go away when this lighting model is chosen, as it's meant for surfaces that you don't want reflection or specular highlights.
Diffuse Color -
This is where you choose the color of a surface/material zone. There is a square box to the left, that when you click on it, you can browse and select your texture map to assign to the surface. To choose a color, you click in the box with the RGB codes showing. In the screenshot above here, that box is white, as the surface is set for true white.
Diffuse Strength -
I know we don't use this a lot, but if you want to apply the texture map at less than 100% strength, this is the place to do that. If you click on where it gives the number value (in this screenshot, 100%), you can type in an exact value. Or, you can use the slider to adjust the value. This goes for all the sliders in Studio. In this screenshot, the box next to the slider is empty with nothing assigned, so it displays as a box with a downward pointing triangle.
The box on Diffuse Strength is where you would apply things like a dirt mask. Dirt masks are transparent PNG images that work as a sort of overlay. The effect won't be visible until the surface is rendered, but it allows for things like splatters or dirt to be overlayed on top of a texture map without having to produce an additional version of the texture. Smay uses these quite a bit, and I like them as well for some things. I've also used this field for things like applying tattoos or body paint over the top of a texture.
Glossiness -
I know this isn't visible in the screenshots above, but that's because the material zone in those screen shots was using the Matte lighting model. In Poser terms, this is basically your Specular Highlight strength/size. Deni Gaka's shaders have a pretty good visual representation of what the Glossiness property does :
You can set a map in the box to the left just like with Diffuse, Bump, etc. And there is also a slider on the Glossiness property that you can use to adjust the strength of the effect.
This property will NOT be visible when using the "Matte" lighting model.
Specular Color -
Just like in Poser, this is where you would choose the specular color. If you have a Specular map, you would assign that to a selected surface in this property as well.
This property will NOT be visible when using the "Matte" lighting model.
Specular Value -
Also very much like Poser, this is where you would adjust the Specular strength up or down.
This property will NOT be visible when using the "Matte" lighting model.
Multiple Specular Through Opacity -
I'm not exactly clear on what this does specifically, but some shaders have it turned on, some shaders turn it off.
This property will NOT be visible when using the "Matte" lighting model.
Ambient Color -
This works the same as it would in Poser. Just pick the color that you want for the ambient glow.
Ambient Strength -
Also works the same as it does in Poser. Adjust the strength up or down via the slider, or type in an exact value for the strength of the ambient glow.
Opacity Strength -
This is the transparency setting in Daz Studio. Adjust the slider up or down to change the level of transparency of the selected material zone. Again, in the above screenshot, you see the box with the downward pointing arrow - that is where you would assign a transmap to a selected surface. The Opacity slider works with or without a transmap applied.
Bump Strength -
Works similar to Poser's bump settings. Assign a greyscale map in the box to the left (white triangle if nothing is assigned), and adjust the slider up or down for the strength.
Negative Bump -
This is where you set how far inward/downward you want the bump map to affect the surface. Go gently on the values with this; it's very common to only use -.10, or maybe -.25 values in both this and the Positive Bump. Some surfaces need a full 1.0 or -1.0 value, but these are pretty rare.
Positive Bump -
This is where you set how far upward/outward you want the bump map to affect a selected surface.
Displacement Strength -
Yup. This is where you assign a displacement map to a surface. Click on the box to the left with the arrow to select your map, and then a slider will appear for you to adjust the strength of the displacement effect.
Minimum/Maximum Displacement -
These two sliders work the same way as the Positive/Negative Bump sliders do, except that the affect only the displacement settings on a surface.
Normal Map -
This is where you can assign a normal map to a surface. In the dzDefault shader, you cannot control the strength of the normal map on the surface, but you can assign one here. I use normals often for skins, to avoid the clothing headaches that displacement creates.
Reflection Color -
Just like in Poser. You assign a reflection map here, as well as the color of the reflection. If you want TRUE reflections, just set the color and Stength value, and do NOT assign a map. True reflections take a little longer to render, but IMO, they look much more believable than a reflection map. I only use reflection maps for small surfaces like shirt buttons, belt buckles, or door hinges/knobs.
I do want to take a moment here to make a note regarding true reflections. I'm not sure how it works these days in Poser, but in Daz Studio, if you are using True Reflections, you have to have something for the surface to REFLECT. So if all you have in the scene is a single object, and you set your Reflection properties, you won't get a reflection. You have to have walls, other objects, or a skydome, something like that in the scene for the surface to reflect when it renders.
This property will NOT be visible when using the "Matte" lighting model.
Reflection Strength -
Also like Poser. You adjust the strength of the reflection up or down on this slider.
This property will NOT be visible when using the "Matte" lighting model.
Refraction Color -
Assign a refraction map (I would assume, based on the presence of the box/triangle) here, as well as the color of the refraction here.
This property will NOT be visible when using the "Matte" lighting model.
Refraction Strength -
Assign the strength of Refraction on this slider.
This property will NOT be visible when using the "Matte" lighting model.
Index of Refraction -
Again, I'm just not entirely sure what this does, other than it has to do with Refraction.
This property will NOT be visible when using the "Matte" lighting model.
Horizontal/Vertical Tiles -
This is where you can adjust how many times a tiling texture will tile on a surface. The default, of course, is 1.
Horizontal/Vertical Offset -
This allows you to sort of "slide" the texture alonng the horizontal or vertical axis of a surface. It might sound like a silly property to have, but it's actually very useful for many things.
UV Set -
This applies more to the Genesis figures which have multuple UV sets that they can use. If using Genesis 1, for instance, clicking in this box, I can choose to use the M4 UVs, or V5 UVs, or the Genesis 2 UVs, etc. Whatever UV sets are installed for a figure, you can choose between them here. This affects only the selected surfaces. If you want the entire Genesis 1 figure to use, say, the Kids 4 UVs, you would select ALL of the figure's material zones and then set the UV option.
Smooth -
I'm actually not sure what this does. LOL. I've tried rendering with it on and with it off, and I can't see any differences. By default, it's enabled, and I pretty much just ignore it.
Angle -
See my comment for "Smooth."
---------------------
I'm going to cover the "Skin" lighting model properties in a separate post, as I really think they're best demonstrated with a couple of example renders to show the effect.
Last edited:
