• Welcome to the Community Forums at HiveWire 3D! Please note that the user name you choose for our forum will be displayed to the public. Our store was closed as January 4, 2021. You can find HiveWire 3D and Lisa's Botanicals products, as well as many of our Contributing Artists, at Renderosity. This thread lists where many are now selling their products. Renderosity is generously putting products which were purchased at HiveWire 3D and are now sold at their store into customer accounts by gifting them. This is not an overnight process so please be patient, if you have already emailed them about this. If you have NOT emailed them, please see the 2nd post in this thread for instructions on what you need to do

Help Me Save This from the Scrap Heap

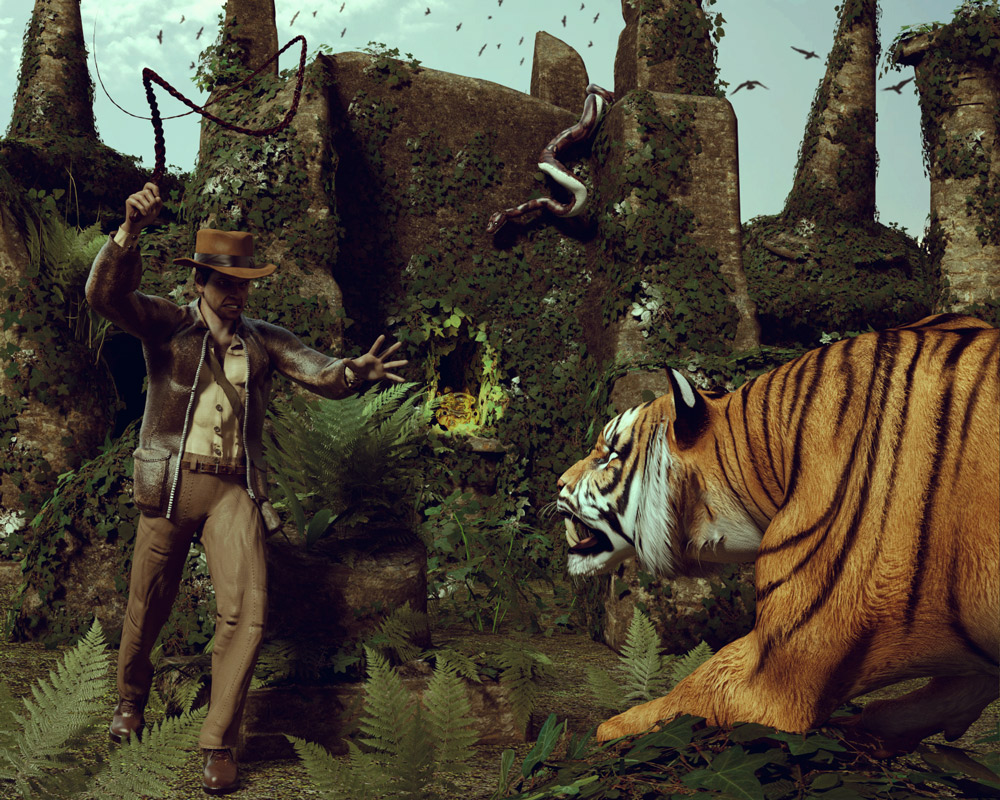
I hope I posted this in the correct forum! I worked on this scene for three days straight and now I'm almost sick of looking at it. It just doesn't look right to me somehow but I don't know how to fix it to make it look "right". Can you help me improve it? It's basically Indiana Jones vs. the Hivewire Tiger while in pursuit of a golden idol. :) Thank you for any and all suggestions!

Render-14b.jpg
 

Janet

Dances with Bees
Contributing Artist
Looks good to me! Maybe try turning the camera a bit to that Indy is more towards the middle and you see more of the back of the tiger. Also maybe try lighting Indy's face a bit more as that the most important bit. Just my 0.000002 cents.
 

Flint_Hawk

Extraordinary
I think your picture holds a lot of promise Dream9Studios! Here are 2 tips that I got from my art professors: 1- flip the picture horizontally to get a "new" look at it. 2- Put the picture away for a few days, don't even glance at it. Then when you do feel like working on it again, it will be fresh. I hope this helps.
 

Miss B

Drawing Life 1 Pixel at a Time
CV-BEE
What strikes me with "scenic" renders is the Rule of Thirds. I think, and this is my own personal opinion and not necessarily an expert's advice, that Indy is too close to the Tiger, and too close to the front of the image. I would suggest you move him back to just before the boulder that's behind him to raise him up a bit, as it looks like the terrain is a mountain, so not level.

That will make him slightly more dominant. You will, of course, need to change the camera angle a bit so you don't lose any of his whip in the render. Perhaps lowering the camera a bit, and changing the rotation would help with that so you're looking up at him, rather than straight forward at him. I'm a Poser user, so I would be fiddling with the Main Camera's xOrbit. I don't have my old DS 3A on this laptop, so I don't recall what it's called in DS, but I'm sure you probably can figure that out easily enough if you're using DS 4.12.

Here's a link to Wikipedia where there's an image that will show you want it's all about if you've never come across this before. Rule of Thirds.

I know Dreamlight had set up a plugin for the older versions of DS to use Rule of Thirds, but I don't recall if my DS 4.0P also had it, or if it needed to be updated for the later versions of DS.

Anyway, that's my 2¢ for what it's worth.
 
I should have probably mentioned in my original post that I'm working in Poser 11. Poser 11 Superfly to be specific. I don't think it will let me edit it now.

I've never heard of the Rule of Thirds before. I'll have to read through that link now! I'm surprised I never learned about it in any of my art classes though maybe I did and just forgot as that was quite a while ago. LOL

You've all given me such great suggestions. I'm working on another scene right now but since one of Flint's suggestions was to put it away for a few days then come back to it, that's what I'll do. Keep the suggestions coming if you can. Once I finish the scene I'm working on now, I'll come back to this one and implement all the suggestions and see what I can come up with anew. :)

Thank you all ever so much! I'm sure Indy and the tiger will thank you too. :D
 

Stezza

Dances with Bees
I don't like giving critique as a rule as my thoughts are more than likely totally different to what the artist is..

but seeing as you asked....

first off, the image has a lot going on and so for me does not really give me a focus point to hit on.. whether it be the fella or the tiger or something else that's in the image.

What I would do is try and put more focus on the fella... by adding some extra lighting just for him so to see his face

I would also change the camera angle ( I dunno how to in Poser or DS ) but in Carrara I would use a 35mm camera with depth of field turned on so the focus on the background is blurred slightly. Move the tiger back as at the moment it is level with the fella but to the left of him and he is looking and showing his hand ahead of him.

so four things I would change

depth of field
camera angle
lighting
and placement of figures

and remember these are just my own personal ways of setting up, everyone is different which sets us all apart but I hope you get some useful info from everyone who contributes here so you can be satisfied with any adjustments you may make.

Render onwards :flower02: :inverted:
 

Miss B

Drawing Life 1 Pixel at a Time
CV-BEE
I've never heard of the Rule of Thirds before. I'll have to read through that link now! I'm surprised I never learned about it in any of my art classes though maybe I did and just forgot as that was quite a while ago. LOL
Actually, I don't think Rule of Thirds is an option for artists, so to speak. I think it's more a photography option so photographers could get the best view for their photographs. That said, using it for setting up your artwork isn't a bad idea either. ;)

Oh, and one of the other options I had in DS that was part of the plugin, was the Golden Spiral, though that's based on math more than anything, but Dreamlight had added an option to give you the Spiral so you could pick the center point of attention. Wikipedia has a page on that as well, though the animated image they have shows how the Spiral keeps growing and duplicating itself endlessly. I usually stick with Rule of Thirds as it's easier to deal with. :D
 

Pendraia

Sage
Contributing Artist
Lots of good suggestions. I agree with the idea of rotating the camera slightly...I would also look at adding more lighting to emphasis the main focus...this might also be achieved by using a touch of depth of field to slightly blur the items in the background.
 

Doc Acme

Motivated
Two really simple suggestions: Change your Camera aspect to something more horizontal; 16:9 is the HD standard these days. That will open things up a great deal. You've a lot going on there; give it some breathing room. You might end up tweeking the comp just from that.

Secondly, since your using Superfly, take advantage of that & put the scene into an HDR environment. That will add a lot of SNAP & details in the shadow areas.

There. Now you've another 2¢.
 

Rae134

Renowned
CV-BEE
Contributing Artist
I'm crap at lighting in poser (I'm a Daz user and use Iray with HDRi lighting mostly) so I'm not going to be much help, but I'm finding there's a cyan cast to the image that I assume is from the lighting? I think its making everything similarly toned/coloured (pretty sure the Tiger should be a bit more orange than it is).

I'm a bit of a fan of 16:9 ratio (its the HW promo size and since I do a fair bit of promos that's my go to size lol) and if you have a go like Doc Acme said above it might give your image a bit of room to breath? (you can always save a copy and if you don't like it you can always go back to your original size)
 
I've been working on this again this evening and here's what I've accomplished so far. I might lengthen the height of the canvas a little because it seems a little short to me but then I'm not used to working in 16:9 ratio so that might be it. I usually work in 4:5 or 5:7 for sake of easy printing. I do like the extra width though. :)

Here's what I did besides changing the canvas' ratio:
1. Moved Indy over to the right and back a little ways. He's now resting his foot on the broken pillar so he's slightly raised above the ground. I also adjusted his head and eyes to focus on the tiger from his new position.
2. Added a second light just to illuminate Indy.
3. Moved the camera around to the right and then upwards via the x-axis.
4. Turned on depth of field.
5. Increased the brightness of my "sun" light and increased the strength of its shadows slightly.
6. Repositioned the tiger slightly and moved its paw up to bare its claws for a little extra action.
7. Moved the snake over because it looked like it was too close to the tiger with everything else that was moved.
8. Postwork was completely different. Just added a curves and color balance adjustment layers.

This is definitely looking WAY better than my original!

Render-19.jpg
 

Stezza

Dances with Bees
yep, big improvement and just some simple tweaks were done, awesome :flower02:

I don't know if you want anymore input, but I would have the tiger roaring with it's head tilted to the side at the fella and I would have the snake with it's tongue out hissing and pull back the reflection on the snake. For the lighting I'd investigate some edge lighting techniques ;-)

and the glowing leaves is distracting for me, not knowing what it should be doesn't add to the scene so I'd tone it down as well and try for some more background blur...

going great guns now though :applause:
 

Stezza

Dances with Bees
a great challenge would be HW3D providing a basic scene file similar to this and everyone do their thing with it... imagine all the different techniques/results you would get.. and what could be learnt.. and the fun that could be had...

sorry..... just daydreaming again.... :inverted: o_O:shineon:
 
a great challenge would be HW3D providing a basic scene file similar to this and everyone do their thing with it... imagine all the different techniques/results you would get.. and what could be learnt.. and the fun that could be had...

sorry..... just daydreaming again.... :inverted: o_O:shineon:

That would be cool! Maybe we could suggest it as the next render challenge! :D
 

Miss B

Drawing Life 1 Pixel at a Time
CV-BEE
With his claws extended, NOW the tiger looks like he's about to strike. I also agree with Stezza that a bit more background blur would work well, so perhaps play with the DoF settings some more.
 
With his claws extended, NOW the tiger looks like he's about to strike. I also agree with Stezza that a bit more background blur would work well, so perhaps play with the DoF settings some more.

So far I haven't figured out how to blur the background elements more without blurring the foreground elements too much. I wanted the temple in the background to blur far more than the tiger but this is what the render did. Superfly can be weird or I just haven't figured out all its intricacies yet. I might just render it in pieces and blur it myself in Photoshop if I can't figure it out soon.
 

Stezza

Dances with Bees
In Carrara it's a very simple process but because I don't use DS or Poser I'm afraid I'm of no help with that, other than using postwork in your graphics program.. sorry ;)
 

Pendraia

Sage
Contributing Artist
I don't use poser, so I'm not any help either...does anyone know why the emoticons and other menu items are all greyed out or is it just mine?
 
Top