-
Welcome to the Community Forums at HiveWire 3D! Please note that the user name you choose for our forum will be displayed to the public. Our store was closed as January 4, 2021. You can find HiveWire 3D and Lisa's Botanicals products, as well as many of our Contributing Artists, at Renderosity. This thread lists where many are now selling their products. Renderosity is generously putting products which were purchased at HiveWire 3D and are now sold at their store into customer accounts by gifting them. This is not an overnight process so please be patient, if you have already emailed them about this. If you have NOT emailed them, please see the 2nd post in this thread for instructions on what you need to do
You are using an out of date browser. It may not display this or other websites correctly.
You should upgrade or use an alternative browser.
You should upgrade or use an alternative browser.
SKYLAB CHAT
- Thread starter skylab
- Start date
Sky, here you go!! Sorry this took me so long to put together... but it's finally done for you.
Hope it helps.
---------------------
I think a couple of quick notes on building poses is necessary first --
I don't know how others do it, but when I am building my poses in DS, I make sure not to use the "body" part of the figure to do any translation work. I always select the "hip" body part when I need to move or rotate the figure around the x/y/z axis. The reason for this is because you don't want your pose to send the figure flying back to the Zero starting point in the scene when someone applies it.
This is important, because if someone has just spent three hours getting their scene arranged and their figure into position, the last thing they want when they go to apply your pose, is to have their figure suddenly pull a Houdini and do a disappearing act on them.
So. Always use the "hip" body part for any needed translations or rotations. This will allow the end user to apply your pose without having to go play Find Waldo afterwards.
The second thing of note about building poses in Studio --
Don't save the morphorms/posing morphs. This would be things like eyes side-to-side, hand grasps, finger spreads, etc. You don't want these saved, really. I know some folks build their poses using these posing morphs, but ideally, for the human figures at least, I prefer to be posing the fingers and hands by their individual body parts. In the case of our Dusk, Dawn, and Baby Luna, this goes for their individual toes as well, if your pose requires it. The reason I don't use these posing morphs when I build my poses, is because it can complicate things later on for the end user.
Now, we're going to assume that you have your pose built, and your figure is positioned the way you want it for the save to the library. So, moving forward with the actual save process now...
1.) Go to your SCENE tab. Make sure your figure is selected.
2.) Now go to your CONTENT LIBRARY tab. Navigate to the place inside of the library that you want to save the pose. If need be, you can create a new folder to save the pose to.
3.) Once you're looking at the folder that you want the pose saved to, look down to the bottom LEFT hand corner of your content library window. Find the plus sign (+), and click that. A fly-up menu will open.
4.) Select "POSE PRESET" from the menu options :
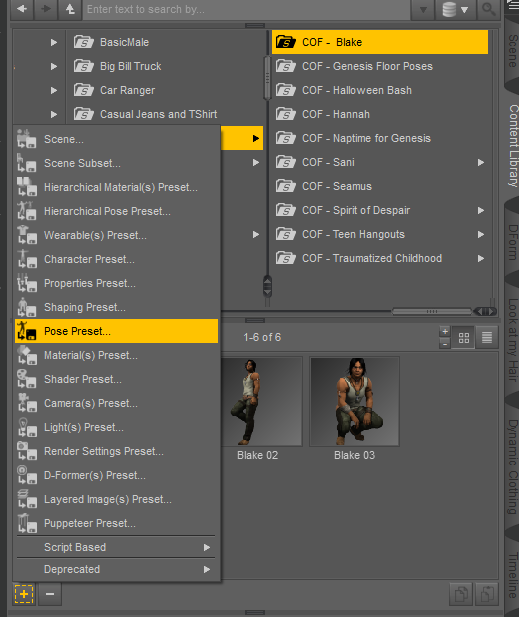
5.) This will open a windows dialogue box. Read the folder name in the dialogue box, just to make sure that it's going to save the pose in the right place. If it's showing the wrong folder, go ahead and navigate via the windows dialogue to the right folder. Type in a name for your pose, and hit "SAVE."
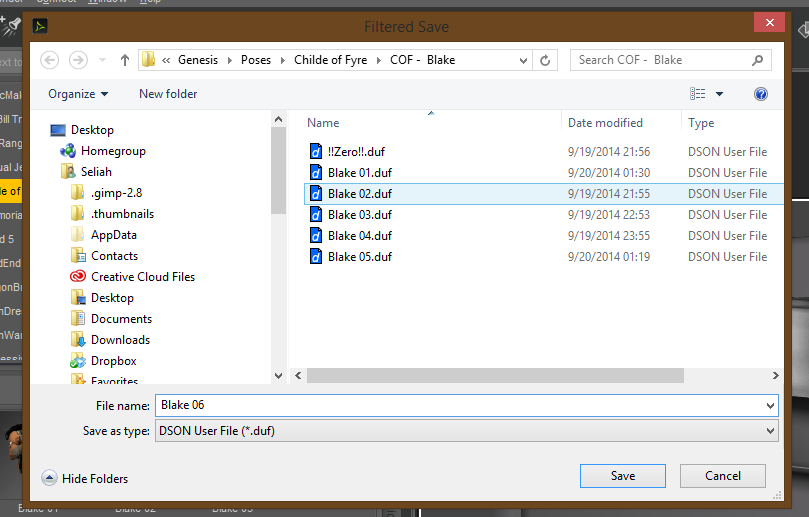
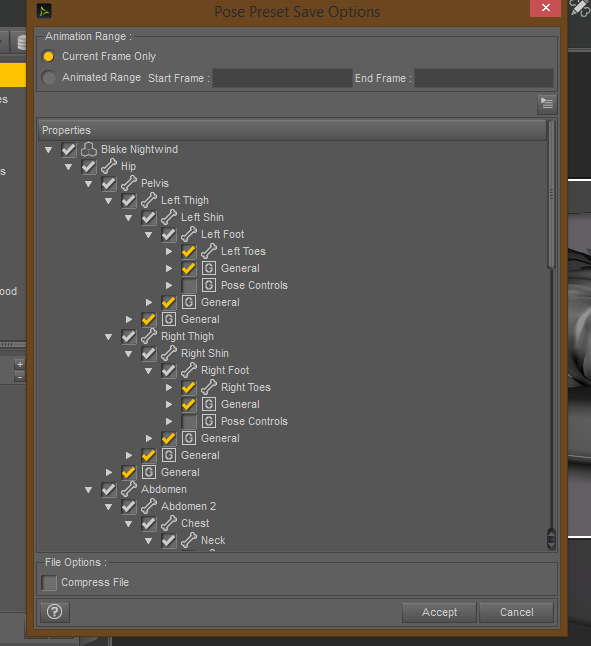
6.) Now, a new box will open in the Studio interface. This is your "Pose Preset Save Options" window :
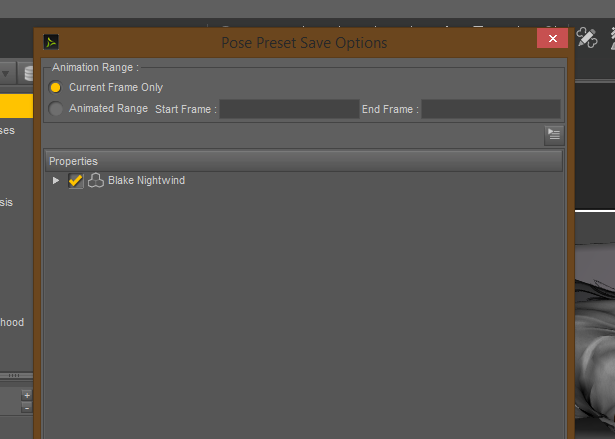
7.) By default, when saving a new pose, everything is always collapsed. You see the little white triangle next to the figure's name? Click that in order to expand the list.
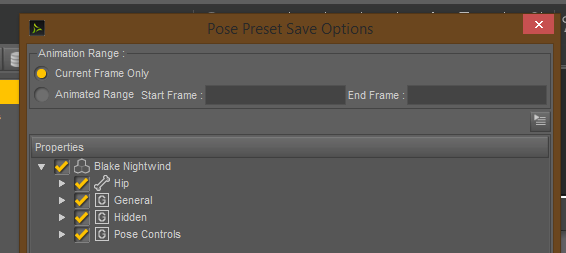
8.) Now, you begin de-selecting the things you do NOT want included in the Pose preset. The first thing I do here, is UN-check "General," "Hidden," and "Pose Controls." Always.
Then I expand the "Hip" body part :
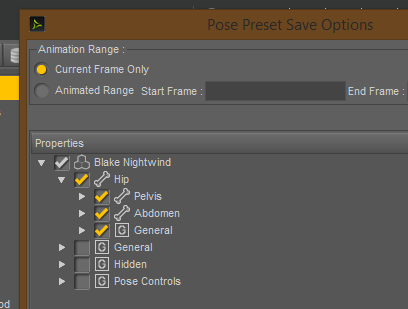
9.) Now, because I'm using Genesis 1 for this particular pose preset, I know where all the stuff is that I do NOT want saved as part of the pose. LOL. If you're not familiar with the layout in this part of things, you might want to spend some time just clicking through everything to see what is contained where, until you're comfortable with, or at least familiar with, how things are laid out. Each figure is a little different...
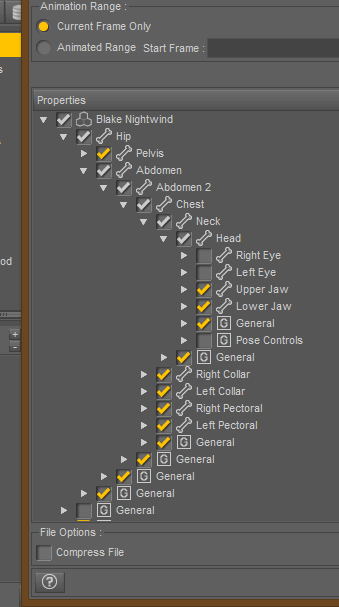
I do not want to save any Posing Morph information with this pose. I also do not want to save any EYE or MOUTH translations, just in case the end user has set up a facial expression that they're happy with. So I'm going to expand the whole shebang all the way out, clicking on the triangle next to Abdomen, and just continuing on until I have all of the head expanded.
Then, I'm going to UN-check the Right Eye, Left Eye, and the POSE CONTROLS sections for the head :
10.) Now, you see where the RIGHT COLLAR and LEFT COLLAR are listed? In the case of Genesis 1, because I've saved a zillion poses for this figure, I already know there are additional POSE CONTROLS for the hands. So starting at the collars, I am going to expand all the way down to the hands, and then UN-check the POSE CONTROLS for each hand :
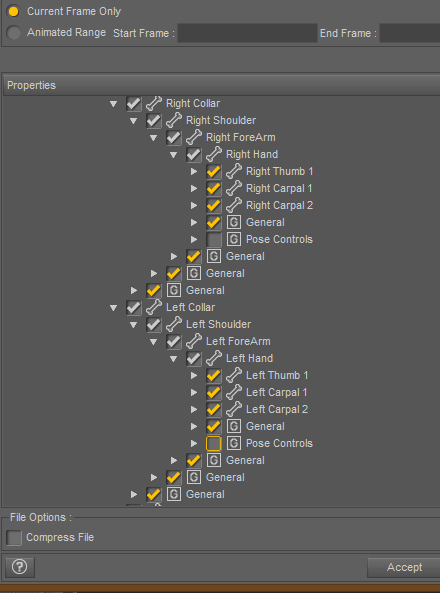
Yes, the list can get quite a bit lengthy on this part, but to save poses correctly, we really should go through and click off all of these things. Otherwise my poses will muck up someone's hard work on a facial expression or scene positioning.
Once you've UN-checked the POSE CONTROLS for the hands and head parts, you can go ahead and scroll back up until you see the ABDOMEN body part. Click the triangle again to collapse this part of the list, if it's easier for your eyes to follow.
11.) Now, you want to start EXPANDING the list again, beginning from the PELVIS body part. Go all the way to the feet, because like with the hands, in my case, Genesis 1 also has POSE CONTROLS on it's feet. So expand all the way down to the feet, and UN-check the POSE CONTROLS for each foot :
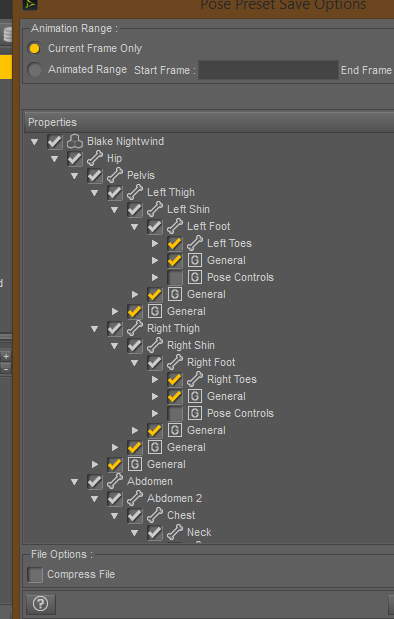
12.) Now, for a "full body pose," I am actually done with the preset save options. Make sure that "Compress File" at the bottom of the options window is UNCHECKED when you save! If for whatever reason you ever need to go in and edit the text of the file, you will NOT be able to do this if the file was saved with compression ON, and Daz Studio does by default, save with compression ON, until you turn that off.
So, you'll notice that "Compress File" in my screenshot above is NOT selected. I've already chosen all the body parts and UN-checked the posing controls and full-body translations. I'm good to go, this is ready to save.
So... at this point, you can go ahead and click on the ACCEPT button on the bottom right of the options window :
Your pose is now saved for distribution, and the new icon should appear in the folder in your Content Library, colored in blue and with a big "NEW" marker printed on it :
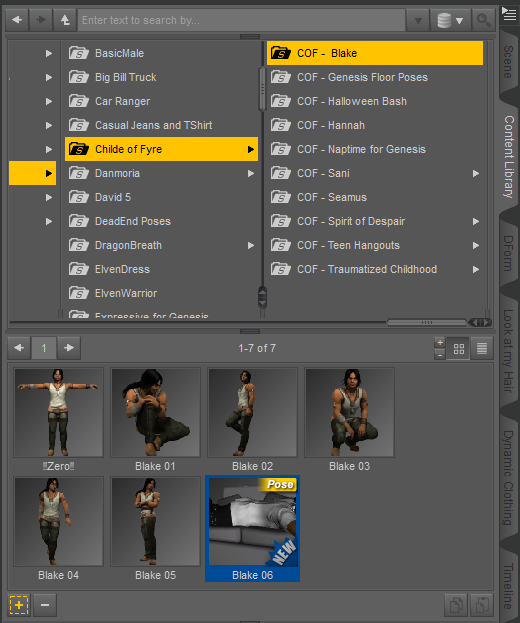
If you click the icon, the blue color and the "NEW" marker will go away.
One last, final note on the save process. For saving a partial pose, you would go through and do the same thing. However, sometimes it's easiest to just UN-check the BASE figure name, and simply expand the list out and SELECT the specific body parts for saving.
I don't know how much partial-pose saving you do, but I at least usually distribute at LEAST an upper/lower partial with my poses, so I make use of that trick a lot myself. It saves me a TON of time... rather than UN-checking a gazillion body parts, I can just uncheck the whole figure, and then select ONLY the bits I want saved for a partial pose.
---------------------------
That's the basics of saving a new pose to the DS content library. To distribute the pose, you just navigate to the folder in your Windows Explorer, and make sure you collect both the "Pose.duf" and the "Pose.duf.png" files for packaging and distribution.
Hope this helps.
Hope it helps.
---------------------
I think a couple of quick notes on building poses is necessary first --
I don't know how others do it, but when I am building my poses in DS, I make sure not to use the "body" part of the figure to do any translation work. I always select the "hip" body part when I need to move or rotate the figure around the x/y/z axis. The reason for this is because you don't want your pose to send the figure flying back to the Zero starting point in the scene when someone applies it.
This is important, because if someone has just spent three hours getting their scene arranged and their figure into position, the last thing they want when they go to apply your pose, is to have their figure suddenly pull a Houdini and do a disappearing act on them.
So. Always use the "hip" body part for any needed translations or rotations. This will allow the end user to apply your pose without having to go play Find Waldo afterwards.
The second thing of note about building poses in Studio --
Don't save the morphorms/posing morphs. This would be things like eyes side-to-side, hand grasps, finger spreads, etc. You don't want these saved, really. I know some folks build their poses using these posing morphs, but ideally, for the human figures at least, I prefer to be posing the fingers and hands by their individual body parts. In the case of our Dusk, Dawn, and Baby Luna, this goes for their individual toes as well, if your pose requires it. The reason I don't use these posing morphs when I build my poses, is because it can complicate things later on for the end user.
Now, we're going to assume that you have your pose built, and your figure is positioned the way you want it for the save to the library. So, moving forward with the actual save process now...
1.) Go to your SCENE tab. Make sure your figure is selected.
2.) Now go to your CONTENT LIBRARY tab. Navigate to the place inside of the library that you want to save the pose. If need be, you can create a new folder to save the pose to.
3.) Once you're looking at the folder that you want the pose saved to, look down to the bottom LEFT hand corner of your content library window. Find the plus sign (+), and click that. A fly-up menu will open.
4.) Select "POSE PRESET" from the menu options :
5.) This will open a windows dialogue box. Read the folder name in the dialogue box, just to make sure that it's going to save the pose in the right place. If it's showing the wrong folder, go ahead and navigate via the windows dialogue to the right folder. Type in a name for your pose, and hit "SAVE."
6.) Now, a new box will open in the Studio interface. This is your "Pose Preset Save Options" window :
7.) By default, when saving a new pose, everything is always collapsed. You see the little white triangle next to the figure's name? Click that in order to expand the list.
8.) Now, you begin de-selecting the things you do NOT want included in the Pose preset. The first thing I do here, is UN-check "General," "Hidden," and "Pose Controls." Always.
Then I expand the "Hip" body part :
9.) Now, because I'm using Genesis 1 for this particular pose preset, I know where all the stuff is that I do NOT want saved as part of the pose. LOL. If you're not familiar with the layout in this part of things, you might want to spend some time just clicking through everything to see what is contained where, until you're comfortable with, or at least familiar with, how things are laid out. Each figure is a little different...
I do not want to save any Posing Morph information with this pose. I also do not want to save any EYE or MOUTH translations, just in case the end user has set up a facial expression that they're happy with. So I'm going to expand the whole shebang all the way out, clicking on the triangle next to Abdomen, and just continuing on until I have all of the head expanded.
Then, I'm going to UN-check the Right Eye, Left Eye, and the POSE CONTROLS sections for the head :
10.) Now, you see where the RIGHT COLLAR and LEFT COLLAR are listed? In the case of Genesis 1, because I've saved a zillion poses for this figure, I already know there are additional POSE CONTROLS for the hands. So starting at the collars, I am going to expand all the way down to the hands, and then UN-check the POSE CONTROLS for each hand :
Yes, the list can get quite a bit lengthy on this part, but to save poses correctly, we really should go through and click off all of these things. Otherwise my poses will muck up someone's hard work on a facial expression or scene positioning.
Once you've UN-checked the POSE CONTROLS for the hands and head parts, you can go ahead and scroll back up until you see the ABDOMEN body part. Click the triangle again to collapse this part of the list, if it's easier for your eyes to follow.
11.) Now, you want to start EXPANDING the list again, beginning from the PELVIS body part. Go all the way to the feet, because like with the hands, in my case, Genesis 1 also has POSE CONTROLS on it's feet. So expand all the way down to the feet, and UN-check the POSE CONTROLS for each foot :
12.) Now, for a "full body pose," I am actually done with the preset save options. Make sure that "Compress File" at the bottom of the options window is UNCHECKED when you save! If for whatever reason you ever need to go in and edit the text of the file, you will NOT be able to do this if the file was saved with compression ON, and Daz Studio does by default, save with compression ON, until you turn that off.
So, you'll notice that "Compress File" in my screenshot above is NOT selected. I've already chosen all the body parts and UN-checked the posing controls and full-body translations. I'm good to go, this is ready to save.
So... at this point, you can go ahead and click on the ACCEPT button on the bottom right of the options window :
Your pose is now saved for distribution, and the new icon should appear in the folder in your Content Library, colored in blue and with a big "NEW" marker printed on it :
If you click the icon, the blue color and the "NEW" marker will go away.
One last, final note on the save process. For saving a partial pose, you would go through and do the same thing. However, sometimes it's easiest to just UN-check the BASE figure name, and simply expand the list out and SELECT the specific body parts for saving.
I don't know how much partial-pose saving you do, but I at least usually distribute at LEAST an upper/lower partial with my poses, so I make use of that trick a lot myself. It saves me a TON of time... rather than UN-checking a gazillion body parts, I can just uncheck the whole figure, and then select ONLY the bits I want saved for a partial pose.
---------------------------
That's the basics of saving a new pose to the DS content library. To distribute the pose, you just navigate to the folder in your Windows Explorer, and make sure you collect both the "Pose.duf" and the "Pose.duf.png" files for packaging and distribution.
Hope this helps.
skylab
Esteemed
Seliah, thank you so much for doing this. I can already see where I've been making one consistent mistake in workflow...I select the body, and not the hip, for positioning. This is because I'm usually fighting with clothing on the figure, and it was easier to just select the whole body than reach through pants or whatever to get to the hip. That's what causes my poses to sometimes make the figure do the "where did he go" routine...haha. I'll change how I do that and see if it makes a difference. Can you tell, completely self-taught...so can't blame anybody but me 
You didn't ask for this, and if you object, we can get the mods to delete this post, but I turned your instructions into a PDF that would be easier to see during the learning process....and who knows, you might want to upload it somewhere as a tutorial. If you want anything changed, I can do that, since I began with a Word .doc, and converted it to PDF.
Again, thank you for taking the time to share this. It not only will help me learn DS4 poses, but how to improve the Poser stuff too. I'm attaching your PDF here.
Attachments
skylab
Esteemed
Seliah, I use Dropbox, if you want any of these files passed to you.
Hey Sanbie....yes, sure was glad that someone finally came up with a zapper for that mess. Nothing like having pop ups on your own desktop, and even removing what I thought were the applicable updates manually would not get rid of that thing. When I restored my laptop to factory I locked it down so it never downloaded that mess, but my workstations both had it. Got enough problems with malfunctioning flash and critical updates without that daily reminder of the aggravation. One workstation indicated that they had slipped the installation file in on me....grrrrr....read my lips....no.
Hey Sanbie....yes, sure was glad that someone finally came up with a zapper for that mess. Nothing like having pop ups on your own desktop, and even removing what I thought were the applicable updates manually would not get rid of that thing. When I restored my laptop to factory I locked it down so it never downloaded that mess, but my workstations both had it. Got enough problems with malfunctioning flash and critical updates without that daily reminder of the aggravation. One workstation indicated that they had slipped the installation file in on me....grrrrr....read my lips....no.
Seliah, thank you so much for doing this. I can already see where I've been making one consistent mistake in workflow...I select the body, and not the hip, for positioning. This is because I'm usually fighting with clothing on the figure, and it was easier to just select the whole body than reach through pants or whatever to get to the hip. That's what causes my poses to sometimes make the figure do the "where did he go" routine...haha. I'll change how I do that and see if it makes a difference. Can you tell, completely self-taught...so can't blame anybody but me
In Poser, it's much easier to select the whole body than navigating the dropdowns or trying to reach through the clothing for the hip, yes. I agree totally. LOL
Inside of Daz Studio, though, you'll find that unless you have a body part set to be NOT SELECTABLE, it's actually quite simple to just reach and click on the hip for posing usage.
I'm completely self-taught myself as well, insofar as doing poses for Poser. I started making poses for distribution back around the Victoria 2 era. LOL Now, when I first migrated over to Daz Studio, I was going NUTS trying to figure out how to do it, and a couple of folks in my Skype helped walk me through the DS save process.
You didn't ask for this, and if you object, we can get the mods to delete this post, but I turned your instructions into a PDF that would be easier to see during the learning process....and who knows, you might want to upload it somewhere as a tutorial. If you want anything changed, I can do that, since I began with a Word .doc, and converted it to PDF.
Again, thank you for taking the time to share this. It not only will help me learn DS4 poses, but how to improve the Poser stuff too. I'm attaching your PDF here.
No, no, I don't object at all, Sky! Thank you. LOL I feel like it's Christmas tonight, Sanbie did the same thing with the mini/quickie tut over on the Lola dynamics thread, too!
I actually appreciate you doing that, as I have never been happy with any PDF I've tried to make. This is why my tuts usually wind up getting distributed as a zip file with a Word Document, .RTF document, and a "visual" (screens-only with lots of text on the screenshots) version. Yes, I will probably put it up on my site, and I'll credit you for making the PDF conversion. Thank you!
And it's no problem at all. It sometimes takes me a little bit of time to get stuff like this put together (gotta love that ADD brain...) but it does eventually get done! LOL
skylab
Esteemed
Great, I'm glad it can help you in return  Any time you need something like that done, I can do stuff like that in my sleep. I'd be interested in Sanbie's Lola tut as well, so let me know when you get it posted. I've been following that thread by the way, and I can see that everyone is turning cartwheels over having the new script, but watching carefully should it displease the powers that be....haha. Back in the early days of DS, that's literally how it developed....a skeleton of a program with a ga-zillion plug-ins.
I thought I'd try some test poses in Poser 11 using Andy to see if that method makes a difference in how the figure "lands" in the scene, and also thought it would be a good time to test Superfly mats....and was surprised at the effortless rendering result using "ghost"....hmmm....I'll be wanting to try Iray as soon as I can get DS upgraded.
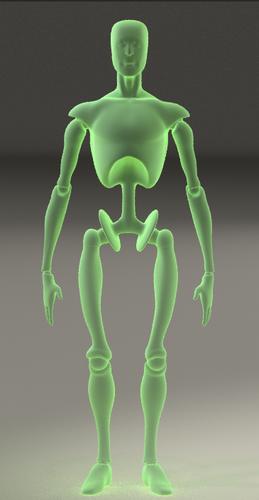
I thought I'd try some test poses in Poser 11 using Andy to see if that method makes a difference in how the figure "lands" in the scene, and also thought it would be a good time to test Superfly mats....and was surprised at the effortless rendering result using "ghost"....hmmm....I'll be wanting to try Iray as soon as I can get DS upgraded.
Well, what the method does, is applies the pose without whisking the figure away to who-knows-where in the scene. If the pose is meant to set the figure up on, say, a horse's back, the figure will still move into the air (provided the hip translations moved them up there). But they won't fly out of the window or go back to Loading Position, or anything like that.
I do remember all the little plugins being developed in the early DS days, yes. And honestly, a lot of what we do DOES still use those plugins. The wolf fur that I used on Hannah's recent render is a plugin developed by AlessandroAM for Daz Studio. It's called Look At My Hair, and it's specifically for making animal furs like that. Nekkid wolf is not pretty. Wolf with fur is purrrty though.
  LOL
LOL
I'll let you know once I update my site with the two PDF's. For right now, you can find the post right on the last page of the dynamics thread, though. That's the one Sanbie converted to PDF. ^_^ The biiiig one.
[Edit] Here's the link to the post Sanbie converted to PDF :
Who is lola69 and does his/her script work?
And yeah, we have been waiting for proper access to dynamic cloth in DS for a LONG time now. I at least, am tired of Optitex holding DS and it's artists for ransom... so I'm also watching another thread over on the Daz forums with a separate dynamic thing that's being developed... and hoping hoping hoping that the developer releases a DS version of it. *crosses fingers* I would LOVE to be able to MAKE dynamics that are legal for distribution...
I do remember all the little plugins being developed in the early DS days, yes. And honestly, a lot of what we do DOES still use those plugins. The wolf fur that I used on Hannah's recent render is a plugin developed by AlessandroAM for Daz Studio. It's called Look At My Hair, and it's specifically for making animal furs like that. Nekkid wolf is not pretty.
I'll let you know once I update my site with the two PDF's. For right now, you can find the post right on the last page of the dynamics thread, though. That's the one Sanbie converted to PDF. ^_^ The biiiig one.
[Edit] Here's the link to the post Sanbie converted to PDF :
Who is lola69 and does his/her script work?
And yeah, we have been waiting for proper access to dynamic cloth in DS for a LONG time now. I at least, am tired of Optitex holding DS and it's artists for ransom... so I'm also watching another thread over on the Daz forums with a separate dynamic thing that's being developed... and hoping hoping hoping that the developer releases a DS version of it. *crosses fingers* I would LOVE to be able to MAKE dynamics that are legal for distribution...
skylab
Esteemed
Sure, I can see why....and I'd like to see a "hair room" equivalent in DS. Sometimes I play around in there with toon characters, Nursoda's stuff mostly. That's one thing I'd be interested in doing, is being able to use the Nursoda characters in DS. I've already heard that rigging is easier in DS now. And the only other thing that I do is, of course, animations. I'd have to re-learn the process in DS. Having dynamic clothing in DS would save content creators a lot of rigging headaches, so I can see why for the enthusiasm.
Sure, I can see why....and I'd like to see a "hair room" equivalent in DS. Sometimes I play around in there with toon characters, Nursoda's stuff mostly. That's one thing I'd be interested in doing, is being able to use the Nursoda characters in DS. I've already heard that rigging is easier in DS now. And the only other thing that I do is, of course, animations. I'd have to re-learn the process in DS. Having dynamic clothing in DS would save content creators a lot of rigging headaches, so I can see why for the enthusiasm.
I don't have any of Nursoda's characters, so I'm not sure if they would work or not in DS.
Rigging is light years easier in Studio than it has EVER been in Poser.
For me, the big deal of having the dynamic cloth as an option is just to get the realistic draping. Conforming cloth only carries us just so far. You reach a point where you've hit the limits of what a conformer/boned system can do and then you really need the soft body physics, or some serious postwork skills to fix the unrealistic drape of a conformer in a render.
I'm not sure how animation works inside of DS, as I do not do ani's myself. My renders are all single frame still images... usually story-based renders from my creative writing...
skylab
Esteemed
I've collected almost all of them over the years, through various sales and a couple Nursoda himself sent to me to show appreciation for all the "entertaining" I'd done with his stuff. I was never into the "sweet" toony stuff...but his characters always had an air of mischief that was, for me, irresistible 
Another surprising superfly result...andy in stone...haha.
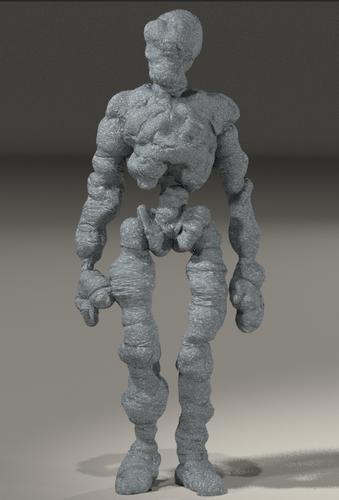
Another surprising superfly result...andy in stone...haha.
I've collected almost all of them over the years, through various sales and a couple Nursoda himself sent to me to show appreciation for all the "entertaining" I'd done with his stuff. I was never into the "sweet" toony stuff...but his characters always had an air of mischief that was, for me, irresistible
Another surprising superfly result...andy in stone...haha.
View attachment 3644
I always loved the look of his figures, and for the same reason. I just could never justify buying them, because I knew I simply would not use them often enough for my own renders.
And wow! Stone Andy really blew up! LOL
We just hit 8 degrees here...brrr...Jo and I are toasty warm though in our kitchen
Another interesting superfly Andy result...snow:
View attachment 3646
You look like you're having fun with the SuperFly materials. That one is interesting!
skylab
Esteemed
I can remember years ago, folks were creating "stone monsters"...the stone superfly mat literally turned Andy into a rigged stone monster...I didn't fiddle with the settings at all. D3D's mats, and they also have a tutorial.
Hehe yeah... do you remember the old (really old) Elementals from Daz? This is going back, gah, maybe ten years? LOL
I still use those buggers! ^_^
I still use those buggers! ^_^
skylab
Esteemed
Oh yes, I couldn't recall the name, but yes, they were elementals (can you imagine how they'd look with superfly mats, or Iray)...haha....that's when I got started in 3D...in 2006...got registered at Poserworld and DAZ, then discovered 3D Commune (remember them?) and Renderosity, and finally RDNA. All I did the first year mostly was collect freebies, since I didn't have a thing with which to work. I think about that now, how it must be the same for others too....they have to give it a try before they plunge in.
Oh yes, I couldn't recall the name, but yes, they were elementals (can you imagine how they'd look with superfly mats, or Iray)...haha....that's when I got started in 3D...in 2006...got registered at Poserworld and DAZ, then discovered 3D Commune (remember them?) and Renderosity, and finally RDNA. All I did the first year mostly was collect freebies, since I didn't have a thing with which to work. I think about that now, how it must be the same for others too....they have to give it a try before they plunge in.
Yes! I started in 2002! I found Renderosity first, then I found 3DCommune after that... and then Runtime DNA. I spent a lot of time in the galleries and freebie areas of all three places. I survived off of freebies for the first two years or so. My very first 3D purchase was from Rendo, and that was in 2004...
That's actually why I started making freebies in the first place. When I reached the point where I thought I had something that I could give back... well, I wanted to give back something. So I did. And then I did it again, and again, and again, and again.... LOL. I enjoy making freebies, as much because it lets me give something back as because I know MANY folks have to survive on mostly what they can get their hands on out of the free zones. I won't put out sub-par quality, though. Even if it's a free item, if it's not working the way it's intended to work, I won't release it.
I received PMs and emails over the years every so often asking me when I was going to start selling... especially once I started making clothing textures. Honestly, back then I didn't think anything I made was good quality enough to actually sell. But I have found some of my poses over the years that were incorporated into others' for-sale packs or that ended up in some big collection file download... and the poses I make seem to be the most frequently downloaded content I have, which always blows my mind, because for me it's just such a simple thing to build the pose! Oh, it can be fiddly on the technical aspects of saving the files out for distribution, but the actual build process is just second nature for me.
I did have a small store over on Content Paradise for a few years. It brought in residual income for us. Never a whole lot, just a little bit here or there... sometimes it was enough to put gas in the car on a week where we were just too tight to manage it otherwise. But I recently emptied out my CP store entirely, because once Nataani is through QAV and officially released here, I am going to assess what items to submit to the store here, and which ones to push into my freebies instead. I don't plan on trying to sell at any other sites... this place is it. I have a strong dislike of Daz's business practices, and I can NOT work at the speed that they demand from their PA's. Likewise, I dislike the "niche/clique" attitudes that permeate some of the other places out there. HiveWire isn't like that at all, and I actually enjoy it here. Enough that I find it satisfying to make content for figures that I don't even render with all that much myself. LOL
But all of that took years to develop. I was just a novice artist in the beginning, mainly doing play renders and "let's see what this does" renders. RGUS, while I was over on Rendo during the V3/M3 era really gave me a lot of encouragement on my renders, and he was wonderful for leaving serious, actual critique in those comments as well. I eventually deleted all of my freebies and gallery from Rendo's site, again because I just could not agree ethically with some of what they were doing. I returned, but not until maybe 2013? 2012? Maybe? I'd have to check my gallery again. And I never went back anywhere near as active as I had been originally.
It just takes time... as we learn things, get better at things, find ourselves making things that we need in a scene but can't find anywhere else... eventually we start thinking "would someone else have a use for this? I bet they would..." and next thing we know, we're distributing content.
I enjoy making the content just as much as I enjoy using it.

skylab
Esteemed
It was Wayii that suggested that I make poses...it never once occurred to me that I could contribute anything of value. I sort of borrowed her strong sense of confidence about that, and launched out making freebies. I still to this day get comments on ShareCG, people will run across some of those old Nursoda character poses, and email me with LOL. I always enjoyed knowing that it made people laugh. I timidly began making M4 poses, and people started downloading those like crazy. Then I progressed to themes, or making whole sets. It was during the time I worked with Suro that so many western poses were done. But going all the way back to the beginning, I was helping a friend of mine learn 3D through email...we lived in different states, so it was the only way to do it back then. We would have gone crazy if we'd had Dropbox then...haha. She progressed really fast, and wanted to do animations....bypass all the fundamentals and go to animations, so that's how I got yanked through the keyhole on that deal...I had to learn it first in order to address the questions she was asking. I started the ShareCG account initially to share things with her, since she had a zero 3D budget. She'd tell me what she needed and I tried to make one....with almost hilarious results, looking back...but we were like two kids learning together. She had an older brother who was extremely critical of everything she ever did....so she was by habit very nervous about things being exactly right....not realizing that we were still very much novices, so some of our interactions on the DAZ forum were probably entertaining for others to watch...it's because we knew each other so well, we were like family. In three years she progressed at an amazing rate. She hid from me the fact that she was suffering from bone cancer, and she passed in 2011. She spent the last three years of her life finally getting to use her art, and I know that she had a ball doing it. I used to try to talk her into changing the "name" that she used at the time...I thought it was more evidence of allowing family members to dog her with a demeaning name...but she didn't see it that way. I almost dropped out of 3D when she died. Had it not been for Wayii's encouragement to join with what they were doing, I probably would have. It seems we are with folks for a season, and grow in our skills while with them, then end up growing with something else for awhile. I've enjoyed all the projects and learning situations I've been in...and again, if we don't partner with others who are better at things than we are, we don't progress. That's why I always wanted my forum threads to be a place of learning....like an extension of those emails I exchanged with Sarah years ago. Here's an example of one of her last animations...I put music to the short clip for her, because I thought she did a good job, though she was a novice, very sick, and working from a budget laptop, it's worth remembering her work:
I actually made the middle eastern houses for her, which you can see in the background. I uploaded as a way for her to retrieve them....and it was shocking to me when other people began showing an interest. I didn't really know the first thing about modeling...we were just creating whatever we didn't have for her scenes. She was putting free V3 dresses on the men because there were no free robes...haha.
I actually made the middle eastern houses for her, which you can see in the background. I uploaded as a way for her to retrieve them....and it was shocking to me when other people began showing an interest. I didn't really know the first thing about modeling...we were just creating whatever we didn't have for her scenes. She was putting free V3 dresses on the men because there were no free robes...haha.
