• Welcome to the Community Forums at HiveWire 3D! Please note that the user name you choose for our forum will be displayed to the public. Our store was closed as January 4, 2021. You can find HiveWire 3D and Lisa's Botanicals products, as well as many of our Contributing Artists, at Renderosity. This thread lists where many are now selling their products. Renderosity is generously putting products which were purchased at HiveWire 3D and are now sold at their store into customer accounts by gifting them. This is not an overnight process so please be patient, if you have already emailed them about this. If you have NOT emailed them, please see the 2nd post in this thread for instructions on what you need to do

Setting up dependencies using Poser

RAMWolff

Wolff Playing with Beez!
Contributing Artist
Hi,

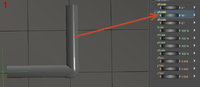
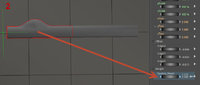
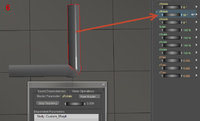
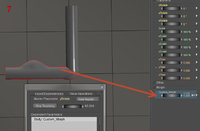
As many of you are figuring out, I've jumped ship using DAZ Studio into Poser waters. So feeling my way around, I'm improving daily. I've got a new pose and expressions pack for L'Homme finished but there are a few little niggles to correct before it's golden. There are a some issues with L'Homme when bending his arm up causing what I call "Chest Balloon Issue" So I made a fix for it using just the morph tool from within Poser. Worked great. Mirrored it and then split it so it works with the mirrored version of the pose.

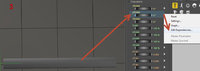
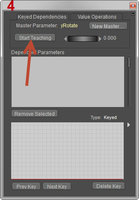
SO what I need is a way to have these fixes automatically apply when this pose is used. So someone mentioned " dependencies " and then never elaborated on how to go about doing that. So I'm here asking. How does one set up something like this using the dependencies editor. I'm more of a visual learner so if there is a video or a tutorial with some reference images that would be most helpful!

Thanks so much!

Richard
Chest Balloon Fix.png.jpg
Chest Balloon Issue.jpg
 
Last edited:

Steve.M

Enthusiast
Hi,

Just a quick example of the way I do it.

I have a tube, with 2 bones (think of it as an arm).
Bone 2 is the bone that will "yRotate" from 0 to 90 (see 01)
I added a morph (sort of like a muscle) onto bone 1 (see 02)

Zero bone 2 and the morph.

Select bone 2 (the bone that will rotate) and click the little white arrow next to the "yRotate" dial, that will bring up a drop down menu, select "Edit Dependencies" (see 03)

That brings up the dependencies editor (see 04), click on "Start Teaching".

Select bone 1 and move the morph dial away from and back to zero (it is so the morph is added as a dependant and is set to zero) (see 05)

Select bone 2 (the bone to rotate) and use the dial to rotate it to position, in this case 90 (see 06)

Select bone 1 (with the morph), and set the morph to 1. (see 07)

Click on the "Stop Teaching" in the dependencies editor.

Thats it. When you move the "yRotate" between 0 - 90, the morph will follow as set.

Hope that helps, just say if anything I have posted is not clear.

(Note:- I had to change image layout (they where to big for forum post and got clipt), just follow the numbers in the images)
 
Last edited:

Steve.M

Enthusiast
Hi,

Images here (I hope). Really needed more than the 10 mins to try and sort out what the forum was doing to my pic uploads.
 

Attachments

  • 01.jpg
    01.jpg
    37.6 KB · Views: 175
  • 02.jpg
    02.jpg
    42.2 KB · Views: 186
  • 03.jpg
    03.jpg
    51.7 KB · Views: 185
  • 04.jpg
    04.jpg
    36.4 KB · Views: 177
  • 05.jpg
    05.jpg
    47.8 KB · Views: 175
  • 06.jpg
    06.jpg
    63.7 KB · Views: 171
  • 07.jpg
    07.jpg
    65.7 KB · Views: 196
Steve.M's explanation makes sense to me, but I already know how to do the process and I don't recall how I first learned. If the explanation with screenshots isn't enough to help you out, RAMWolff, let us know and maybe I can make a quickie screencast video. I go through this process all the time to set "easy posing" dials and also to set up "eye beams" on my figures (so that a single dial on the head will activate morphs on two parented props).

But I almost always set up dependencies that are linear, meaning that they're weighted pretty evenly across the turning of the dial, and if you need the weighting to be more "curved," then that's getting into a trickier area. For that sort of thing, I'd recommend Netherworks' Spawn script set, which has 2014 in its name but works just fine in Poser Pro 11. I got it to help me figure out how to set up JCMs in clothing and do other tricky stuff beyond simple linear dependencies.

What you're wanting to do is basically a JCM, as in joint controlled morph, so that when you rote the joint a particular morph kicks in. But something else you could try is using the Joint Editor to edit the weight map for the joint rotation (and/or adjust the bulge settings).

However, now that I think about it, neither of these methods will work on someone else's figure, only on the figure you're working with in a Poser scene (and which you might save to your own library). If you want to make poses that others can use on their copies of the figure, there must be another method for resolving the issue you're seeing!
 

Steve.M

Enthusiast
But I almost always set up dependencies that are linear, meaning that they're weighted pretty evenly across the turning of the dial, and if you need the weighting to be more "curved," then that's getting into a trickier area. For that sort of thing, I'd recommend Netherworks' Spawn script set, which has 2014 in its name but works just fine in Poser Pro 11. I got it to help me figure out how to set up JCMs in clothing and do other tricky stuff beyond simple linear dependencies.

Is there a reason you do not use the inbuilt graph editor, to add/edit curved input for the dependancy?
 

RAMWolff

Wolff Playing with Beez!
Contributing Artist
Thanks so much Steve. I'll compile this into a rtf file and have it as reference. I was also private messaged here with some video's so I'll look over both and if my addled mind can't make heads or tales after all that I'll just get a lobectomy and be done with it! LOL
 

RAMWolff

Wolff Playing with Beez!
Contributing Artist
I have another question. I want to slave expressions I've made for L'Homme to their own dials to give the end user the ability to mix and match the expressions to their liking. I've been steered to Spawn 2014 but it's not seeing L'Homme's face chips so it's no good to me sadly.

Is there a way to do this with the tools that Poser provides? If so how do I go about doing that?

caisson over at the 'Rosity forums suggested I create a new Master Parameter and then tell it to 'teach'. I have no idea what or how to properly set up things to have it teach an expression saved out to .Fc2 file format.

Do I apply the expression and then tell it to teach while dialing the dial to 1 or ? It's very confusing to me trying to figure this out. My attempts were just that.

1 Applied the expression
2 Create the new Master Parameter
3 Set up the names and
4 Then hit the Teach button after setting the dial to 1.

Nothing happens. The saved dial doesn't nothing so I'm missing a step or just didn't do it correctly!

Please help!

Thanks so much
Richard
 
Is there a reason you do not use the inbuilt graph editor, to add/edit curved input for the dependancy?

I suppose I would use it if I understood what kind of curved input I needed, but I'm not that far along yet and have only needed linear dependencies thus far.
 

Steve.M

Enthusiast
Hi Richard,

I do not know what you have been told at "Rosity forum" or by PM, so I may just be repeating what you have already been told. Please also realise I am just a basic user of Poser. (I fumble around a lot)

You will not be able to add a "Fc2" expression into "Teaching", it will (more than likely) cause the "master parameter" to overflow(corrupt). You may be able to add the "Fc2" expression and use the result as a morph (it is not somthing I have tried), but that would be another topic.

Going through the steps for the "Master Parameter" setup for the expression:-

With the figure expression at default, create a new "Master Parameter" (rename it as required). Set the wheel [setting in the master parameter] to 1. Click "Start Teaching"
Change the figure expression dials / move the face control handles to set the expression you require.
Once you have the expression you want, change the master parameter setting to 0
You then need to go back through the expression dials/face control handles and manually set them back to the default settings (Do NOT use any zero setting scripts to set default, you must do them manually).
Once all back to default, click on "Stop Teaching"
 
@RAMWolff: I'm not sure what you want to do is the sort of thing that can be shared with others, at least not without sharing your CR2, since rigging dials to control other dials is essentially modifying the rigging of the base figure (even if only in a fairly simple way). If it IS possible, then here's my best guess at how you'd do it, based on my experiments with setting up "easy posing" controls on one V4 figure and then coming up with a way to "inject" them into fresh copies of V4.

(1) Use the Object menu to spawn a new morph target (on the head, presumably, in your case). This morph target will not have any delta changes in it but will instead act as your "master parameter." The reason for doing it this way is that you can export the results as a morph target, which others can then "inject" into their figures. (I handled that process using Netherworks' Creator's Toybox.)

(2) Right-click on your new morph target and select Edit Dependencies, and then make sure you're on the Keyed Dependencies tab.

(3) Click the "Start Teaching" button and change the value to 1. (The value is the number to the right of "Start Teaching" button.)

(4) Now go to the dials you want to "kick in" when your new master dial is at 1 and dial them in to whatever values you want. So, for example, you might dial in a bit of a lip shape and a bit of an eye shape or whatever.

(5) If you want your master dial to also work at a negative value, then change the value to -1 and return to each of the dials you want to affect and set their values.

(6) Now change the value to 0 and return to each of the dials you've been affecting and manually set them all to zero.

(7) Test out what happens when your master dial is activated by clicking the PreKey and NextKey buttons at the bottom of the dependency editor and make any necessary adjustments.

(8) When everything seems to do what you want at -1, 0 and 1, click "Stop Teaching" and close the editor. Then you can test out your new dial.

Now you've "taught" your new dial what you want it to do whenever you use the dial.

If you need to modify anything, just repeat the process.

Here's something to keep in mind: while you're in "teaching" mode, the dependency editor will record every dial you adjust, even if you adjust it back to 0, so try to only select the dials you intend to include. If you adjust a dial by accident, you can use the "remove selected" button to remove it from the list of parameters affected by your dial.

Now, when it comes to doing something like this for a figure with facial chips... I would assume that the chips have corresponding parameter dials, so those are what you'd dial in (and then back to 0) while "teaching" your new dial. It doesn't matter if those dials are on separate actors or even "handle" props; whatever you do to those dials while "teaching" your new dial will get recorded by the new dial.

Does that help at all? I've been thinking of doing a screencast to show how to set up "eye beam" props for any figure ("eye beams" = little rods that you can extend from the figure's pupil to more easily determine what they're looking at), and that would probably also help you just to see what's involved in "teaching" a master dial to do what you want it to!
 
Looks like Steve.M and I were replying at the same time! I'll underscore what he said about NOT applying a Face library expression while you're "teaching" a new master dial. Here's why: when you apply the expression (.fc2) file, it "modify" ALL the dials on the head, even if most of them were set to 0, which means that the master dial will record all those dials. But you don't want all those dials to be part of your master dial for a particular expression b/c then your dial will turn all those other dials to 0, overriding whatever character/shaping dials the user had already dialed in.

If you feel like you can't dial in the expression you want from memory, here's a "trick" to get around that problem. WIth ONLY the dials needed to produce your desired expression dialed in and the rest of the figure in the default state, "memorize" the figure. I have that assigned to a keyboard shortcut b/c I use it all the time, but the "Memorize" options are under the Edit menu in the Mac version.

Then zero the figure and go through the process of setting up your new master dial.

Once you've clicked "Start Teaching" and set the value to 1, then you can "restore" the figure (which restores it back to the last "memorized" state). (The "Restore" options are also under the Edit menu, right below the "Memorize" options.)

When you do that, you should see in the dependency editor a list of only those parameters that actually changed when you restored the figure, and the only ones that should've changed are the ones you dialed in to create the expression. So then you carry on with "teaching" the master dial what to do when it's at 0 (by manually returning all adjusted dials back to 0), before you stop the teaching process. (As Steve.M said, do NOT use the "zero figure" menu command or any kind of "zero" pose file, as it'll introduce unwanted stuff into your master dial.)

However, now that I've given this more thought, if your expression can be captured in an expression (.fc2) file, why not just share it that way with others? Why even try to create a master dial, unless you just want it for your own use? (Just FYI: V4 and M4 have quite a few expression dials that are "master dials," meaning that dialing them in activates other parameters, but those were set up before everyone had such easy access to the dependency editor!)
 

Steve.M

Enthusiast
I'm not sure what you want to do is the sort of thing that can be shared with others, at least not without sharing your CR2, since rigging dials to control other dials is essentially modifying the rigging of the base figure (even if only in a fairly simple way).

I am curious. What about "Morph Dependant Joint Centers"?
 
I am curious. What about "Morph Dependant Joint Centers"?

Do you mean, how would you share modifications to those with others? The answer is that I'm not sure! Sharing dialed-in character morphs is easy via Pose (.PZ2) files, and saving custom morphed characters is relatively easy via morph injection files (also delivered via .PZ2), but both of those affect only the shape of the mesh, not the rigging. I don't know how you would share changes you've made to the figure's rigging.

I tried all the systems available for applying weight-mapping to V4, which is a BIG change to the figure's rigging, and some used a method of "injection" .PZ2 files, but I have no idea how they were built as I'm pretty sure you can't just save the necessary info to the Pose library. The method I
settled on (Karina's S-16 version of V4) is delivered via a modified .CR2

I've tinkered with weight mapping some of Nursoda's figures, particularly the more problematic joints, and I've wondered what I'd do if I came up with something I thought others might find useful. I suppose I'd ask Nursoda if I could distribute modified .CR2 files, as that's the only way to ensure that the revised figure has all the rigging changes you've made. (The user would still, of course, need to own the original in order to have the OBJ and textures.)

If you were asking something else about morph dependent joint centers, then the answer is I haven't a clue! I'm primarily an artist who likes to render stuff with Poser, but occasionally I like to get geeky with the "inner workings," just to see what I can figure out (or what problems I can solve). And I have not had an occasional to figure out joint centers... yet :)
 

RAMWolff

Wolff Playing with Beez!
Contributing Artist
Well the face library expressions were ones I made and saved out.

SO applying them and then turning on the "Teach" button won't work then?
 

RAMWolff

Wolff Playing with Beez!
Contributing Artist
There is so much info here I'm getting confused. I think someone here mentioned using the timeline. So what I did was applied the Fc2 Exp-01 to the last frame so when I scrub back and forth I get the intended effect. Is there a way to set up expression dials using the time line?

Thanks so much
Richard
 
Well the face library expressions were ones I made and saved out.

In that case, why not just distribute the .fc2 files as part of your expression pack? If they work to apply the expression on the figure, then that's all anyone else would need to use them. And that's far simpler and easier to use than a new "compound" parameter dial!

SO applying them and then turning on the "Teach" button won't work then?

I think you might not yet be clear on what the "Teach" button does. What you're doing is "teaching" your new dial what to do when it's set to 0 and what to do when it's set to 1 (and possibly also to -1). As soon as you start "teaching" your new dial what to do, ANY parameter dial you adjust will get recorded by the new dial. (This process is similar to recording a macro for Microsoft Word or an action for Photoshop, if you're familiar with either of those.) But ONLY the parameter dials you manually adjust will get recorded, not the dials that were adjusted before you started "teaching" the dial.

So applying the expression file before you start "teaching" won't do anything, because you won't have actually changed anything once you started "teaching" the dial what to do when it's turned to 1. And if you apply the expression file after you start "teaching," the dial will record adjustments in EVERY SINGLE parameter dial that was saved in the expression file, even the ones that were set to 0. I suppose you could go through and delete all those extras, but that's likely to be a royal PITA.

Here's why you don't want all those extras associated with your new dial: because when you use the new dial, the parameters associated with your expression will kick in, but ALL OTHER parameters will be set to 0, which means you'd lose any face shaping changes you'd made.

As for using the timeline, I don't know if that would work, but you could give it a try and let us know!
 

RAMWolff

Wolff Playing with Beez!
Contributing Artist
Timeline didn't work but another at the "Rosity" forums said if I really wanted to make an expression dial after the fact then just apply the expression, export it as an OBJ selecting on the head and bring it back in as a morph target. I guess that's what I'll do but then I get to the selecting parts area of the export dialog and I see there are more than just one set of bits and pieces to the head. There is the jaw, lips, teeth, tongue and all the rest. So do I export just the entry named "Head" or so I select all the other bits that are part of the head? Just wanna make sure I'm doing this correctly!
 

RAMWolff

Wolff Playing with Beez!
Contributing Artist
Got it figured out. Set L'Homme to 0.000 in the L'Homme Size area Since he's really just a morph of La'Femme, so he needs to be set at that scale in order to import face morph files, which is what I did with the expressions. Worked just fine!
 
Top