-
Welcome to the Community Forums at HiveWire 3D! Please note that the user name you choose for our forum will be displayed to the public. Our store was closed as January 4, 2021. You can find HiveWire 3D and Lisa's Botanicals products, as well as many of our Contributing Artists, at Renderosity. This thread lists where many are now selling their products. Renderosity is generously putting products which were purchased at HiveWire 3D and are now sold at their store into customer accounts by gifting them. This is not an overnight process so please be patient, if you have already emailed them about this. If you have NOT emailed them, please see the 2nd post in this thread for instructions on what you need to do
You are using an out of date browser. It may not display this or other websites correctly.
You should upgrade or use an alternative browser.
You should upgrade or use an alternative browser.
I am SO glad you're back!
- Thread starter Rokket
- Start date
quietrob
Extraordinary
That's exactly what I did. I went into the material room, chose the cloth material and changed it one of my many materials. Because the creator of the jacket (Lotus for A3) was kind enough to add material zones it was simply point and click and voila! A jacket with new materials. Her red and white outfit is a second skin, Sci-fi for Hiro, which I then added details to the second skin.
I like Second Skins. Saves on cpu resources and zero poke through. Miss B I posted the decal about two seconds after your post, sorry if it discombobulates the thread.
I like Second Skins. Saves on cpu resources and zero poke through. Miss B I posted the decal about two seconds after your post, sorry if it discombobulates the thread.
Not at all, it's a nice decal, but as I said, unless I was working with a UV map, I'm not sure exactly how you would place that decal on the jacket, unless you can do it with transparency for the rest of the jacket, so only the decal shows up where you want it, and the diffuse color dominates the rest of the jacket.
Is there a texture map included with the set? I don't have it so can't check.
Is there a texture map included with the set? I don't have it so can't check.
quietrob
Extraordinary
Back from hunting groceries.
I think I understand what you mean by using a transparency map though I admit I've never done it. I've always taken the texture map into photoshop and manipulated it. The second skin for instance, has a Medical decal and a star at her throat and neck.
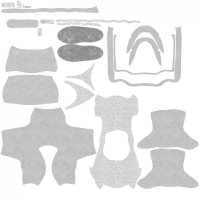
Here is the texture map for the jacket. It was a combination effort by DAZ Originals and Lourdes. At a $1.99 how could I say no?

OK, I'm guessing, though possibly wrongly, that the bottom left island is the jacket. Please correct me if I'm wrong.
What you would need to do is place the decal where you want it on the jacket, and it'll probably take trial and error to get it right where you want it, but once you have it there, add a layer between the UV map and your decal, and fill it with white, so that all that shows is the decal. That way it, and it alone, will show up.
Now if you used this UV map to add that red texture, and not just a red Diffuse color, then you can add the decal on a layer over the red texture, and then it'll show up where you want it. Let me know how you did the red texturing, and maybe I can give you some more details on how to get this done. I did something like this myself recently, and to my surprise, it worked.
Lorraine
The Wicked Witch of the North
quietrob
Extraordinary
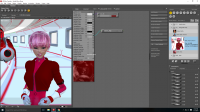
I suppose I made a rookie in simply using the diffuse channel. That is indeed how I retextured the jacket. Here is a material room screenshot.

I did notice that the transparency channel on the simple view is empty. I'm wondering I can still use your solution. I simply want the decal to appear on the back of the jacket. I'm off to make kielbasa sausage and eggs for a late dinner and then I'll for some tutorials regarding Decal Placement.

I did notice that the transparency channel on the simple view is empty. I'm wondering I can still use your solution. I simply want the decal to appear on the back of the jacket. I'm off to make kielbasa sausage and eggs for a late dinner and then I'll for some tutorials regarding Decal Placement.
Hey Rob, my initial thought of using transparency was actually wrong. I was visualizing, but couldn't remember exactly what I had done recently while playing with some textures. What I was thinking was you'd have your regular texture map for the whole outfit, and a separate texture map with just the emblem you want to put on the back. That's accomplished with placing the transparent color, in my case white, over everything else, but the part I wanted to show.
What I did come up with for you, and again, this depends on whether you're actually using the UV map. From what I see in your screenshot above, it appears you're only assigning the red color to the diffuse. What I'm thinking you need to do is texture the UV map like the following. I only bothered with the jacket so you can see the placement of the emblem on the UV map below the red color. Needless to say you would have to texture the whole map for the rest of the items in the outfit.

That said, I thought you should know this particular image has been used, or a very similar one has been used, on one of the textures in the World Jacket texture set for Dusk's Bomber Jacket here in the store.
What I did come up with for you, and again, this depends on whether you're actually using the UV map. From what I see in your screenshot above, it appears you're only assigning the red color to the diffuse. What I'm thinking you need to do is texture the UV map like the following. I only bothered with the jacket so you can see the placement of the emblem on the UV map below the red color. Needless to say you would have to texture the whole map for the rest of the items in the outfit.
That said, I thought you should know this particular image has been used, or a very similar one has been used, on one of the textures in the World Jacket texture set for Dusk's Bomber Jacket here in the store.
Rokket
Dances with Bees
That looks spot on. There is another way too, I just have to remember how I did it. I'll have to recreate it because I don't think I have the clothing I did the work on anymore.Hey Rob, my initial thought of using transparency was actually wrong. I was visualizing, but couldn't remember exactly what I had done recently while playing with some textures. What I was thinking was you'd have your regular texture map for the whole outfit, and a separate texture map with just the emblem you want to put on the back. That's accomplished with placing the transparent color, in my case white, over everything else, but the part I wanted to show.
What I did come up with for you, and again, this depends on whether you're actually using the UV map. From what I see in your screenshot above, it appears you're only assigning the red color to the diffuse. What I'm thinking you need to do is texture the UV map like the following. I only bothered with the jacket so you can see the placement of the emblem on the UV map below the red color. Needless to say you would have to texture the whole map for the rest of the items in the outfit.
View attachment 9492
That said, I thought you should know this particular image has been used, or a very similar one has been used, on one of the textures in the World Jacket texture set for Dusk's Bomber Jacket here in the store.
Yes Rokket, I remember making some notes about doing it with a Blender node, where you plug the original texture in Value_1, and the new one in Value_2, but I tried and everything turned out red, because you "blend" at .500000, so I'm thinking that's not quite what I was remembering.
Rokket
Dances with Bees
No, you have to tweak it. It's harder to do it this way, because you will spend a lot more time tweaking the size of the image.
Rob, create a photo negative of your decal and plug that into the bump node, start out small, with a bump size of .1 and see how it looks. It should give the decal a bit of depth, instead of just looking like a silk screened t-shirt.
Rob, create a photo negative of your decal and plug that into the bump node, start out small, with a bump size of .1 and see how it looks. It should give the decal a bit of depth, instead of just looking like a silk screened t-shirt.
Rokket
Dances with Bees
Pay particular attention to the blending amount. 5 is the middle ground, meaning that both items are being projected onto the model at the same strength. More than 5 bumps up the strength of Input 2, and less bumps up the strength of the top image, if I remember correctly.
Also, take note of the fact that I am using the alt specular node instead of the tree's default specular. The blinn node is really powerful, and you never want to use it with the eccentricity to 1. Gives it a really washed out look if you do. Keeping the eccentricity and roll off values low makes for a more realistic shiny material.
Remember too, everything in life has some specular attributes. Using the alt specular instead of the default gives you a better look. You could plug that Blinn node into the regular specular, but you'd have to dial it way down to make something usable.
Post another render of it when you get something you like...
quietrob
Extraordinary
I am in the airport in Low Angeles. I am on my phone and it's very hard to see what is going on. I will be online on my laptop in a few hours. Nice to see more than one post every few days from you Rob!
Welcome to my neck of the woods! I live in Orange County! So right now we're about 40 miles apart. That's only about two hours in traffic. Six hours if there is an accident.
There is always an accident.
I'll do my best to be on and stay on. Actually I do what I used at Rendo. Check the forum everyday. I gave up trying to run a comic thread over there. I felt like I was showing off. But here, I have to admit to feeling quite welcome without certain people trying to make me believe I didn't belong because I didn't know what they did. Let none mention his name lest he appear. Still, I think you rokket, might be aware that Sweethearts computer had issues and that meant one of us (me) had to give up their computer time for the other (her). That problem is solved! One of my fans and friends also knew about my problems and now I have a mid-range computer! The specs aren't kickass however it has 8 gig of Ram and can take a more powerful graphic card when I save up the necessary. Next came reinstalling the software, Poser, Browers, Photoshop and hooking up my runtimes. I'm not lightning fast but I'm fast enough for now. I've been playing Poser catch up so I can understand what the hyper-intelligent Miss B is saying, trying it out on my own, failing miserably, while still enjoying Mommy's day (Our day is next month, right?). By the way, my first girl (Mom) is 83 and has moved from just Mom to family treasure. I hope I last as long and still have my health. Oh yeah! I still play tricks on her. The youngest (me) always has that privilege.
For the life of me, I've only been able to read the head (face) of a UV map. I suppose I could go with Blacksmith3d and if it does what it says it does, that would be a solution.
But without deep roots. I'm a firm believer in deep roots. Now then. Back to join the program in progress.
