Skylab was asking about this in the other thread, and I promised that I would put this together. This is just a quick how-to for saving a pose preset in Studio.
I think a couple of quick notes on building poses is necessary first --
I don't know how others do it, but when I am building my poses in DS, I make sure not to use the "body" part of the figure to do any translation work. I always select the "hip" body part when I need to move or rotate the figure around the x/y/z axis. The reason for this is because you don't want your pose to send the figure flying back to the Zero starting point in the scene when someone applies it.
This is important, because if someone has just spent three hours getting their scene arranged and their figure into position, the last thing they want when they go to apply your pose, is to have their figure suddenly pull a Houdini and do a disappearing act on them.
So. Always use the "hip" body part for any needed translations or rotations. This will allow the end user to apply your pose without having to go play Find Waldo afterwards.
The second thing of note about building poses in Studio --
Don't save the morphorms/posing morphs. This would be things like eyes side-to-side, hand grasps, finger spreads, etc. You don't want these saved, really. I know some folks build their poses using these posing morphs, but ideally, for the human figures at least, I prefer to be posing the fingers and hands by their individual body parts. In the case of our Dusk, Dawn, and Baby Luna, this goes for their individual toes as well, if your pose requires it. The reason I don't use these posing morphs when I build my poses, is because it can complicate things later on for the end user.
Now, we're going to assume that you have your pose built, and your figure is positioned the way you want it for the save to the library. So, moving forward with the actual save process now...
1.) Go to your SCENE tab. Make sure your figure is selected.
2.) Now go to your CONTENT LIBRARY tab. Navigate to the place inside of the library that you want to save the pose. If need be, you can create a new folder to save the pose to.
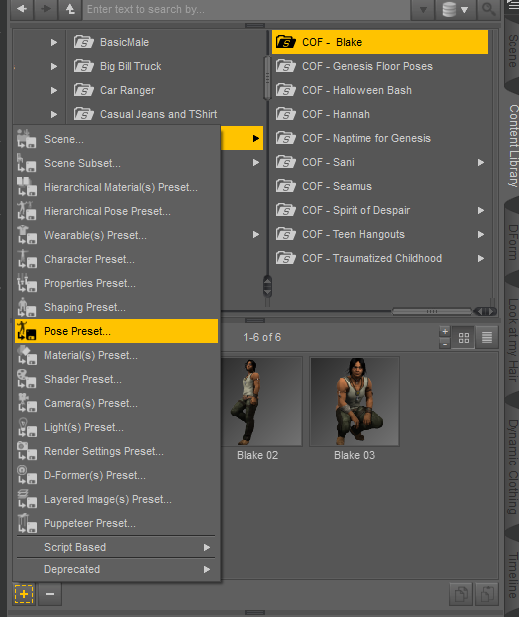
3.) Once you're looking at the folder that you want the pose saved to, look down to the bottom LEFT hand corner of your content library window. Find the plus sign (+), and click that. A fly-up menu will open.
4.) Select "POSE PRESET" from the menu options :
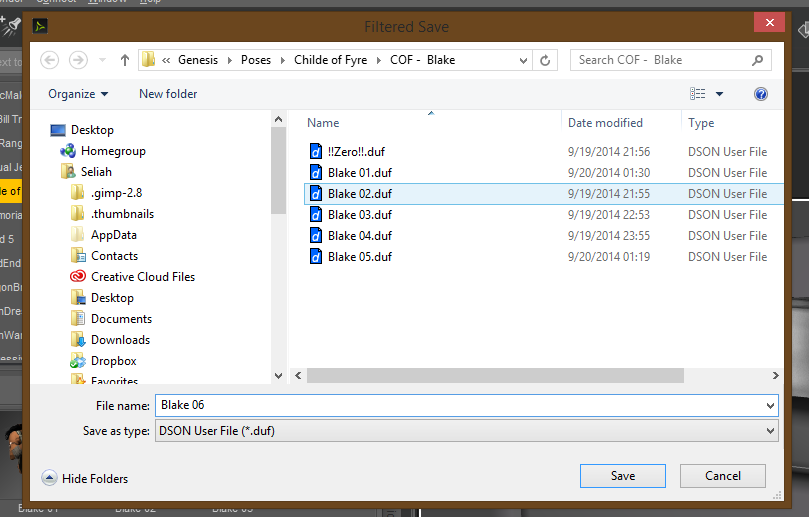
5.) This will open a windows dialogue box. Read the folder name in the dialogue box, just to make sure that it's going to save the pose in the right place. If it's showing the wrong folder, go ahead and navigate via the windows dialogue to the right folder. Type in a name for your pose, and hit "SAVE."
6.) Now, a new box will open in the Studio interface. This is your "Pose Preset Save Options" window :
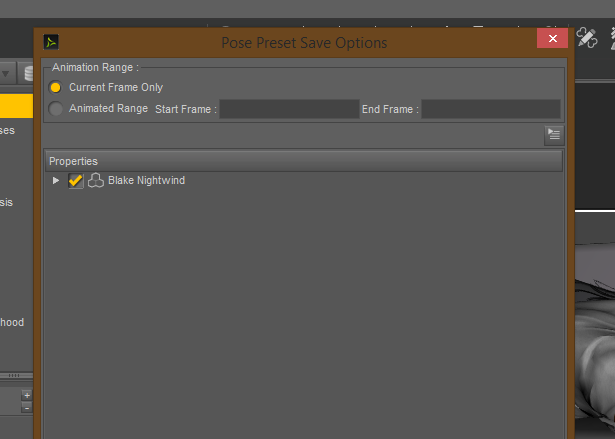
7.) By default, when saving a new pose, everything is always collapsed. You see the little white triangle next to the figure's name? Click that in order to expand the list.
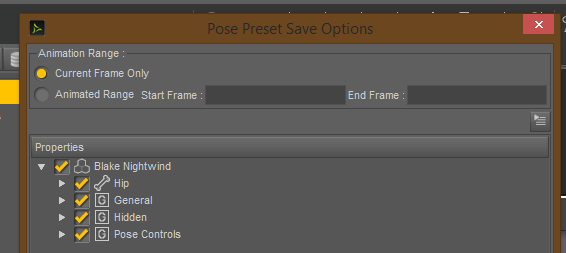
8.) Now, you begin de-selecting the things you do NOT want included in the Pose preset. The first thing I do here, is UN-check "General," "Hidden," and "Pose Controls." Always.
Then I expand the "Hip" body part :
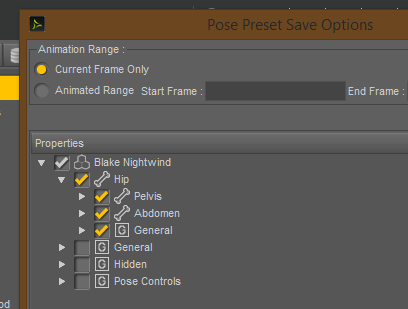
9.) Now, because I'm using Genesis 1 for this particular pose preset, I know where all the stuff is that I do NOT want saved as part of the pose. LOL. If you're not familiar with the layout in this part of things, you might want to spend some time just clicking through everything to see what is contained where, until you're comfortable with, or at least familiar with, how things are laid out. Each figure is a little different...
I do not want to save any Posing Morph information with this pose. I also do not want to save any EYE or MOUTH translations, just in case the end user has set up a facial expression that they're happy with. So I'm going to expand the whole shebang all the way out, clicking on the triangle next to Abdomen, and just continuing on until I have all of the head expanded.
Then, I'm going to UN-check the Right Eye, Left Eye, and the POSE CONTROLS sections for the head :
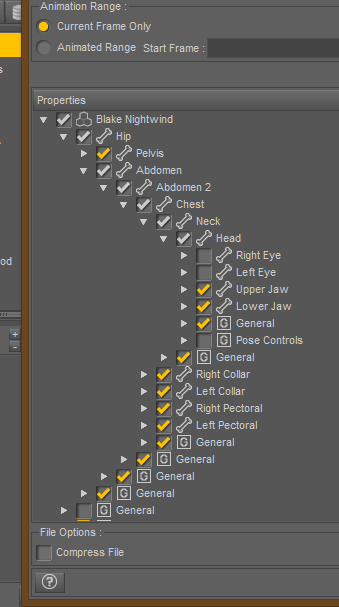
10.) Now, you see where the RIGHT COLLAR and LEFT COLLAR are listed? In the case of Genesis 1, because I've saved a zillion poses for this figure, I already know there are additional POSE CONTROLS for the hands. So starting at the collars, I am going to expand all the way down to the hands, and then UN-check the POSE CONTROLS for each hand :
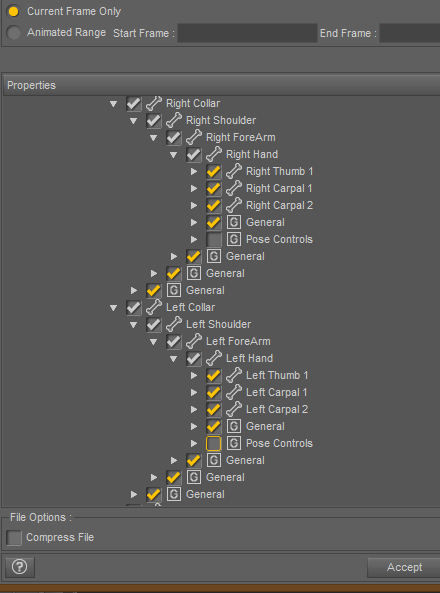
Yes, the list can get quite a bit lengthy on this part, but to save poses correctly, we really should go through and click off all of these things. Otherwise my poses will muck up someone's hard work on a facial expression or scene positioning.
Once you've UN-checked the POSE CONTROLS for the hands and head parts, you can go ahead and scroll back up until you see the ABDOMEN body part. Click the triangle again to collapse this part of the list, if it's easier for your eyes to follow.
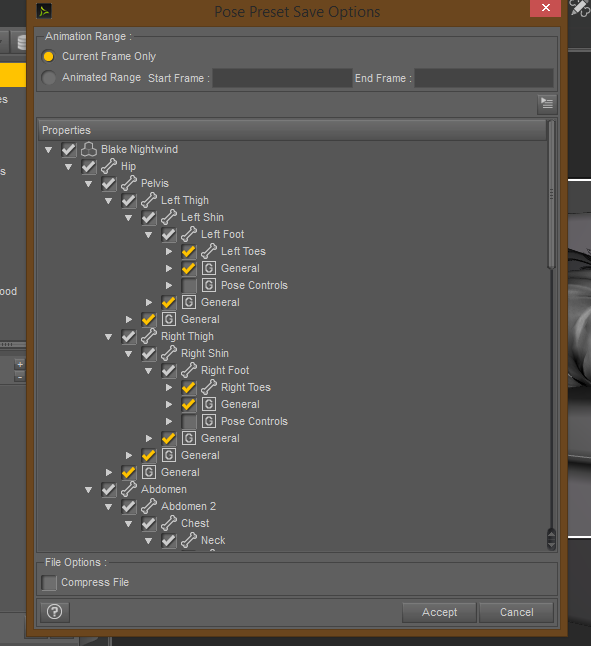
11.) Now, you want to start EXPANDING the list again, beginning from the PELVIS body part. Go all the way to the feet, because like with the hands, in my case, Genesis 1 also has POSE CONTROLS on it's feet. So expand all the way down to the feet, and UN-check the POSE CONTROLS for each foot :
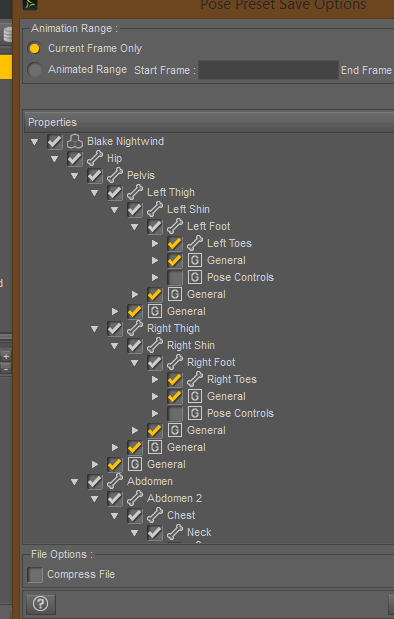
12.) Now, for a "full body pose," I am actually done with the preset save options. Make sure that "Compress File" at the bottom of the options window is UNCHECKED when you save! If for whatever reason you ever need to go in and edit the text of the file, you will NOT be able to do this if the file was saved with compression ON, and Daz Studio does by default, save with compression ON, until you turn that off.
So, you'll notice that "Compress File" in my screenshot above is NOT selected. I've already chosen all the body parts and UN-checked the posing controls and full-body translations. I'm good to go, this is ready to save.
So... at this point, you can go ahead and click on the ACCEPT button on the bottom right of the options window :
Your pose is now saved for distribution, and the new icon should appear in the folder in your Content Library, colored in blue and with a big "NEW" marker printed on it :
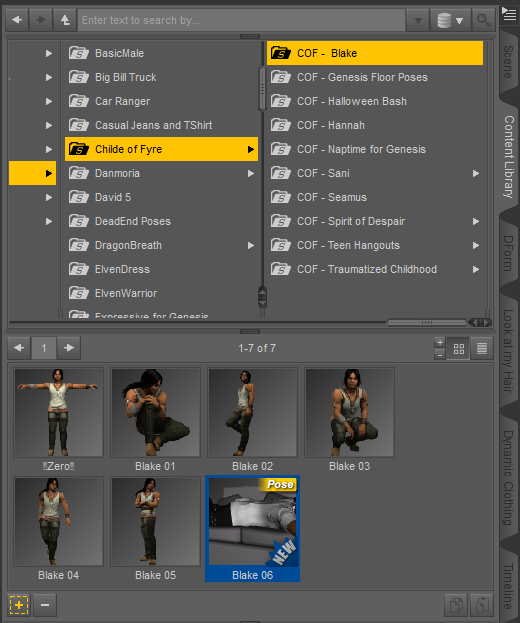
If you click the icon, the blue color and the "NEW" marker will go away.
That's the basics of saving a new pose to the DS content library. To distribute the pose, you just navigate to the folder in your Windows Explorer, and make sure you collect both the "Pose.duf" and the "Pose.duf.png" files for packaging and distribution.
Hope this helps.
I think a couple of quick notes on building poses is necessary first --
I don't know how others do it, but when I am building my poses in DS, I make sure not to use the "body" part of the figure to do any translation work. I always select the "hip" body part when I need to move or rotate the figure around the x/y/z axis. The reason for this is because you don't want your pose to send the figure flying back to the Zero starting point in the scene when someone applies it.
This is important, because if someone has just spent three hours getting their scene arranged and their figure into position, the last thing they want when they go to apply your pose, is to have their figure suddenly pull a Houdini and do a disappearing act on them.
So. Always use the "hip" body part for any needed translations or rotations. This will allow the end user to apply your pose without having to go play Find Waldo afterwards.
The second thing of note about building poses in Studio --
Don't save the morphorms/posing morphs. This would be things like eyes side-to-side, hand grasps, finger spreads, etc. You don't want these saved, really. I know some folks build their poses using these posing morphs, but ideally, for the human figures at least, I prefer to be posing the fingers and hands by their individual body parts. In the case of our Dusk, Dawn, and Baby Luna, this goes for their individual toes as well, if your pose requires it. The reason I don't use these posing morphs when I build my poses, is because it can complicate things later on for the end user.
Now, we're going to assume that you have your pose built, and your figure is positioned the way you want it for the save to the library. So, moving forward with the actual save process now...
1.) Go to your SCENE tab. Make sure your figure is selected.
2.) Now go to your CONTENT LIBRARY tab. Navigate to the place inside of the library that you want to save the pose. If need be, you can create a new folder to save the pose to.
3.) Once you're looking at the folder that you want the pose saved to, look down to the bottom LEFT hand corner of your content library window. Find the plus sign (+), and click that. A fly-up menu will open.
4.) Select "POSE PRESET" from the menu options :
5.) This will open a windows dialogue box. Read the folder name in the dialogue box, just to make sure that it's going to save the pose in the right place. If it's showing the wrong folder, go ahead and navigate via the windows dialogue to the right folder. Type in a name for your pose, and hit "SAVE."
6.) Now, a new box will open in the Studio interface. This is your "Pose Preset Save Options" window :
7.) By default, when saving a new pose, everything is always collapsed. You see the little white triangle next to the figure's name? Click that in order to expand the list.
8.) Now, you begin de-selecting the things you do NOT want included in the Pose preset. The first thing I do here, is UN-check "General," "Hidden," and "Pose Controls." Always.
Then I expand the "Hip" body part :
9.) Now, because I'm using Genesis 1 for this particular pose preset, I know where all the stuff is that I do NOT want saved as part of the pose. LOL. If you're not familiar with the layout in this part of things, you might want to spend some time just clicking through everything to see what is contained where, until you're comfortable with, or at least familiar with, how things are laid out. Each figure is a little different...
I do not want to save any Posing Morph information with this pose. I also do not want to save any EYE or MOUTH translations, just in case the end user has set up a facial expression that they're happy with. So I'm going to expand the whole shebang all the way out, clicking on the triangle next to Abdomen, and just continuing on until I have all of the head expanded.
Then, I'm going to UN-check the Right Eye, Left Eye, and the POSE CONTROLS sections for the head :
10.) Now, you see where the RIGHT COLLAR and LEFT COLLAR are listed? In the case of Genesis 1, because I've saved a zillion poses for this figure, I already know there are additional POSE CONTROLS for the hands. So starting at the collars, I am going to expand all the way down to the hands, and then UN-check the POSE CONTROLS for each hand :
Yes, the list can get quite a bit lengthy on this part, but to save poses correctly, we really should go through and click off all of these things. Otherwise my poses will muck up someone's hard work on a facial expression or scene positioning.
Once you've UN-checked the POSE CONTROLS for the hands and head parts, you can go ahead and scroll back up until you see the ABDOMEN body part. Click the triangle again to collapse this part of the list, if it's easier for your eyes to follow.
11.) Now, you want to start EXPANDING the list again, beginning from the PELVIS body part. Go all the way to the feet, because like with the hands, in my case, Genesis 1 also has POSE CONTROLS on it's feet. So expand all the way down to the feet, and UN-check the POSE CONTROLS for each foot :
12.) Now, for a "full body pose," I am actually done with the preset save options. Make sure that "Compress File" at the bottom of the options window is UNCHECKED when you save! If for whatever reason you ever need to go in and edit the text of the file, you will NOT be able to do this if the file was saved with compression ON, and Daz Studio does by default, save with compression ON, until you turn that off.
So, you'll notice that "Compress File" in my screenshot above is NOT selected. I've already chosen all the body parts and UN-checked the posing controls and full-body translations. I'm good to go, this is ready to save.
So... at this point, you can go ahead and click on the ACCEPT button on the bottom right of the options window :
Your pose is now saved for distribution, and the new icon should appear in the folder in your Content Library, colored in blue and with a big "NEW" marker printed on it :
If you click the icon, the blue color and the "NEW" marker will go away.
That's the basics of saving a new pose to the DS content library. To distribute the pose, you just navigate to the folder in your Windows Explorer, and make sure you collect both the "Pose.duf" and the "Pose.duf.png" files for packaging and distribution.
Hope this helps.


