• Welcome to the Community Forums at HiveWire 3D! Please note that the user name you choose for our forum will be displayed to the public. Our store was closed as January 4, 2021. You can find HiveWire 3D and Lisa's Botanicals products, as well as many of our Contributing Artists, at Renderosity. This thread lists where many are now selling their products. Renderosity is generously putting products which were purchased at HiveWire 3D and are now sold at their store into customer accounts by gifting them. This is not an overnight process so please be patient, if you have already emailed them about this. If you have NOT emailed them, please see the 2nd post in this thread for instructions on what you need to do

Bump versa Normal maps

English Bob

Adventurous
Now I have a better idea of what's going on, I did another experiment which some may find illuminating (no pun intended!)

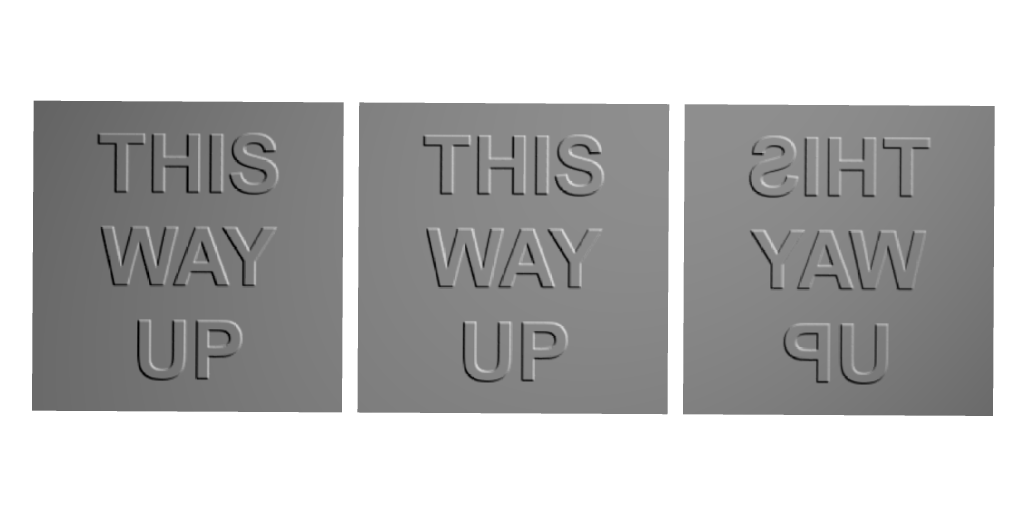
In this set-up, I have three single-poly squares. The centre one is the standard Poser single-sided square prop, with some text used as a displacement map. I set the value to 0.0005 PNU.
The left hand square is also the Poser single-sided square, with the same text used as a bump map; again set at 0.0005 PNU.
The right hand square has its UV mapping flipped horizontally, so the text appears as a mirror image. The material settings are the same as for the left hand square.
The light is in the top right corner, at 0.5, 0.5, 0.5 PNU.
FF_Bump.png

You can see that although the text on the right-hand square is mirrored, it still catches the light as if it was coming from the top right, which is kind of what you would expect. In fact from this angle, the bump map and the displacement map have very much the same visual effect; again, as you would expect.

Now I make the text into a normal map using this tool: NormalMap-Online
I won't bore you by going through all the permutations, but I chose to invert the height and the green channel for the following render.
The centre square is the displacement map as before; the left and right squares have my normal map applied, with Gradient_Mode = Tangent space.
FF_Tangent.png

This illustrates the problem a bit better, now that I'm using a non-symmetrical map. On the right hand square, the lighting has been inverted as well as the text, so it looks as if that square is being lit from the other side of the stage. Plainly not very useful.

If you're using Firefly, my recommendation would be to avoid normal maps altogether if you can. I have yet to find any combination of settings that produces the correct result.
Superfly is a different matter, and I'll look at that next. I haven't got to grips with it yet, and it won't do displacement on a single polygon, so my test scene will have to be different.

@seachnasaigh Bump maps will show inverted as well, so when it comes to normal vs bump, none is the better (in this particular case) because both are affected by the OBJ's inverted UV map.

I think you maybe confused between the mirroring of the map - which is fine - and the mirroring of the lighting, which is not. Hopefully the renders above will clarify that. Bump maps are better, at least in this case.
 

Gadget Girl

Extraordinary
Contributing Artist
Now I have a better idea of what's going on, I did another experiment which some may find illuminating (no pun intended!)

Oh that's a great example. It's very easy to both sort of 'feel' the difference, as well as look at parts of the letters to compare shadows. Thanks for continuing to dig into the technical details of this.
 

Ken1171

Esteemed
Contributing Artist
@English Bob It's arguable which one is displaying "correctly". The way bump and normal maps work is entirely different, in the sense that bump is processed as 2D data, while normal maps are a 3D representation with X, Y and Z coordinates. Therefore a bump map "fakes" shadow projections, while normal maps calculate shadows that can be actually projected in 3D. So what you have seen in your test was that a bump map will always project shadows the same way because it's fake, while normal maps, when flipped, will flip the shadows as well.

Unfortunately, Cycles still has no support for micro-poly displacement, so we cannot produce high-res displacement on a single face like Firefly does. However, this is included in the next batch of Cycles features for the next release, along with a much needed shadow caster.

You can see more details about the differences between bump, normal and displacement maps in my article here --> Bump, Displacement and Normal maps!
 
Last edited:

Gadget Girl

Extraordinary
Contributing Artist
You can see more details about the differences between bump, normal and displacement maps in my article here --> Bump, Displacement and Normal maps!

Thanks for sharing this link Ken. I went through and read it, and at this point it seems I've been reading about this stuff enough that it's finally starting to make sense (way more than it did when this thread started).

But I did want to clarify something that's started to confuse me. The issue with Superfly/Cycles not supporting micropoly-displacement is that with displacement maps only? It seems like that would make sense, but it also seems like you are talking about normal maps in some of the examples because of talk of tangent and object space etc.

Also how 'small' does something have to be for the micro-poly displacement to become an issue? For instance I'm working on an outfit with some leather textures on it. Grain on leather tends to be pretty fine, and I could at once easily see this as falling into the catagory of micro poly, on the other hand, a lot of the time when texturing things you are working with fine detail, so it would seem that this would always be an issue.
 

English Bob

Adventurous
The issue with Superfly/Cycles not supporting micropoly-displacement is that with displacement maps only?

Yes it is just displacement - bump and normal maps don't require micropolygons so they will work fine.

Also how 'small' does something have to be for the micro-poly displacement to become an issue?

When micropolygons are not available, the features you want to displace have to be larger than the polygons, in general. You can compensate to some extent by using subdivision on the mesh you want to displace, which makes the polygons smaller. But there's a limit how far you can take it.

I wondered about this myself. Here's a very similar test set-up to the one I used above, but rendered in Superfly this time. In this case, the left hand square (a single polygon) has the text applied as a bump map, and you can see it works fine. The right hand square has the text used as displacement. If I render this 'as-is', the result is a blank square because the features I want to displace are smaller than the polygon, so I won't bother posting that. :) The render below is with the right hand square subdivision set at 8, the maximum.
Subdiv_8.png

You can see that the text is still a little blocky. In practice, trying to subdivide a mesh of any complexity at 8 will result in mayhem; at best, the render will take an age, or it may even run out of memory and crash. I haven't tried it.

One last render; this is with the right hand square's subdivision set to 6.
Subdiv_6.png

My recommendation: until such time as Superfly gains micropolygon displacement - and I hope it's soon - bump maps are good for most purposes.
 

Pendraia

Sage
Contributing Artist
I remember when I was trying to create fur for the mil cat in Shader mixer...if I didn't subD the mesh it would just rip apart and look terrible. You can also effect it by changing the shader rate in DS iirc...not sure if Poser has that or not?
 

English Bob

Adventurous
I remember when I was trying to create fur for the mil cat in Shader mixer...if I didn't subD the mesh it would just rip apart and look terrible. You can also effect it by changing the shader rate in DS iirc...not sure if Poser has that or not?

There's a shading rate slider in the Firefly render settings, which needs to be reduced in order to get finer detail. I imagine that's the equivalent.
 

Pendraia

Sage
Contributing Artist
Sounds like it might be...someone did explain to me at the time it would allow finer detail using displacement and how but I can't remember...seems a long time ago now.
 

Ken1171

Esteemed
Contributing Artist
Indeed, micropoly displacement only affects displacement maps. This is because bump and normal maps add "fake" details that don't really change the model - they only fake it during renders. Displacement actually changes the geometry, and can be seen from the object's silhouette. With bump and normal, the model's silhouette remains smooth and unchanged. That's when we see the difference.

The major issues with displacement are 2:

1. It's very computationally expensive = takes long to render = slowers the renders.
2. It's quality depends on mesh resolution, which in most cases isn't necessary [or desired] to start with.

This is why bump and normal maps exist, so we can work with lower-res models. This is also why micropoly displacement was introduced, so displacement quality doesn't depend on mesh density. Unfortunately, Cycles/Superfly doesn't support it yet, but it has been promised for the next version. Most likely in Poser 12, along with support for a much needed Superfly shadow catcher. I had a lot of fun with EZDome in Superfly, but HDRI rendering is only a half-done solution without a shadow catcher.

@Pendraia For micropoly displacement, "small" means the detail in the displacement map has to be smaller than the size of the smallest face in the geometry. In other words, without micropoly displacement, we can only displace actual geometry vertexes. If the model doesn't have enough vertexes where you need displacement, Cycles/Superfly cannot create the level of detail you are aiming for.

The bad about subdividing the model to compensate for that is that:

1. Every subdivision level QUADRUPLES the poly count and memory usage.
2. You are adding polys to the entire model, not just to the parts that need it.

My suggestion is for you to use bump or normal maps instead. It's a much more sensible solution, not to mention it will also render faster using less memory.
 
Last edited:

Pendraia

Sage
Contributing Artist
I actually like using displacement as I think it gives better results in many things but I also feel that there is a need to use both. Bump for small light details that it won't notice the difference at the edges but displacement for stuff that needs more oomph...I know I use really technical language for stuff. ;)

Like anything there are pros and cons and depending on what you're trying to achieve and the resources you have at your disposal will inform what you choose to use.

I don't think you can say that bumps and normals will always be the best option.
 

Ken1171

Esteemed
Contributing Artist
I don't think you can say that bumps and normals will always be the best option.

That's right - some things need to be displaced, like those Xmas furry decorations and water surfaces. I use displacement when I really need the geometry to be changed. Otherwise I go for lightweight and quicker bump and normal maps. :)
 

seachnasaigh

Energetic
...there is a need to use both. Bump for small light details that it won't notice the difference at the edges but displacement for stuff that needs more oomph...

You have that exactly right for Firefly, Pen.
With P11's Superfly, we don't have per-material micropoly displacement. However, that feature has been beta introduced to Cycles, so there is a chance that it will be added to Superfly.

Until then, for Superfly, I'd prefer bump/height maps to normal maps because the bump can be negated (switch raised detail to engraved detail), or the bump range re-centered to zero so that dark parts of the map engrave while bright areas of the map emboss.
 

Gadget Girl

Extraordinary
Contributing Artist
The right hand square has the text used as displacement. If I render this 'as-is', the result is a blank square because the features I want to displace are smaller than the polygon, so I won't bother posting that. :) The render below is with the right hand square subdivision set at 8, the maximum.

Okay that was really helpful. Thanks you so much. This conversation also gave me a huge AhHa! moment about a project of mine that went very badly. At one point someone pointed out to me that the geometry seemed to have come apart in places. I couldn't for the life of me figure out how that had happened. But I realize now that at one point I had switched from normal to displacement maps. It looked at lot better from certain angles, but I hadn't gone all the way around the figure and checked, and in the places where the material zones met, it cause things to 'break apart'. Makes sense now.
 

Ken1171

Esteemed
Contributing Artist
One thing I was doing wrong with bump and normal maps was to leave them with the default 2.2 gamma correction in the materials. This overblows the effect and makes it look bad. Bump, normal and displacement maps don't need gamma correction because they are not meant to be rendered to be seen. Instead, we should set gamma to "1.0", and then they show properly. It's easy to forget that part, along with setting normal maps to the proper projection space in Poser, where the default is "object space".
 

RAMWolff

Wolff Playing with Beez!
Contributing Artist
From an article I read about the differences between Displacement, Bump and Normal maps is that Displacement actually displaces the geometry while Bump and Normals "FAKE" this effect. Normals are like Bump maps on steroids but it still only faking what the end viewer is rendering out. So makes me like Displacement a bit more but in iRay it can slow down the renders and took me a while to figure out that you need to set the SubD Displacement Level MUST be activate to at least 1 (I use 3 for most things) to get even a semi nice effect. Without that the displacement looks blocky !
 
Top