• Welcome to the Community Forums at HiveWire 3D! Please note that the user name you choose for our forum will be displayed to the public. Our store was closed as January 4, 2021. You can find HiveWire 3D and Lisa's Botanicals products, as well as many of our Contributing Artists, at Renderosity. This thread lists where many are now selling their products. Renderosity is generously putting products which were purchased at HiveWire 3D and are now sold at their store into customer accounts by gifting them. This is not an overnight process so please be patient, if you have already emailed them about this. If you have NOT emailed them, please see the 2nd post in this thread for instructions on what you need to do

Ken1171's Products at HiveWire3D

Hornet3d

Wise
Easy solution for this: resize the script panel to make it wider, and now you have single digit precision when using the sliders. Easy peasy!

As you say, easy peasy, I suspected I was doing something wrong and I was. Wider panel and more accurate control.

Many Thanks.
I can think of only one improvement... A sun, for eye reflections, and a way to link it to the HDRI.

That would certainly be very useful. As it is this is a perfect partner to the vast number of HDRI images I have by ShaaraMuse3D.

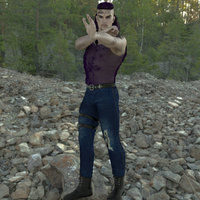
This is from After The Rain and eye reflections would improve it.

After the Rain  HW.jpg
 

Ken1171

Esteemed
Contributing Artist
I can think of only one improvement... A sun, for eye reflections, and a way to link it to the HDRI.

The way I do this is to place a large emissive square in the background somewhere in front of the character at a certain distance. This tends to create beautiful eye reflections, sometimes even 2 large planes. Photographers do this in studio shootings, but it's way easier in Poser with a mere square plane you can find in the Props -> Primitives runtime. You can add a constraint to the square so that it always faces the figure's head, no matter where you place it. Select the square, and add a "Look at" constraint and select the figure's head as the target. Very effective and simple to do. Remember eye reflections are independent from sun position. ^^

Hope this helps.
 

MEC4D

Zbrushing through the topology
Contributing Artist
I can think of only one improvement... A sun, for eye reflections, and a way to link it to the HDRI.
Hi @Sunfire you don't need a sun , just a proper HDRI with sun already included with the maps , I will have some very soon .
If you set the eyes correct there is not need for faking the reflection , they will be there according to the HDRI map , all the reason for that , but if you want to do that , put an Area light around 3 ft -1 m away from the figure , set the Area light scale to around 10% and you will get accurate sun reflections in the eyes .. Remember how bigger the scale of the Area light how softer the shadows and vice verse .

Make sure you find some HDRI for now that have some sunlight in it so it match the Area Setup , other way it will looks like flash light .

Change the eye corners on your figure to specular 0.36 and Roughness to 0.00020
 

Sunfire

One Busy Little Bee
QAV-BEE
Contributing Artist
Hi @Sunfire you don't need a sun , just a proper HDRI with sun already included with the maps , I will have some very soon .
If you set the eyes correct there is not need for faking the reflection , they will be there according to the HDRI map , all the reason for that , but if you want to do that , put an Area light around 3 ft -1 m away from the figure , set the Area light scale to around 10% and you will get accurate sun reflections in the eyes .. Remember how bigger the scale of the Area light how softer the shadows and vice verse .

Make sure you find some HDRI for now that have some sunlight in it so it match the Area Setup , other way it will looks like flash light .

Change the eye corners on your figure to specular 0.36 and Roughness to 0.00020
That roughness is practically non-existent
 

Ken1171

Esteemed
Contributing Artist
Hi @Sunfire you don't need a sun , just a proper HDRI with sun already included with the maps , I will have some very soon .
If you set the eyes correct there is not need for faking the reflection , they will be there according to the HDRI map , all the reason for that , but if you want to do that , put an Area light around 3 ft -1 m away from the figure , set the Area light scale to around 10% and you will get accurate sun reflections in the eyes .. Remember how bigger the scale of the Area light how softer the shadows and vice verse .

Make sure you find some HDRI for now that have some sunlight in it so it match the Area Setup , other way it will looks like flash light .

Change the eye corners on your figure to specular 0.36 and Roughness to 0.00020

You always have very helpful info, Cath. Thank you! ^____^=b

I love the ideas that this in generating such as the last two. The other point to make is that the renders are a lot faster.

It makes renders FASTER because this reduces the number of lights that are included in the render calculations. Zero lights mean VERY fast renders.
 

Sunfire

One Busy Little Bee
QAV-BEE
Contributing Artist
Here's my first render with Ken's Script. Not happy with the way the feet look on the "ground".

This uses ShaaraMuse's Sunset Quarry
 

Attachments

  • ravenquarry.jpg
    ravenquarry.jpg
    321.9 KB · Views: 31

Ken1171

Esteemed
Contributing Artist
Here's my first render with Ken's Script. Not happy with the way the feet look on the "ground".

This uses ShaaraMuse's Sunset Quarry

This HDRI appears to be low contrast, and has no "sun" to project actual shadows on the ground, which helps placing the character into the location. You can deal with this in a couple of ways: either pick a different HDRI with a "sun", or add a sun to this one by using a distant light, similar to how I did in the demo video.

I mention in the manual that not all HDRI are created the same. Some are good, some are ugly, and some are just bad. The script cannot make up for bad HDRI maps. This is why I have used Mec4D's high quality 10K HDRI in the demo video - to show how quality HDRI actually shows in renders. Can't wait for her to release her HDRI packs, for THEN people will see how bad these others actually are. The ones bundled with Poser 13 are especially bad for the same reasons. -___-
 

Ken1171

Esteemed
Contributing Artist
Outdoor lighting using Mec4D's 10K Gardens Vol.2 HDRI. Same I used in the demo video. I have tried even 16K HDRI, and Poser can take it, but requires 16GB RAM minimum. Since DawnSE lacks proper cornea shape to produce good eye reflections, I used an area light trick as Cath suggested to "force" the eye reflections.

x2scrap.jpg
 
Last edited:

Sunfire

One Busy Little Bee
QAV-BEE
Contributing Artist
This HDRI appears to be low contrast, and has no "sun" to project actual shadows on the ground, which helps placing the character into the location. You can deal with this in a couple of ways: either pick a different HDRI with a "sun", or add a sun to this one by using a distant light, similar to how I did in the demo video.

I mention in the manual that not all HDRI are created the same. Some are good, some are ugly, and some are just bad. The script cannot make up for bad HDRI maps. This is why I have used Mec4D's high quality 10K HDRI in the demo video - to show how quality HDRI actually shows in renders. Can't wait for her to release her HDRI packs, for THEN people will see how bad these others actually are. The ones bundled with Poser 13 are especially bad for the same reasons. -___-

Sometimes there really isn't much if any shadows. For one thing that image is at sunset, so not much sun there, also heavily overcast skies limit shadows as well.
 

Ken1171

Esteemed
Contributing Artist
Sometimes there really isn't much if any shadows. For one thing that image is at sunset, so not much sun there, also heavily overcast skies limit shadows as well.

Overcast skies are great for shooting with smooth diffuse light, but the side-effects are low contrast and no shadows. I will be testing some sunset HDRIs here. I think I have a bunch. ^^
 

Ken1171

Esteemed
Contributing Artist
As far as lighting/HDRI is concerned, this script has got to be the closest anyone has ever come to producing a make art button.

I remember when HDRI was first used in movie productions, it was solving a very old problem - matching the real-world location's environment lighting with the rendering of 3D models we want to put into it. HDRI automates this process without using any of the usual 3D lights, making it easier, produce less digital noise (less 3D lights in the scene), and renders faster as a bonus. ^^
 
Top