• Welcome to the Community Forums at HiveWire 3D! Please note that the user name you choose for our forum will be displayed to the public. Our store was closed as January 4, 2021. You can find HiveWire 3D and Lisa's Botanicals products, as well as many of our Contributing Artists, at Renderosity. This thread lists where many are now selling their products. Renderosity is generously putting products which were purchased at HiveWire 3D and are now sold at their store into customer accounts by gifting them. This is not an overnight process so please be patient, if you have already emailed them about this. If you have NOT emailed them, please see the 2nd post in this thread for instructions on what you need to do

Using a greyscale mask to blend two colours... without actually blending. ?! :OS

3dcheapskate

Engaged
(I'm using Poser 11 Firefly)

I'll start at the end - this isn't quite what I was trying to do, and I'm not sure what this is, but I like it !

Render 1.jpg


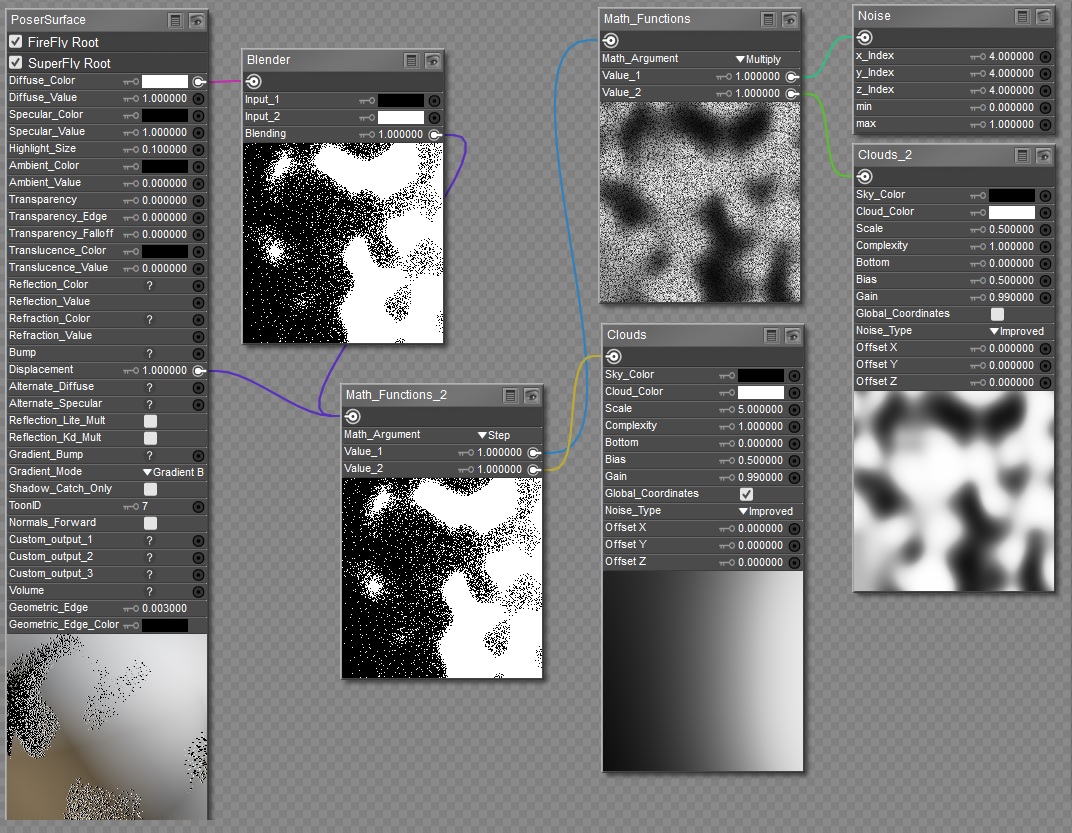
Here's the shader, which I had applied to the Ground zone of the construct:

Mat.jpg
 

3dcheapskate

Engaged
Okay, back to the start. You know when you use a greyscale mask, e.g. a clouds node, to decide between two layers, say a green one and a red one, you end up with blended colours, yellows oranges and browns in this case, in the grey areas of the mask. My explanation's not too good, so like this:
Mat2.jpg

Render 2.jpg
 

3dcheapskate

Engaged
In many cases that's exactly what you want, so no problem.

But for some reason I was imagining a situation where that's not what you want. Pretend that you want each pixel to be either 100% red or 100% green, none of that intermediate yellow-orange-brown rubbish.

The thought that immediately struck me, living in this age of quantum mechanics, was that the the greyscale image/procedural node is a probability function ! The value of the greyscale image at any point is simply the probability that the pixel will be red or green, black (zero) indicating 100% red, white (one, or 255 if you prefer) being 100% green, mid-grey (0.5, or 127.5 ;) ) being a 50/50 toss-up, etc.

That's where I came a bit unstuck...
 

3dcheapskate

Engaged
My first (and thus far only) idea was to use a Noise node, which I believe* produces only black/white outputs with no intermediate greys (or grays if you're that way inclined) in a random (in the Poser sense, i.e repeating) manner.

But the noise node just (I once again believe, but would not swear to) produces 50/50 (or 60/40, or whatever) random black/white. What I actually want (I think? But then I'm not really sure) is for each pixel to be a random shade of grey ranging from black to white.

My thinking had jumped ahead to using a Math_Functions > Step, with the greyscale mask controlling the value of the step, and the other input being my prospective greyscale noise.

My firstest, bestest, and onliest idea for creating greyscale noise was to combine the Noise node with another higher frequency (lower Scale value) clouds node using a Maths_Function > Multiply. Don't ask me why I didn't just try the Noise node alone...

And why did I also plug the Step into the PoserSurface > Displacement ? I'm a displacement fiend ! Here's the original shader with a 1' displacement for good measure:

Render 3.jpg


*it may produce the full gamut of greys, but how can I can tell ?
 

English Bob

Adventurous
I like that - it looks like a field of flowers, if some good colours could be magicked up.

For getting rid of intermediate values you want a threshold function, and the node for that is Math_Functions > Step. Here's an example using v_Texture_Coordinate as the input, to make everything in the lower half of the UV space transparent:
V-step Transparency (lower).png

You'd change Value_1 of the Math_Functions node to choose how far up or down you want the threshold to be. Just swap values 1 and 2, and plug the input into Value_2, to reverse the effect.
 

Rokket

Dances with Bees
I like that - it looks like a field of flowers, if some good colours could be magicked up.

For getting rid of intermediate values you want a threshold function, and the node for that is Math_Functions > Step. Here's an example using v_Texture_Coordinate as the input, to make everything in the lower half of the UV space transparent:
View attachment 67308
You'd change Value_1 of the Math_Functions node to choose how far up or down you want the threshold to be. Just swap values 1 and 2, and plug the input into Value_2, to reverse the effect.
I just learned something today. Thank you.
 

Janet

Dances with Bees
Contributing Artist
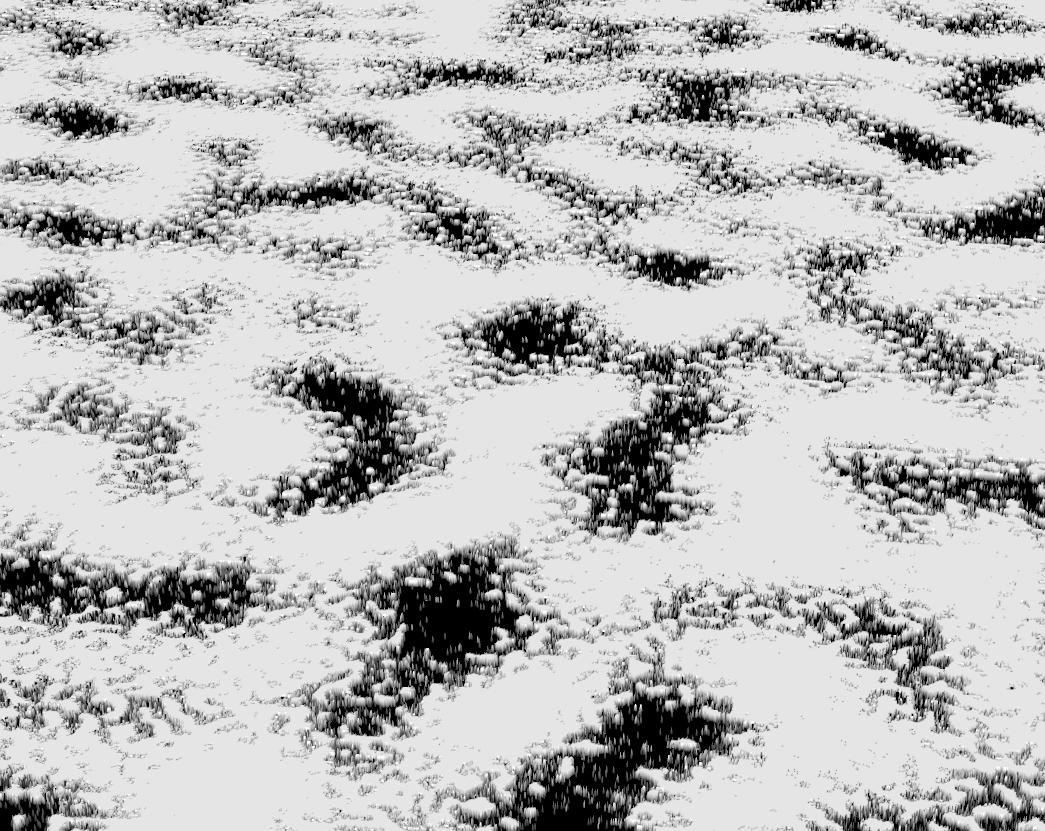
The first one looks like snowy ground to me with bits of the snow melted.
 

3dcheapskate

Engaged
The first one looks like snowy ground to me with bits of the snow melted.
I had one that I think looked even more like partially melted snow, but I deleted it !

Fortunately it was easy to remake something very similar. I started with the shader in the first post (I've attached the MT5 for that original shader which I forgot to do, zipped - Probability Mask 1.zip), made the "Don't ask me why I didn't just try the Noise node alone..." correction mentioned in post #4 (i.e. deleted the Clouds_2 and Math_Function (Multiply) nodes, and plugged Noise directly into Math_Function_2(Step)), then added three more Math_Function nodesto add smooth displacement hillocks where Clouds has a value over 0.5

Here's the new shader (I've also uploaded the zipped MT5 file - PartiallyMeltedSnowPerhaps.zip):
PartiallyMeltedSnowPerhaps.png

...and here's a render (I think this render was before I added the Clamp node, which makes a small difference):
PartiallyMeltedSnowPerhaps.jpg

(the horizontal black lines are probably due to some render bias setting or something like that)
 

Attachments

  • Probability Mask 1.zip
    1.5 KB · Views: 160
  • PartiallyMeltedSnowPerhaps.zip
    1.5 KB · Views: 156

3dcheapskate

Engaged
I like that - it looks like a field of flowers, if some good colours could be magicked up.

For getting rid of intermediate values you want a threshold function, and the node for that is Math_Functions > Step. Here's an example using v_Texture_Coordinate as the input, to make everything in the lower half of the UV space transparent:
View attachment 67308
You'd change Value_1 of the Math_Functions node to choose how far up or down you want the threshold to be. Just swap values 1 and 2, and plug the input into Value_2, to reverse the effect.
The original shader's already using a threshold function (Math_Function_2), but with a variable threshold level driven by the Clouds node. So I plugged that into Transparency and Transparency_Edge (both set to 1) and disconnected it from Displacement.

I tried various things to get nice colours (Cellular, Clouds) but it ended up more Jackson Pollock* than a field of flowers.

Here's the shader (zipped MT5 attached - With Transparency.zip)
ShaderWithTransparency.jpg


and here's a render (I also did a render with the Noise node connected directly to the Step for a side-by-side comparison)
With Transparency.jpg


To me the left one looks like powder (salt, sugar, etc) while the right one's more like... err... partially melted snow ? I think Janet was right ! :)

*In case you don't know, that's bad - unless you're after an explosion in a paint factory effect.
 

Attachments

  • With Transparency.zip
    1.5 KB · Views: 162
Top