• Welcome to the Community Forums at HiveWire 3D! Please note that the user name you choose for our forum will be displayed to the public. Our store was closed as January 4, 2021. You can find HiveWire 3D and Lisa's Botanicals products, as well as many of our Contributing Artists, at Renderosity. This thread lists where many are now selling their products. Renderosity is generously putting products which were purchased at HiveWire 3D and are now sold at their store into customer accounts by gifting them. This is not an overnight process so please be patient, if you have already emailed them about this. If you have NOT emailed them, please see the 2nd post in this thread for instructions on what you need to do

Upping the ante with the Poser atmosphere's Depth Cue (I'm still using Poser 11 with Firefly)

3dcheapskate

Busy Bee
Zipped runtime attached, as used in the previous post. Contents of the runtime folder listed below. Simply unzip to any runtime (although I recommend creating a temporary folder on your desktop, unzipping the runtime to that, and using the 'Add Runtime' from the Poser library pane to allow you to get at the files - it's easier to delete when you've done with it)

1) Open Poser
2) Load the FogTestRigD.pz3 scene - use the single tick option to replace the whole scene, otherwise the atmosphere doesn't seem to load.
3) Run the RealisticHeightDependentFog02.py script
4) Render. It should automatically use FireFly,take less than 10 seconds, and look like this:
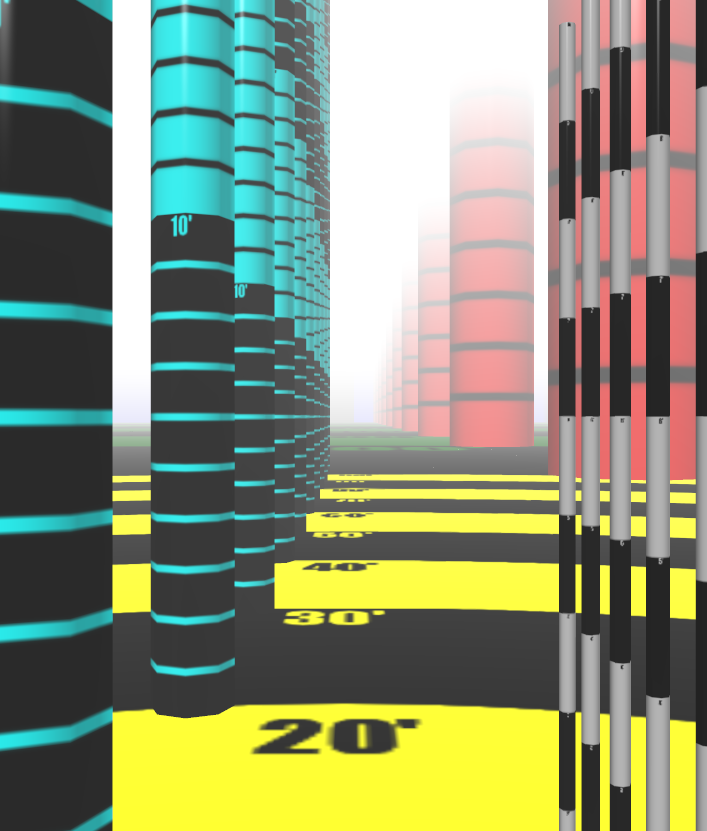
Render 1.png


5) Try adjusting a few things and re-rendering
- the heightof the Dolly camera (DollyY)
- the three user parameters in the Atmosphere shader (PM:Half Distance, MaxVisHeight_Feet, and ZeroVisHeight_Feet)
- the four Morph dials on the FogTestRigD prop. No explanation as it should be fairly easy to work out how to use it.


File list for the attached zip:
libraries\materials\3DCheapskate\TEMPORARY\DepthCueFog\RealisticHeightDependentFog02.mc6
libraries\materials\3DCheapskate\TEMPORARY\DepthCueFog\RealisticHeightDependentFog02.png

libraries\props\3DCheapskate\TEMPORARY\FogTestRig\FogTestRigD.png
libraries\props\3DCheapskate\TEMPORARY\FogTestRig\FogTestRigD.pp2

libraries\scene\3DCheapskate\TEMPORARY\DepthCueFog\FogTestRigD.png
libraries\scene\3DCheapskate\TEMPORARY\DepthCueFog\FogTestRigD.pz3

Python\3DCheapskate\TEMPORARY\DepthCueFog\RealisticHeightDependentFog02.py

textures\3DCheapskate\TEMPORARY\DepthCueFog\TestRig\1000FootColumns.png
textures\3DCheapskate\TEMPORARY\DepthCueFog\TestRig\1000FootGround.png
textures\3DCheapskate\TEMPORARY\DepthCueFog\TestRig\100FootColumns-inv.png
textures\3DCheapskate\TEMPORARY\DepthCueFog\TestRig\100FootGround-inv.png
textures\3DCheapskate\TEMPORARY\DepthCueFog\TestRig\10FootColumns.png
textures\3DCheapskate\TEMPORARY\DepthCueFog\TestRig\10FootGround.png
textures\3DCheapskate\TEMPORARY\DepthCueFog\TestRig\BackdropCylinder.png


Things I noticed that I need to look at
- The Atmosphere now appears on the Paramater Dials pane, but the 'PM:Half Distance' doesn'tshow up. I obviously deleted the Parmatic bit that handles that when I was cutting down bagginsbill's script.
- I forgot to rename MaxVisHeight_Feet, and ZeroVisHeight_Feet as Isaid I would. I should also give them the Parmatic PM: prefix so they appear on the Parameter Dials pane
- Add a few other Atmosphere shaders - realistic fall-off only, height dependent only, etc
 

Attachments

  • DepthCueFog+TestRig Runtime(D).zip
    965.3 KB · Views: 203

3dcheapskate

Busy Bee
I'm gradually deleting all my rubbish from DeviantArt and while doing so found this. I'm fairly sure that it was something bagginsbill came up with - but any errors in implementation are mine ;)

atmospheric_water_shader_by_3dcheapskate_d9tr6uz.jpg
 

KageRyu

Lost Mad Soul
Contributing Artist
@3dcheapskate I have a question that you just might be the person to ask. It involves volumetric lights in Poser, and while I used to know haw to use them, I seem to have forgotten. None of the tutorials or resources I had in old forum threads at RDNA or on SM are available anymore, and what little I am finding at Rendo or Youtube has been helpful.

So here's what I am doing- I am trying to use a Spotlight with narrow start and end angle with volumetrics to create a Targeting beam (think laser scope). I intend to do other beams as well, but I can not get this working so I am stuck. No matter what I do I am getting just widely spaced dots.

I have Atmosphere turned on in materials. I have no texture applied to any parameters currently (thought texture might be messing it up).
I only have the Light I am using for the Beam set to use atmosphere, and have tried a variety of strenghts. It is a spotlight set to raytrace with no AO and Shadow Smoothing at 1.5 parrented to a robot head. No textures are applied to the light.

All other lights have atmosphere strength set to 0.
Backdrop prop is a simple Infinity Cove 2 Parabla with a Stamped Rubber texture from on of Parrot Dolphins Free sets.

I removed all textures from the Light and the Atmosphere as I thought those might have been causing the dots (normally I like to use a mix of clouds and turbulence to give smokey depth variations to atmosphere).

I am using Poser 2012 and 2014 for the bulk of this project...
I have used this technique in limited capacity back in Poser 7 (did not use it often due to how massively it increased render times on that poor 2.3ghz and texture tests were killing me), so I know it should work in P2012 and P2014

So, any thoughts on what I am doing wrong? Tips? Suggestions? Aside from using newer poser or newer machine.
 

3dcheapskate

Busy Bee
...

So, any thoughts on what I am doing wrong? Tips? Suggestions? Aside from using newer poser or newer machine.
My initial thoughts are twofold.

If you're just getting widely spaced dots that makes me think, from memory so I may be way off, that the volume settings in your Atmosphere node aren't 'fine' enough. Have a look at Connatic's Visible Glowing Lights on the Rendo forums. Getting Volume_Density and Volume_StepSize are key to this I think. Also have a look at How Do You Use The Poser Atmosphere ? on Rendo forums as there may be a link to something useful there.

Secondly my Sexy bald space babes render (in my Rendo gallery) has laser beams, but I have a feeling that they're actually long thin cylinders with a cloudy semi-transparent texture. I have the PZ3 for that so I'll open it up and check. I think I tried using a spotlight in the way you're trying but for some reason didn't end up using it.
 

3dcheapskate

Busy Bee
Those sexy bald space babes reminded me of my spaceman Going Baldly (my Rendo gallery). Although it's not clear in any of the images there, at some point there was a horizontal(ish) green laser plane like in Alien when they first found the eggs, and a triple dot laser beam like the targeting thingy in Predator.

Here's a screenshot from the DAZ topic where I originally posted the image I'm thinking of, including some relevant words plus the image I'm thinking of:

Capture.JPG


The green planar beam was an ordinary spotlight but with two mesh squares positioned so as to block all except the bit I wanted.
The triple red dot beam aimed at the spaceman's head was, I believe, three spots done in exactly the way you're trying. I'm not whether I have the PZ3 for this but I'll check...

(P.S. Here's a link to the post in the DAZ forum - https://www.daz3d.com/forums/discussion/comment/6199776/#Comment_6199776 - it's the last image in that post)
 

3dcheapskate

Busy Bee
Found it (my ref: 2020-11-12 - Space Dwarf 6b(moreAliens).pzz)

Here's the atmosphere settings:
atm.JPG


The triple red dot is three separate spotlights - here's the settings for one of them:
red1mat.JPG
red1parm.JPG
red1prop.JPG


Top view showing position of the three red spots:
redmesh.jpg


And the green spot with the two blocking squares:
greenmesh+slit.jpg
greenmat.JPG
greenparm.JPG
greenprop.JPG
 

KageRyu

Lost Mad Soul
Contributing Artist
I had glanced at those two threads and made adjustments based on them in numerous tests but was not having luck. I will try some of the direct settings you have given from your two renders and see if I get those results, then adjust out from there to try to get what I am after. Thanks for the information, will keep you posted.
Render times with atmosphere are brutal, even on a dual hex core. All these tests and tweaks are killing me.
 

3dcheapskate

Busy Bee
...
Render times with atmosphere are brutal, even on a dual hex core. All these tests and tweaks are killing me.
As mentioned in the screenshot from my DAZ topic it's the combination of atmosphere and ray-tracing that really bloats the render time. So it may be worth disabling ray-tracing and doing a render of the whole scene, re-enabling ray-tracing and doing spot renders of the bits that actually need ray-tracing, then combining them in GIMP or Photoshop.
 

KageRyu

Lost Mad Soul
Contributing Artist
As can be seen here, all I am getting is dots. I have tried ramping the stepsize up and down. Larger Values the dots get further appart, smaller values bring them closer together, but I can not get a beam effect for some reason. As can be seen in the settings, I am using an extremely small stepsize that is driving up render times imensely - and this is on a test for just one light for this figure (three are needed total...two red beams, and the spotlight...then this figure needs to be added to a larger scene which has many lights already.
All I can conclude is that Poser hates me.
PoserHatesMe.jpg
 

KageRyu

Lost Mad Soul
Contributing Artist
Derp... Just noticed after posting that last screen shot I have been adding smaller noise and not reducing stepsize... brb...more tests.
 

3dcheapskate

Busy Bee
A possible answer - I forgot to mention the bagginsbill magic words which go with my screenshots...

"My units are inches"

(I just need to double check that they still are - I'll be back in a mo')
 

3dcheapskate

Busy Bee
Basic test: Very simple scene PZ3 attached - the Poser 11 ground/construct, two Poser 11 cone primitives, and two spots (one white so you can see the cones, the other red and set up as a laser beam.

Preview and render below

LaserTest01.jpg
 

Attachments

  • LaserTest01.zip
    26.7 KB · Views: 72

KageRyu

Lost Mad Soul
Contributing Artist
Now that I have figured out I have been adjusting the wrong setting, I am making progress. I have a beam, more or less. I am just fenangling with various settings to get the precise look I want (I am being way too much of a perfectionist for this part). I hope to post a good WIP image soon, maybe today, maybe tomorrow.

A Few Production Notes For Atmospherics -
I am setting this up in Poser Pro 2012, but this should also apply to P11 and later. These are based on my observations over the last couple of days of test rendering and finessing. Currently the Light Rig I am toying with has 1 Spotlight Eye Beam, 1 Point Light Eye Flare, A Spotlight on a shoulder mount with more diffused and vague atmospheric (going for Smokey Room effect a-la the opening to the movie Aliens), and there will be a smaller and shorter Eye beam on a second sensor eye at some point.
  • The Closer to the camera the Atmospheric Light is, the smaller a step size that seems to be needed to get a more solid looking beam. This is especially true when using very small cone angles.
  • Changing Atenuation Mode can help produce hotter (white) cores on Beams and Point Lights fading into the color of the light.
  • It might be desireable to attach noise textures to the lights rather than the atmosphere if you want more variety
  • Falloff Distance will affect the illumination of the light byt does not seem to affect the atmospherics (?). The Volumetric radius and distance seem to be a function purely of Light Intensity and Atmospheric Strength. I will need to do more testing.
  • I have been playing with Edge Blend nodes on the lights - when using extremely High light intensities they will wash out to white unless the Edge Blend attenuation are also excessive. For example, on an Intensity of 150% the Edge Blend needs to be at 20-40 to be noticable on color.
I will keep notes and add more as I find them.

Now, the real trick comes later when mixing and matching lights to, say...ad a spotlight beam on a mini-sub using the underwater Atmospherics @3dcheapskate shared previously - or headlights in a fogbank..or...or...or... Well, you get the idea.
 

KageRyu

Lost Mad Soul
Contributing Artist
So here are some results, been doing a lot of tests and retests making adjustments. I think I finally have everything about where I want for this part of the greater Project.
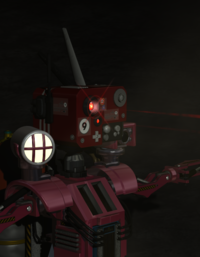
EyeBeam2.png

This first test is just the main eye beam. I finally got a beam effect but still wanted it to be much more pronounced than this. This was using some very fine Step Size in the atmosphere settings, and high Atmosphere strength on the light with constant attenuation. There is also a point light on top of an FX plane to give that flare at the eye.
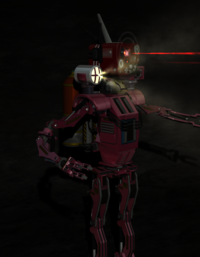
EyeBeam5.png
Still using the same Atmosphere settings. I pulled back to get a view from a distance. This is several iterations later, added the wider angle spotlight. Made lots of tests on that, and in the process changed the main eye to use Inverse Square attenuation which so intensified the beam I had to significantly drop it's Atmosphere strength. I also added a second, smaller beam (really just cloned the first beam and moved it to line up with the smaller eye). For the second Eye Beam I kept it with Constant Attenuation and it has a large Atmosphere Strength. You can see how much fainter it is in comparison with the same Light Intensity. The Spotlight has a texture applied to it's intensity to add the breaks for those cross bars on the model - it's not perfect but I feel it will be good enough. I set the spotlight to use Inverse square attenuation as well. I did several tests at differing distances.
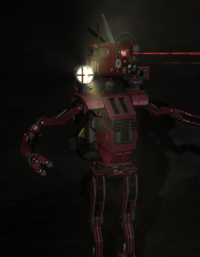
EyeBeam6.png
I parented the Lights up to respective emissive body parts, and did some posing and tests to check angles. I finally am happy with the result. I just need to do a little more work on kitbashing the droid, some retextures, then into my library he will go to be added to the actual project animation. Not sure if everyone else knows this - Figures with Parented Lights and their Settings can be saved to the Poser Library. This can be incredibly useful, especially for Light Fixture figures. You can create a simple scene to get the position, parenting, falloff distances, and intensity correct, parent the light, and save the whole figure so that when you later add it to a scene it just needs to be positioned.

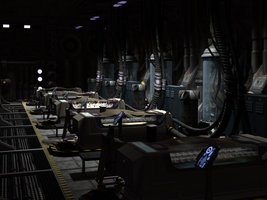
So now I will save the base atmosphere settings to my library to import into other scenes. Then I will reload the main project room and apply the atmosphere, and make adjustments to the 100 or so lights in that scene to get some good ambient feels. Here's the scene without atmospherics or the characters:
CryoBayWIP.jpg
 
Top