-
Welcome to the Community Forums at HiveWire 3D! Please note that the user name you choose for our forum will be displayed to the public. Our store was closed as January 4, 2021. You can find HiveWire 3D and Lisa's Botanicals products, as well as many of our Contributing Artists, at Renderosity. This thread lists where many are now selling their products. Renderosity is generously putting products which were purchased at HiveWire 3D and are now sold at their store into customer accounts by gifting them. This is not an overnight process so please be patient, if you have already emailed them about this. If you have NOT emailed them, please see the 2nd post in this thread for instructions on what you need to do
You are using an out of date browser. It may not display this or other websites correctly.
You should upgrade or use an alternative browser.
You should upgrade or use an alternative browser.
Poser Tips & Tricks
- Thread starter Lyne
- Start date
Glitterati3D
Dances with Bees
Ummm, sorry, but Smooth Polygons is not EVIL! ROFL!
For Dusk and Dawn and most figures, turning off smooth polygons means really "blocky" renders on bends. You NEED to smooth polygons as most organic figures (Humans, etc.) are designed to be used with a polygon smoothing routine.
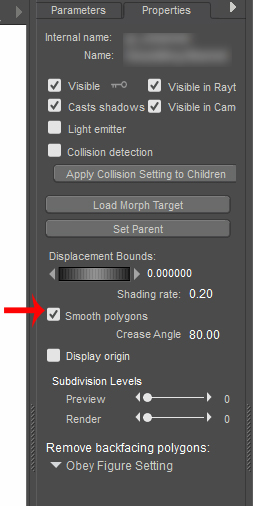
Now, the solution to your problem is very easy. Instead of turning off smooth polygons in the render stage, do it at the prop stage. Select your prop in the Poser dropdown menu, then the Properties pallete and UNCHECK Smooth Polygons there. For THAT prop only
 .
.
For Dusk and Dawn and most figures, turning off smooth polygons means really "blocky" renders on bends. You NEED to smooth polygons as most organic figures (Humans, etc.) are designed to be used with a polygon smoothing routine.
Now, the solution to your problem is very easy. Instead of turning off smooth polygons in the render stage, do it at the prop stage. Select your prop in the Poser dropdown menu, then the Properties pallete and UNCHECK Smooth Polygons there. For THAT prop only
It's funny that you just discovered Depth Map shadows, as that's all I used for more years than I can remember.
It's only in the past few years that I've started using Ray Traced shadows, and yes they take a lot longer to render, but depending on what I'm rendering, I'd rather have soft shadows for say a portrait of a character or two, but the Depth Map shadows I don't mind for outdoor/landscape type renders, though I do sometimes have to tone it down a bit or it comes out too dark.
It's only in the past few years that I've started using Ray Traced shadows, and yes they take a lot longer to render, but depending on what I'm rendering, I'd rather have soft shadows for say a portrait of a character or two, but the Depth Map shadows I don't mind for outdoor/landscape type renders, though I do sometimes have to tone it down a bit or it comes out too dark.
Glitterati3D
Dances with Bees
ohhh so it messes with Dawn's sub-division too? Very good point... use on the prop ONLY... THANKS!
Yeah, when you turn it off in the render settings that's the entire scene.
Sweet! Good to know as I do have several older props in particular that go bonkers with smoothing on.
Thx!
Yeah, and if you are using P9/P10 and Snarlygribbly's Scene Fixer script, you can turn smoothing off on multiple props at once. Actually, I usually turn it off on the Whole Scene, then run it again after selecting my figure and turn it back on for them. That can be faster, especially, if I have a lot of props in the scene.
Scene Fixer may work in P11, I haven't actually tried it. I'm not sure.
Glitterati3D
Dances with Bees
Too late to edit - I just tested and Snarlygribbly's Scene Fixer works fine in Poser 11.
Where can you get SceneFixer? There's no link to download it on his site, and he only mentions he wants to update it for P11.Too late to edit - I just tested and Snarlygribbly's Scene Fixer works fine in Poser 11.
I'll do a quickie render to see if anything explodes, then disable smoothing on just those props.
I also used Depth Map Shadows for a long time ... especially as the default Ray Trace has such sharp shadows. But once I learned how to adjust the shadows so they are softer, I only use Ray Trace. I don't mind the extra time with hair because the shadows are so more realistic. Hmm ... so more? Ok then. Clearly, I've been awake too many hours today.
I also used Depth Map Shadows for a long time ... especially as the default Ray Trace has such sharp shadows. But once I learned how to adjust the shadows so they are softer, I only use Ray Trace. I don't mind the extra time with hair because the shadows are so more realistic. Hmm ... so more? Ok then. Clearly, I've been awake too many hours today.
She sounds like a smart girl! Hands frogimus some Tim Tams...Hehe. My daughter is getting addicted to TimTams. Bit pricey here in the states.
Personally, I tend to use shadow maps a lot. The harder shadows work well for my post processing.
I've never used a shadow maps. Can someone explain how they get used?
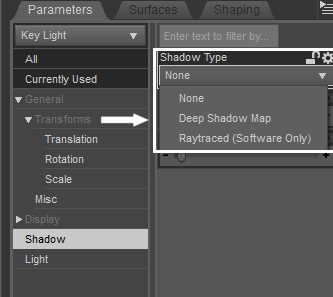
Hi Pen, I opened my DS 4.0, so your UI probably looks different, but if you click on one of your lights that's set up to use shadows, in the Properties tab you'll see something like the following screenshot.

By default it might be set to None, but you can select either Deep Shadow Map or Raytraced for the type of shadows you want to see in your scene. As Satira said, Raytraced does take much longer, but I prefer them for portrait renders so any long hair throws soft shadows on a character's face and neck.
The Deep Shadow Map I'm more likely to use for outdoor scenes, say with sun shining down through trees, as there the darker, thicker shadows would be more like what you would see in nature.
Well I think I have changed my mind on Depth map shadows VS Ray Traced... been working on my render for some hours now...and with DEPTH shadows, there is a think BLACK or dark line OUT-LINING objects... like an arm, where a shoe meets the foot, etc... I started to post work those out and thought.... wait a minute, this is NOT worth the time saved...I'd rather use ray traced shadows and not do post work on aspects I discovered I do NOT like.... so ! live and learn some MORE!
Glitterati3D
Dances with Bees
Where can you get SceneFixer? There's no link to download it on his site, and he only mentions he wants to update it for P11.
Let's see if we can get @Snarlygribbly in here to answer. I find Scene Fixer indispensable!
Glitterati3D
Dances with Bees
Well I think I have changed my mind on Depth map shadows VS Ray Traced... been working on my render for some hours now...and with DEPTH shadows, there is a think BLACK or dark line OUT-LINING objects... like an arm, where a shoe meets the foot, etc... I started to post work those out and thought.... wait a minute, this is NOT worth the time saved...I'd rather use ray traced shadows and not do post work on aspects I discovered I do NOT like.... so ! live and learn some MORE!
Lyne, you can control those shadows by using the properties settinga on the light. Poser's default shadow map settings give you that very dark, very sharp shadow because the default Shadow Min Bias setting is just too strong. Change it on the properties tab here. And, while you're there, change the blur radius as well...........
Thanks Traci. I haven't "searched" over at Renderosity, so a link might be there, but if he stops in here with a link, that'll be great.Let's see if we can get @Snarlygribbly in here to answer. I find Scene Fixer indispensable!
