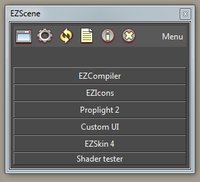
How does it work to change the colors on a WX button? It has a background and a foreground color, but setting those do not affect a very thick border all around the button. I have created a dark theme for my GUI, and these thick white borders are ruining it. I have searched the documentation and I couldn't find out why this happens.
View attachment 58405
Any hints? Is this normal?
You need to subclass wx.lib.buttons.GenButton to have the control you want.
First, import wx.lib.buttons
Then do something like this:
class EZButton(wx.lib.buttons.GenButton):
def __init__(self, parent, label = wx.EmptyString, btn_name = wx.EmptyString, wxid=wx.ID_ANY, style=0):
# Initialise the base class
wx.lib.buttons.GenButton.__init__(self, parent, wxid, label=label, name=btn_name, style=style)
# Configure appearance
self.SetBezelWidth(1)
# Add bindings
self.Bind(wx.EVT_ENTER_WINDOW, self.EnterWindow)
self.Bind(wx.EVT_LEAVE_WINDOW, self.LeaveWindow)
def EnterWindow(self, event):
bg_colour = self.GetBackgroundColour()
R, G, B = bg_colour
if max(R,G,B) > 235: return
new_bg_colour = wx.Colour(bg_colour.Red() + 20, bg_colour.Green() + 20, bg_colour.Blue() + 20)
self.SetBackgroundColour(new_bg_colour)
self.Refresh()
def LeaveWindow(self, event):
bg_colour = self.GetBackgroundColour()
R, G, B = bg_colour
if max(R,G,B) > 235: return
new_bg_colour = wx.Colour(bg_colour.Red() - 20, bg_colour.Green() - 20, bg_colour.Blue() - 20)
self.SetBackgroundColour(new_bg_colour)
self.Refresh()

")