• Welcome to the Community Forums at HiveWire 3D! Please note that the user name you choose for our forum will be displayed to the public. Our store was closed as January 4, 2021. You can find HiveWire 3D and Lisa's Botanicals products, as well as many of our Contributing Artists, at Renderosity. This thread lists where many are now selling their products. Renderosity is generously putting products which were purchased at HiveWire 3D and are now sold at their store into customer accounts by gifting them. This is not an overnight process so please be patient, if you have already emailed them about this. If you have NOT emailed them, please see the 2nd post in this thread for instructions on what you need to do
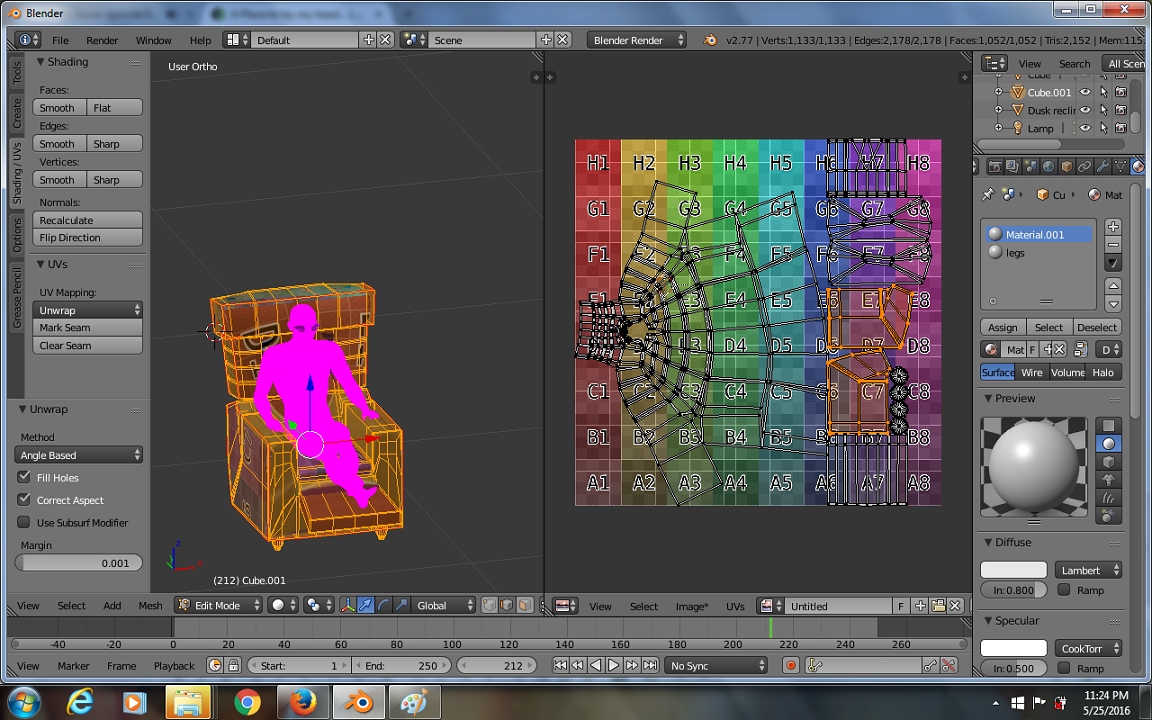
I need a course in UV Mapping

eclark1894

Visionary
Clothes aren't a real problem for me. They're sort of easy. But inorganic things like well chairs for example...
 

Lyrra Madril

Eager
Contributing Artist
I don't use blender .. so I do not know how it handles things. I use Uvmapper pro and UVlayout for UVmapping. Conceptually, most solid shapes can be broken down into rectangular or cylindrical sections. Rectangular shapes can then be split apart like taking apart a cardboard box. Cylinders you take apart like a tin can .. cut off both ends and then cut it the long way. Clothing is generally a lot of cylinders or tubes.

Also, think about the real world object and where its seams would be. This is usually a good guide as to where to cut for a uvmap. so for this chair I would start by cutting off the arms into 2 big squares. the feet are cylinders, the footstool is a square. then the front panel, seat cushion, bottom and back of chair are all natural divisions.

Now you can cut this open and flatten them out. With nice squared up parts you can arrange them all running the same way on the UV map so the fabric pattern lays in a natural way across all pieces.

I do have 2 chapters on UVmapping in my book using UVmapper and UVlayout, but those focus on clothing of course. You might find those an interesting read, since they are more detailed.

LM
 

Glitterati3D

Dances with Bees
Well, it's kinda hard to explain without doing, but here are a couple "rules" you need to adhere to or attempt to do so:
1. Hide the seams - cut where your UV seam will be less likely to be seen
2. Cut as much as you need to to get a flat piece, then "sew" or "weld" pieces back together after they have been flattened
3. Take your seam cues from a real life example of what you are mapping.

For your recliner, I could cut so that each piece is a separate UV island - arms, back, footrest, seat - because you have plenty of places for hidden seams
 

eclark1894

Visionary
Taking a bit of a break from building my house. As per normal, it's because texturing is not my thing. As it turns out, it may be for the best because I'm hoping this will be a learning moment for me. So, now, I texturing a barn, or a horse stable, and again, right around time to texture, i run into problems. Right now, I'm trying to texture the roof and I'm running into a similar problem that I ran into with the house. I'm getting different sizes for similar objects which ends up distorting the texture. I can't see anything I'm doing wrong so I'm hoping someone can help me out. My guess is that I'm not enabling some feature or maybe I did enable some feature i wasn't supposed to? This is all in Blender v. 2.77a.

map.png
 

Miss B

Drawing Life 1 Pixel at a Time
CV-BEE
I wish I could help Earl, but I only create my UV Map in Blender. I do my actual texturing in Photoshop.
 

Lissa_xyz

I break polygons.
You need to normalize your uvs as they seem to be different sizes. You can do it manually, or see if this script will work in the newest Blender.

New Addon: UV Normalize

Here's a video on normalizing UVs, it utilizes the above script, but hopefully will give you an idea.

/edit
Also, keep your uvs roughly the same shape as the 3d counterpart. For instance, don't smoosh a rectangular surface down to a square uv tile.

/edit2
This also mentions a normalized option under the pivot points when editing UVs.
Editing UVs — Blender Reference Manual
 
Last edited:

Miss B

Drawing Life 1 Pixel at a Time
CV-BEE
Thanks for those Vask. Even though I've been doing UV Maps in Blender for a long time, it's always good to learn newer/better ways to do it.
 

eclark1894

Visionary
I haven't downloaded the add-on yet, but I have been manually adjusting the UVs. I'll post an image once I've finished. Thanks for the advice Vaskania.
 

eclark1894

Visionary
Okay, just a quick screen cap to show that I've managed to equalize the UVs all around. Again, this was done manually, but I do plan to download the add-on that Vaskania posted about. BTW, what you're seeing is a stacking of the UVs for each side. That way I was sure to get them as close to equal as possible.

map.png
 

RAMWolff

Wolff Playing with Beez!
Contributing Artist
I'd say yes to that Earl. In case someone else wants to do a texture add on for the prop in question, it's always good to supply one! Plus your shader will apply better too!
 

Pendraia

Sage
Contributing Artist
I would say yes also...some shaders have bump or image maps which won't work properly if they aren't uv'ed. If someone tries to apply a shader of their own it may not work.
 

RAMWolff

Wolff Playing with Beez!
Contributing Artist
Have you tried a simple Two Sided Planar mapping? That's really basic and it SHOULD work on the plate with no issue.
 

Miss B

Drawing Life 1 Pixel at a Time
CV-BEE
Hey Earl, I don't know if you're plate has a top (inside) and bottom (outside), though it looks as though it does. If it does, have you cut a seam around the edge of the plate to make them separate items? That would give you two distinct islands on the UV Map, which you can then move where you want to place them. I'd suggest diagonally across from each other so you have as much room as possible between them for color/texture bleeding.
 
Last edited:

eclark1894

Visionary
Figured it out folks. You need to do UV mapping in Blender under the Blender default render engine. You can't do it under the Cycles engine.
 
Top