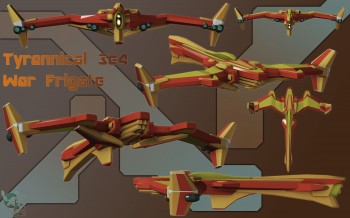
I use Hexagon 2.5 and as it is I don't have access to a group boolean union function in my program to make my primative modeled designs unimesh in order to UV map them and paint and texture them. One example is this ship that I would like help with in group boolean union welding all the obj groups into a single unimesh group. If anyone can point me in the direction of a relatively cheap program to group boolean union weld my figure, or would prefer I pay a fee for the service, post here. Here is the design in question:
1) Booleans are evil. They are the nuclear-bomb of 3D modeling. When used, they are certainly not good for much beyond very simple intersections. In any case, there's always "clean-up" work to do and the more complex the shape, the more clean-up is required. Do not use them willingly but, instead, practice a lot with them so you know exactly how limited they are in your chosen app.
")
2) It is almost certain you will not get a satisfactory result by UV'ing that object as one object group. That doesn't mean it can't be done, but I'm just making an assumption of how much work/skill/effort would be required and weighing that against what I think you will be willing/able to easily do.
3) Instead, what you should do, considering the construction, is map each group in that object separately, in a logical manner, and then manipulate those UVs in your program of choice until they are logically arranged. Assign material groups to help you organize your texture set, if there is more than one texture map.
Here's an example:
Imgur: The most awesome images on the Internet
There are four individual, non-contiguous (unconnected) bits of geometry, here. A Cabin, a wing, and two Engines. Each was UV mapped separately. The Cabin and Wings were UVMapped using an easy Box "Projection Map", since they're basically boxes, and in that map, each "side" that overlapped an opposing side, relative to a cardinal direction, got stacked on top of the map for that side. Basically - They share the same UV space, so they will share the same textures. You don't have to do it like that, but it's a quick, easy, way to map. You can even separate out those shared UVs if you wished, if you later decided you wanted those faces to have different textures. The Engines were modeled from one engine, which was UVmapped with a Cylindrical projection, and after it was mapped, the object was simply copied and pasted, giving the other engine the exact same UVmap and Texture Space. Here, too, you could separate those out when manipulating the UV by hand if you later decided you didn't want those engines to share the same texture.
Then, the different UV sets were moved around in the UVMap, by hand, until they didn't overlap each other. They were normalized, by hand, a bit to make sure their relative scales were fairly correct so someone creating textures wouldn't have to worry about scaling textures differently for different parts of the model.
When exported all as one object, the object would retain each named Group and Each Material group if, for instance, it was a wavefront.obj export. Cabin/Wings/Engines could have separate texture maps or special materials. One could, before export, also assign more materials, like to the back of the engines so a "glow/ambient effect" material could be applied to that one Material group in one's chosen app.
4) However, the real point is - You don't want to model this way.
This would be called "modeling by primitive" and would entail simply creating primitives and stacking them onto and into each other to define an object. This produced a lot of geometry that isn't actually seen by a renderer and there'd be a lot of texture space that wouldn't actually be seen, as well. However, the renderer would still have to load the geometry and textures, even if they were obscured/culled due to how the model was constructed.
Blocking out an idea with primitives is fine. And, for basic models, it's not really that much of a problem. However, this is not the way you'd want to do a complex shape like the one you have and that is why, and only why, you're probably having issues with trying to figure out how to map it.
There are plenty of good 3D modeling videos out there and all of them related to polygon modeling, which is what you're doing, are going to be relevant, no matter the application, in terms of demonstrating general 3D modeling skills. Take some time to watch some of them and watch some of the tutorials for your chosen application.
Some links for Hexagon general vids and some decent walkthroughs of modeling a spaceship model in Blender:
Geekatplay™ Studio, Resources for 3D Artists. Tutorials.