• Welcome to the Community Forums at HiveWire 3D! Please note that the user name you choose for our forum will be displayed to the public. Our store was closed as January 4, 2021. You can find HiveWire 3D and Lisa's Botanicals products, as well as many of our Contributing Artists, at Renderosity. This thread lists where many are now selling their products. Renderosity is generously putting products which were purchased at HiveWire 3D and are now sold at their store into customer accounts by gifting them. This is not an overnight process so please be patient, if you have already emailed them about this. If you have NOT emailed them, please see the 2nd post in this thread for instructions on what you need to do

Lyrra's Dawn DevSuit, My head will explode!

Faery_Light

Dances with Bees
Contributing Artist
I'm trying to create a bodysuit for Dawn and this is what I have so far.
But before I do anything else it needs rigged and grouped.

So I tried to bring in DawnSE's DevKit as a donor but stuff bent out of shape badly.
I used to do this in the older Poser versions but now I can't wrap my head around it...sigh.
Is there a step by step tutorial for dummys to show how to do it?

This is what I have so far and want to add some trims atound the neckline and wrists.
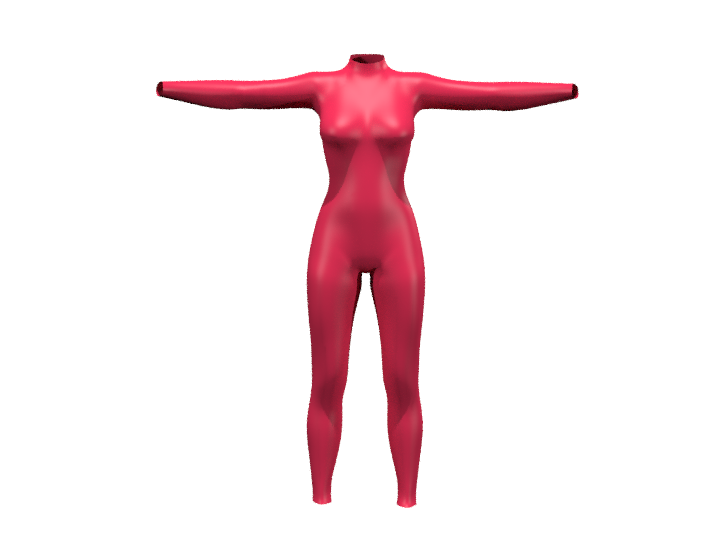
My BdySuitDawn.png
 

Janet

Dances with Bees
Contributing Artist
My head has been exploding since I started learning Blender around last Christmas. I finally got the morphs thing figured out with the help of Glitterati3d. She sent me to a script for poser so I got that then she spent about an hour on skype with me to show me how to use it.

I have that suit also and will give rigging a go later today. Though I think those arm and leg bends require some special things to make them work.
 

Glitterati3D

Dances with Bees
Faery_Light this one should be pretty easy, actually......

Load Dawn with your suit conformed to her. Now load the Resource Kit suit that comes with Dawn.

In the parameters tab, the small white arrow on the top, right........check Show Hidden Parameters

Now, on the main dropdown menu, choose your Devsuit>Body

From the Main Menu Figure>Copy Joint Zones From and choose the Dawn Resource Kit as the source.

Delete the Resource Kit out of your scene and test your now, fully rigged Dev Suit.

Be sure to save a copy to your library.
 

Faery_Light

Dances with Bees
Contributing Artist
Faery_Light this one should be pretty easy, actually......

Load Dawn with your suit conformed to her. Now load the Resource Kit suit that comes with Dawn.

In the parameters tab, the small white arrow on the top, right........check Show Hidden Parameters

Now, on the main dropdown menu, choose your Devsuit>Body

From the Main Menu Figure>Copy Joint Zones From and choose the Dawn Resource Kit as the source.

Delete the Resource Kit out of your scene and test your now, fully rigged Dev Suit.

Be sure to save a copy to your library.
Thanks. I'll try that. :)
 

Faery_Light

Dances with Bees
Contributing Artist
I have it all so it now has the bones and morphs and the material groups.
But I'd like to remap it in UV so it matches the pose in the image below.
Is there anyway to do that as I only manage UV Mapper as it is.
This is how they cut V3's Catsuit and if I could get the UV to match the pose all my textures could easily be adapted.
 

Attachments

  • BloodFireExample.jpg
    BloodFireExample.jpg
    118.9 KB · Views: 385

Glitterati3D

Dances with Bees
I have it all so it now has the bones and morphs and the material groups.
But I'd like to remap it in UV so it matches the pose in the image below.
Is there anyway to do that as I only manage UV Mapper as it is.
This is how they cut V3's Catsuit and if I could get the UV to match the pose all my textures could easily be adapted.

The short answer is No.

Even with professional UV mapping tools, you have 2 very different meshes. Getting them UV mapped even remotely close enough to interchange textures would be a massive stroke of luck.

The long answer is even IF you managed it, the textures from a V3 set are going to distort horridly because the figures themselves aren't remotely similar, and that doesn't even address the disparate rigging.
 

Faery_Light

Dances with Bees
Contributing Artist
I want to practice UV mapping in Blender but will need to do it with objects I'm not actually using for projects.

Today is one where I do nothing, both arms are hurting so bad, trying to get out of bed this morning was like a fish out of water flopping around.
Both shoulders and arms were useless and it took me at least 15 to 20 minutes to get out of bed.

Then I get a cup of coffee and could not hold the cup so it spilled all over the floor...sigh, what a mess.

I want to make a little ornamentation to go on the suit that resembles a bikini and need to figure how to make it 3d from an image.
Then I need little bands like a collar and cuffs trim for it.
Once I have that it will be texture time. :)

Maybe tomorrow will be a better day, one can at least hope.
 

Faery_Light

Dances with Bees
Contributing Artist
I'm wondering how would I go about making a 3d object from an image?
I want to make the image inserted here into a 3d object to add onto the bodysuit I am working on.
Then parent it and save as an object so it is all one piece like the red set.

Bloodfire-D.jpg


BloodfireTest.jpg
 

Janet

Dances with Bees
Contributing Artist
In Blender you can use the sculpt mode and change the second image to your image and set it to raise then put it on an object. It will raise that area.
 

Bonnie2001

Extraordinary
If you really want it as a separate geometry FL, I could easily make it for you in ZBrush and send it to you as an obj file.
 

Bonnie2001

Extraordinary
This took all of a couple of minutes FL:

FL1.jpg


I used your image as an alpha and dragged it onto a Plane with Texture on and set to colour the white part of the alpha red. Then I masked the red, inverted the mask and extracted the geometry.
All I have to do is decimate the polycount and I guess split the three parts up, that is if you want them.
 

Doug Hunter

Busy Bee
Contributing Artist
Hi Faery_Light, I’m not sure if I could be of any help but I am interested in this post to learn how people do things.

I’m not sure what you want the end product to look like.
It looks like you are making a red body suit (like a super hero suit) and you want to put some gold ornamentation on the suit to resemble a bikini and you want to have these gold ornaments to be 3D offset from the suit. And I think you also wanted some bands to go around the arms and legs.

Are you making the ornaments and bodysuit as all-in-one so that the gold part is displaced but still part of the suit?
Or are you making it as two separate pieces so that the gold parts follow the curve of the suit but are separate?

I did a quick knock-up of each (the left side is all-in-one and the right side are two separate pieces). Are either of these anything like what you are making?
FaeryLight1.jpg
 

Faery_Light

Dances with Bees
Contributing Artist
This took all of a couple of minutes FL:

View attachment 39797

I used your image as an alpha and dragged it onto a Plane with Texture on and set to colour the white part of the alpha red. Then I masked the red, inverted the mask and extracted the geometry.
All I have to do is decimate the polycount and I guess split the three parts up, that is if you want them.
Bonnie, that is pretty much what I want.
Thank you. :)
 

Faery_Light

Dances with Bees
Contributing Artist
Hi Faery_Light, I’m not sure if I could be of any help but I am interested in this post to learn how people do things.

I’m not sure what you want the end product to look like.
It looks like you are making a red body suit (like a super hero suit) and you want to put some gold ornamentation on the suit to resemble a bikini and you want to have these gold ornaments to be 3D offset from the suit. And I think you also wanted some bands to go around the arms and legs.

Are you making the ornaments and bodysuit as all-in-one so that the gold part is displaced but still part of the suit?
Or are you making it as two separate pieces so that the gold parts follow the curve of the suit but are separate?

I did a quick knock-up of each (the left side is all-in-one and the right side are two separate pieces). Are either of these anything like what you are making?
View attachment 39798

I've used it so far with displacement but would like it separate to fit over the suit.
If you do Superfly renders displacement will not work so well.
 

Faery_Light

Dances with Bees
Contributing Artist
I'd like to add it over the suit to alter the resource suit, which I've already added the morphs to so it conforms to Dawn.
But for retail I need to alter the whole suit a bit, not sell the original as is.
For the most part the suit will be smooth with that decoration on it and will have trans maps for other changes.
BloodFire-1aDawn.png
 
Top