• Welcome to the Community Forums at HiveWire 3D! Please note that the user name you choose for our forum will be displayed to the public. Our store was closed as January 4, 2021. You can find HiveWire 3D and Lisa's Botanicals products, as well as many of our Contributing Artists, at Renderosity. This thread lists where many are now selling their products. Renderosity is generously putting products which were purchased at HiveWire 3D and are now sold at their store into customer accounts by gifting them. This is not an overnight process so please be patient, if you have already emailed them about this. If you have NOT emailed them, please see the 2nd post in this thread for instructions on what you need to do

A question for all the texture artists out there...

eclark1894

Visionary
I'm told that I should include UV maps in case you guys decide that you wish to make texture sets for these models later. So where the heck are you guys when I NEED you? When I'm first making the model I could sure use your input then, like where to put a seam? Would you rather I model that detail or are you willing to just texture it in? Toon item or realistic?

Look, there are somethings I can texture on my own, I'm not THAT hopeless, but if I learned how to texture, then I won't need you, will I? What and how do you guys charge to texture a model? Do you charge by the model or project? How do I reach you when I need to reach you? (I'm not a phone person)

Hello... is thing on?:unsure:
 

Miss B

Drawing Life 1 Pixel at a Time
CV-BEE
Yes Earl. Could you upload a render (or point to your original post of the tea set), as that will help us to make recommendations for where good places for seams would be.
 

Glitterati3D

Dances with Bees
Not trying to sound harsh, Earl, just share my own experiences.

First, UV map to make texturing easy for YOURSELF. Don't worry about others because, as I found out the hard way, you're going to have to learn texturing if you want to get product in the marketplace. You need to invest in some decent MRs and learn how to do the basics yourself.

Once you get there, vendors will enjoy working with your stuff because if you made it easy for YOU, imagine how easy it will be for a professional texture artist.

You'll even learn to model based on how you are going to texture an item. You can make all kinds of cool stuff, but if you can't UV map it, no one is ever going to use it. I've seen lots of great models ruined by lousy UV maps.

Look at ArtofDreams over at Renderosity - they have some decent MRs that will work for male and female clothing, and contain a lot of materials in one package. Like this one: Selection-Fabrics-Basics 2D Merchant Resources ArtOfDreams

That allows you to make a minimal investment in GOOD merchant resources and learn how to use them effectively.

Then, make a simple sleeveless dress for Dawn. UV map it. Texture it with a good MR and learn where you made mistakes in the UV map. Then re-map it and start over.

Once you have that perfect, add sleeves to the same model and do it all again.

It's the only way you'll learn to do the thing you need to do to get a product to market.
 

Glitterati3D

Dances with Bees
Also, you always want to work with texture artists. If they create addon textures to your items, that brings your stuff to the forefront over and over. If the customer likes that addon, they need YOUR product to add it on TO. Add a reputation for excellent, easy to use UV maps, and you can stop begging texture artists, they'll come to you.
 

Miss B

Drawing Life 1 Pixel at a Time
CV-BEE
OK Earl, these are just suggestions as to how I would try to mark/cut seams for the teacup (see the screenshot below). These are just from what I see of how you textured it, keeping your mat zones in mind. If you try these and they don't all work well, at least it will give you an idea of what to look for. Just remember, you want the pieces laying flat for texturing.

Suggested Seams - Teacup:

1. Around the outer edge of the Tea mat zone.

2. Around the inner edge of the top of the teacup.

3. Down the edge that runs down the teacup where the handle is attached. Use Select > Edge Loop to get the edges all the way down the inside and outside of the teacup.

4. Down the edge that runs down the teacup directly opposite of the seam no. 3.

5. Around the edges where the handle meets the cup.

6. The inner and outer edges of the handle so it can lay flat.

7. The top and bottom edges of the teacup bottom/foot. Since there's no texture on it, you might just do the bottom edge and see how that goes.

SuggestedUVSeams.jpg
 

NapalmArsenal

Distinguished
Contributing Artist
Good suggestions Miss B. and in good placements. Also great advice Traci.

I would also say a program like Photoshop or something similar is a must. It will let you not only create your own textures but help with good MR ones. Antje also has some nice MRs over at Renderosity and the nice thing is they are sometimes posted for free for commercial or personal use.

When you place your seams if you can do them inconspicuously that's always a plus with the texture artist. Sometimes....... you have to find a way to make the seam work if it's in a very obvious place.

Blacksmith is good for making seams unnoticeable because it lets you paint over them in a 3d setting when you import the model and import the texture for it. It then allows you to export the texture map after you have made changes and you can sometimes get it on sale for a pretty decent price and of course Filter Forge has a nice selection of MR resources.

There are lots of different ways to texture you can use a square seamless tile and just use the vertical and horizontal settings to achieve something you like or you can just use color shaders with bump and displacement maps that give you a pattern. Then for the high detail on the models you use a fixed map on the templates.

Blacksmith version is on the left. Seam.......... what seam? The one on the right you can see a very obvious one running through the middle. Seams on curves like this can be really really hard to texture over so they aren't noticed.
Garlic 4.png

After Blacksmith on the left and before Blacksmith on the right. I can kind of hide this one in my displacement map and bump because garlic does have that kind of texture around the roots.
Garlic3.png
 
Last edited:

kobaltkween

Brilliant
Contributing Artist
I'm told that I should include UV maps in case you guys decide that you wish to make texture sets for these models later. So where the heck are you guys when I NEED you? When I'm first making the model I could sure use your input then, like where to put a seam? Would you rather I model that detail or are you willing to just texture it in? Toon item or realistic?

Look, there are somethings I can texture on my own, I'm not THAT hopeless, but if I learned how to texture, then I won't need you, will I? What and how do you guys charge to texture a model? Do you charge by the model or project? How do I reach you when I need to reach you? (I'm not a phone person)

Hello... is thing on?:unsure:

You should include UV maps because procedural textures aren't enough for anything but plain glass and water, and you should pretty much always texture your work. You're actually very well known, so you might have other people texture your work, but in my experience that's really rare. Mostly you need to map for yourself. And really, that's what will teach you the most about where to put your seams and how to map. Because it really depends on how you texture.

For instance, you look at most Blender tutorials on modeling, and they'll just auto map the item, because the tutorials don't tend to use anything but Blender. So many use multiple UV maps and texture painting to make their textures. Easy peasy, and it doesn't matter if the mapping has tons of islands, so long as those islands aren't crazy distorted. The same could be said for pretty much any method mostly reliant on 3D texture painting. But if, instead, you rely partially or mostly on a 2D image editor, you might want to watch your seams.

That goes double for if you manage to pair with a texture artist. If they're a great artist and use Photoshop and GIMP, you want to UV map to make life easier for them. That means making sure you balance number of seams with distortion (stretching and compressing, there shouldn't be twisting), and you make sure things that can be straight are.

With clothes and shoes, though, it's easy. You put seams where they'd be on real clothes. And with hard surfaces, you put your seams at most of your sharp angles. In my mind, you kind of extrapolate from how you map a cube, a cylinder, and a sphere. Like that cup, that's basically three cylinders or so: two for the cup (inside and out) and one for the handle. That garlic, it's essentially like a sphere with a cylinder on top. And you put your seams as much as possible where they either won't be seen or fit with the object. For instance, that cup handle is like a cylinder with open ends. So you put a cut around the top and bottom where it joins with the cup, and one down a side to make that into a strip. You could put that seam on the inside or the outside of the handle and it would be correct either way, but it's probably less hassle on the inside.

If you use Blender, I definitely recommend using its texture paint for seams. And if you want to get really fancy, you can use the multiple UV map trick. You can make a new UV map (or 3), set the map to projection, and then paint on the projected UV. You can do this with as many views as you want. You can even do the auto map, and get nice undistorted textures, then switch back to a UV map with fewer seams. I've only tried out Blacksmith as a demo, but I found Blender _much_ simpler and easier to use, with a lot more tutorials out there. But that's just me, and I find Blender easier in general. But it's free, so I figure it's worth mentioning in general.
 

HaiGan

Energetic
Contributing Artist
Looking very nice, and well done on the hard work in areas that will then potentially affect the way other people do their own thing.

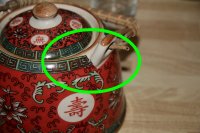
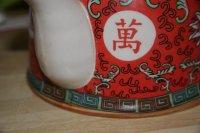
A teaset-specific comment that I hope is helpful, and nothing about how you do the UV mapping: tea sets are often textured in real life via transfers after the first firing. To match real life the decoration in the texture should not look as if it goes underneath handles or spouts. It could in fact stop quite abruptly with a very visible break in the pattern, depending on the quality of the original item you are trying to replicate in 3D. Here's a couple of photos of one of my own collection of teapots (yes, I have a collection of teapots, shut up, I like tea, okay? :p ). This one was a Chinese-style second, picked up cheap, and you can see how the applied transfer is bunched up at the edge of the handle and cut away rather badly for application around the handle and spout.

Img_2637.jpg Img_2638.jpg .
 

Gadget Girl

Extraordinary
Contributing Artist
Actually, I think I need to check the teapot. I think all the textures are upside down.

They look great, and I'm not sure if all the teapots are upside down, but I think the third one is, or it's a cloud city on the underside of the clouds :) But honestly they look great. If it were an actual item I was going to have in my house, I'd probably go for the second one like MissB, but for a render I think the first one is the one I'd be more likely to use.

To match real life the decoration in the texture should not look as if it goes underneath handles or spouts. It could in fact stop quite abruptly with a very visible break in the pattern, depending on the quality of the original item you are trying to replicate in 3D.

Nothing wrong with collecting teapots :rolleyes: (okay I don't collect teapots, but it sounds like a cool thing to collect). That's a really neat observation, about how real teapots are made. And also one of those terrible conundrums for a 3d artist. Do you go with the flaws in reality, and risk people thinking you 'messed up' the 3d version, or do you do 'better than reality'. Although it sounds like the really high end teapots they take the time to make look nicer.
 

Miss B

Drawing Life 1 Pixel at a Time
CV-BEE
They look great, and I'm not sure if all the teapots are upside down, but I think the third one is, or it's a cloud city on the underside of the clouds :)
I think you're right GG. It looks like the last one is the only teapot with the design upside down. The other two look fine to me.
 

eclark1894

Visionary
They look great, and I'm not sure if all the teapots are upside down, but I think the third one is, or it's a cloud city on the underside of the clouds :) But honestly they look great. If it were an actual item I was going to have in my house, I'd probably go for the second one like MissB, but for a render I think the first one is the one I'd be more likely to use.

I'm working on several things alternately right now that I may never release. A tuxedo for Dusk, a tomb raider style outfit for Pauline, complete with guns, and these tea sets. Technically, If I can finish with the texture on the tea sets, I'll actually complete a project
 

Miss B

Drawing Life 1 Pixel at a Time
CV-BEE
It's not necessarily the UV map that's the problem. The texture was just placed upside down on that one. It happens. I've had good laughing fits at some of the textures I've done, simply because I didn't realize I had placed the texture in the wrong direction.
 

eclark1894

Visionary
It's not necessarily the UV map that's the problem. The texture was just placed upside down on that one. It happens. I've had good laughing fits at some of the textures I've done, simply because I didn't realize I had placed the texture in the wrong direction.
No, it wasn't. The other two maps have no directional cues so you can't really tell that they're upside down. I thought Poser was glitching or something when I first realized that it was upside down, but the boat on the texture map is point righting side up, but when you apply it, it's upside down.
Just for clarification, it's not the WHOLE map that's upside down. just that section around the middle. Somehow it got flipped.
 
Top