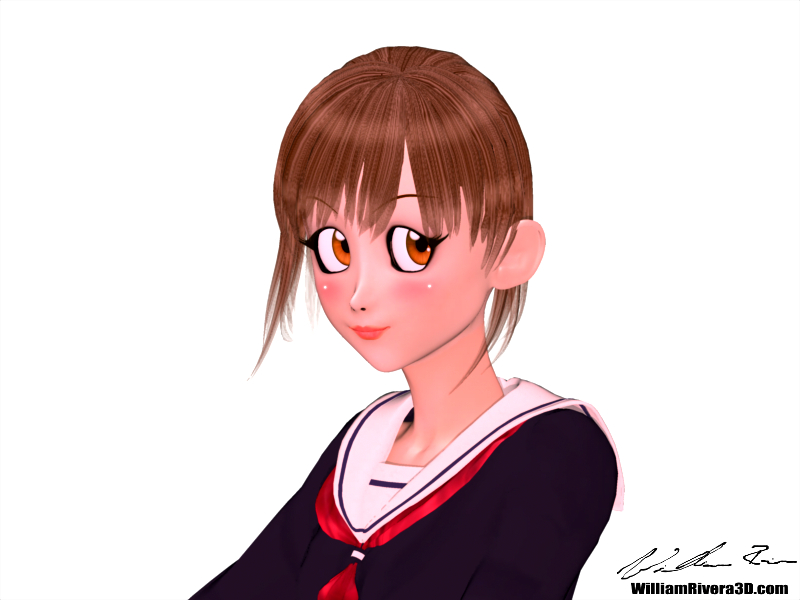
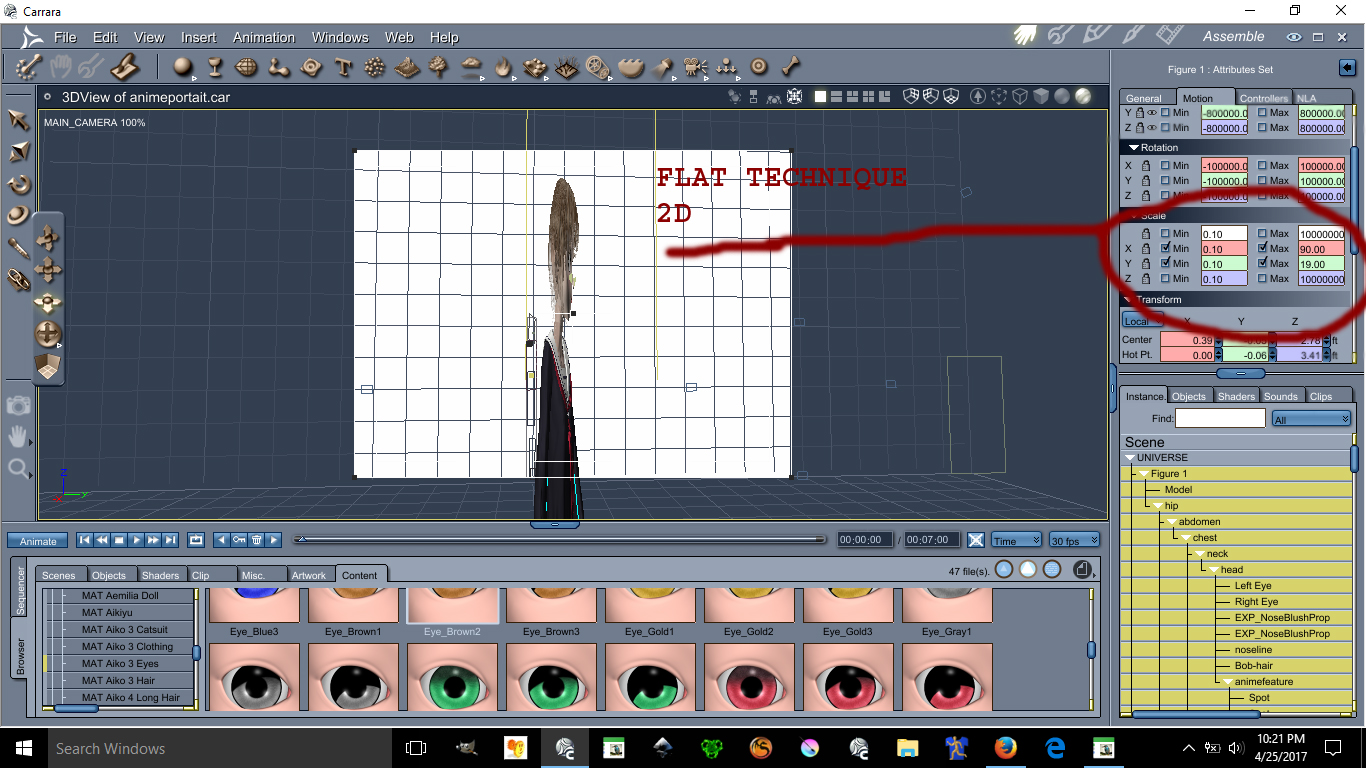
I'd like to share some skills I use to render anime characters, I flatten the character making it look 2D. I use carrara but it might be possible in Daz studios.
Please see the images below for better understanding.

This image has been resized to fit in the page. Click to enlarge.

This image has been resized to fit in the page. Click to enlarge.
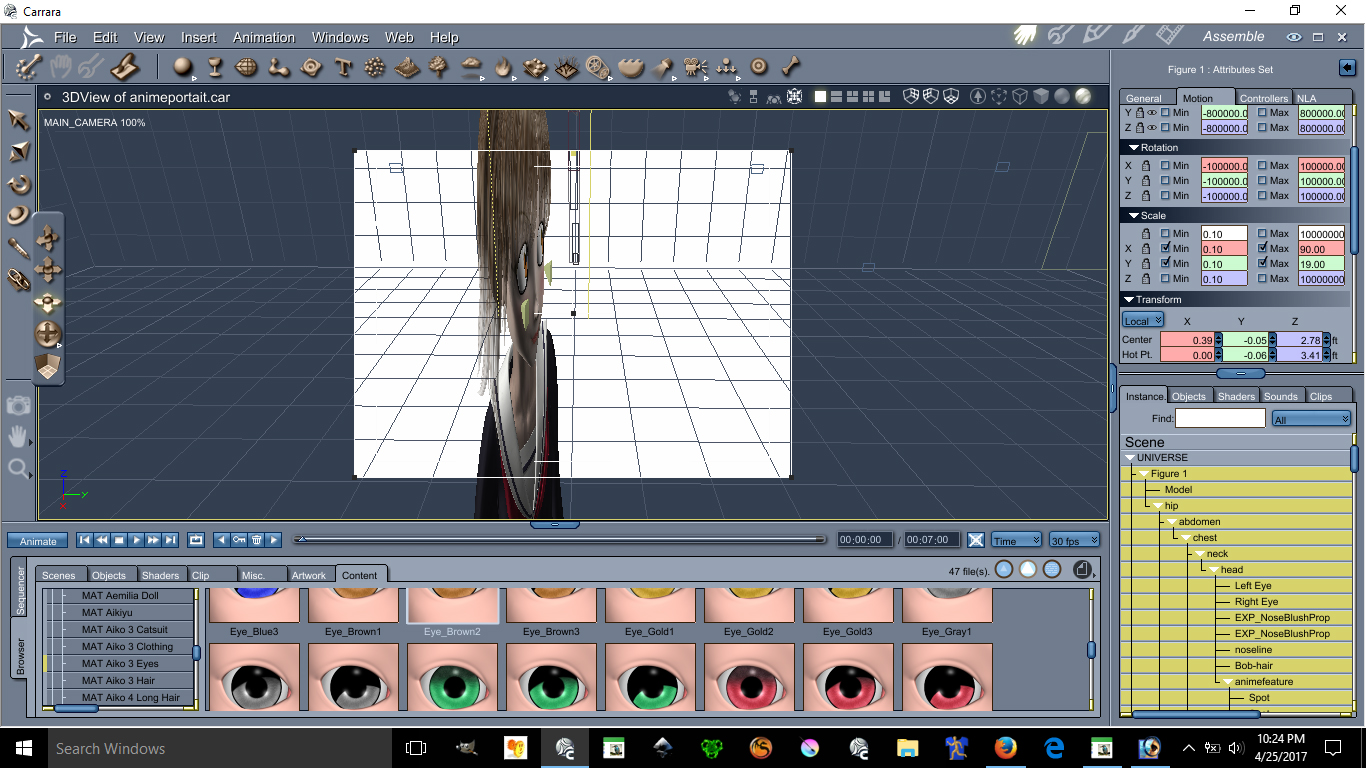
Using the scale X and Y can make possible the flatten of a character you can make her as flat as you want.
Ear Pulled, Square big eyes, small mouth, unrealistic skin and light bulbs on the cheek are all anime features.
Lets start with lightings
See images below please:
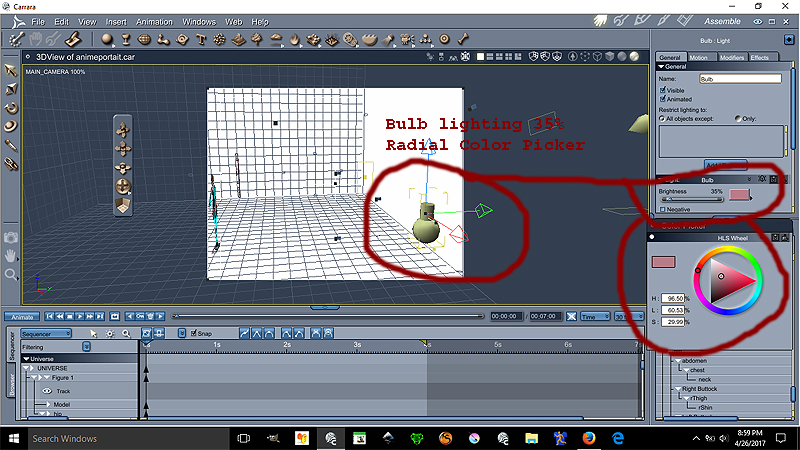
Ok the Bulb is at 35% lighting at the color on the radial is
H= 96.50%
L=60.53%
S=29.99%
This bulb gives proper anime skin lighting unrealistic notice that the bulb is over by the edge the character is centered
Now we go for the Distant light settings see image below please:
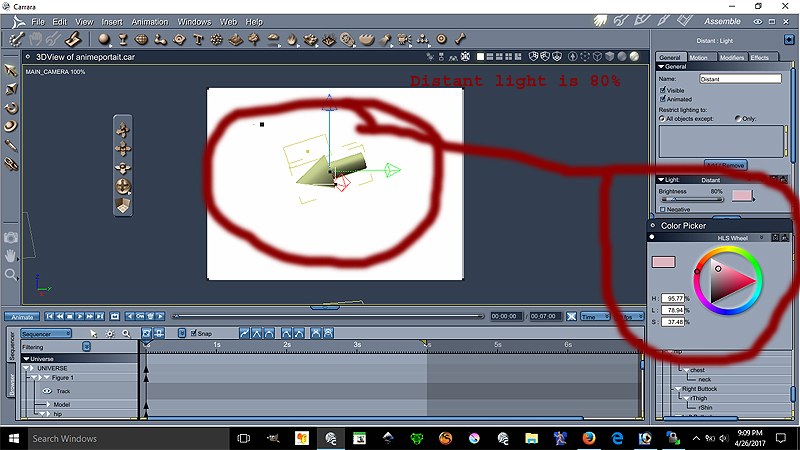
Ok the Distant light is at 80% lighting at the color on the radial is
H= 95.77%
L=78.94%
S=37.48%
The location of the distant light can be seen on image 1. Both lights are set to best settings - raytraced under the effect tab
This conclude the lesson on the environmental light settings is more of a pinkish lights.
The following lesson will focus on the Ear Pulled a very important anime feature disregarded by many
We will place our lovely model facing forward for better teaching.
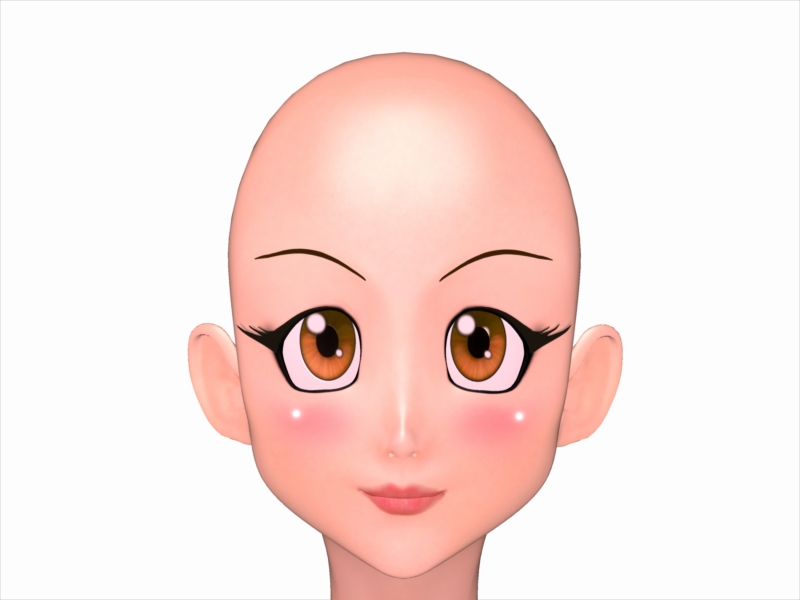
This model is Aiko 3 with kioki morph, This character has many morph and lots of clothes. Aiko 3 is widely supported in the Japanese Community including pixiv.net PoserClub.net.
In order to pull the ears on Aiko 3, see the images below:

This image has been resized to fit in the page. Click to enlarge.
The values are as follow
Earin= -2.0 (thats minus 2.0)
EarBig= 0.7
EarSmall= 0.9
I doubt you can do these with Aiko 4 or up. I always recommened Aiko 3 for your anime needs.
Next Lesson we will talk about Triangular Chin
This next lesson focuses on her Triangular Chin. The triangular chin cannot be done using Aiko 3 alone. You need to have Kioki for Aiko 3 to make this triangular chin, without Kioki I do not think you can create such a perfected Anime Chin. Kioki by Capces can be purchased here at Daz. at Kioki | 3D Models and 3D Software by Daz 3D and Kioki Requires Aiko 3 morph and map located here Aiko 3 Morphs and Maps | 3D Models and 3D Software by Daz 3D now on to the lesson.
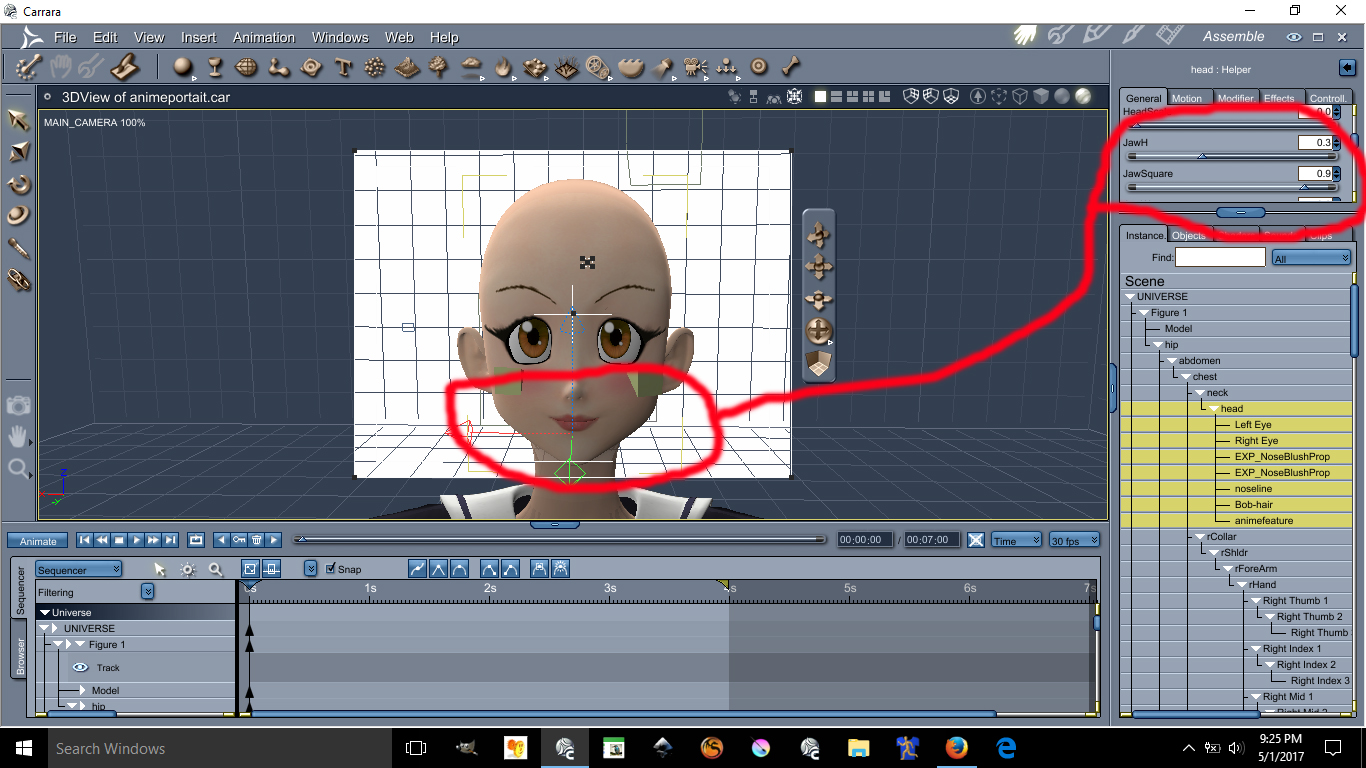
This image has been resized to fit in the page. Click to enlarge.
The values are as follow:
JawH=0.3
JawSquare= 0.9
Here are the eyes lesson, possibly the hardest and tedious part is morphing these eyes in an anime style shape. First you need to darken the eye socket materia, by making the eyes socket material dark it will create a dark outline all around the eyes. Again, the morph I used on these requires the Kioki Morph. Here are the values of the Anime Eyes Shapes along with links.
I recommend Dumb or Anime Eyes for Victoria 3 (Victoria 3 Eyes fits on Aiko 3) @ DOAnimEyes
The values for the eyes are as follow:
EyesScale 0.5
EyeSpace 0.5
EyeAngle Up 0.2
EyeGumDrop 0.3
EyeinSquare 0.3
Eyelwrflat 0.3
EyeOutDwn 0.4
EyeShape1 0.8
EyeUpFlat 0.1
EyeDepth -0.1
EyeHeight 0.1
EyeWidth 0.1
Eyelidshllw 0.1
Eyelidshvy 0.1
Lasheslong 1.0
Lashlofull -9.0
Headshape and nose is as follow:
HDstylized 0.8
ThroatThin 1.0
Nosepointed 0.4
MouthSmall 0.2
MouthNarrow 0.2
Doing the HDStylized will automatically make the nose small and will also give the head an anime style. This are the basics of making an anime head using Aiko 3 with Kioki morph in Daz Studios it may be possible to do all this but I am not 100% sure if Kioki will work in DazStudios, I assume it does because is sold here. The above was all done in Carrara.
This next lesson we will focus on Anime Hair we will need the following for this tutorial
XinXin for Aiko 3 | 3D Models and 3D Software by Daz 3D
Dixie Hair | 3D Models and 3D Software by Daz 3D
Rainbow for Dixie hair by fantasiesrealm
Elfdance enchanted hair expansion
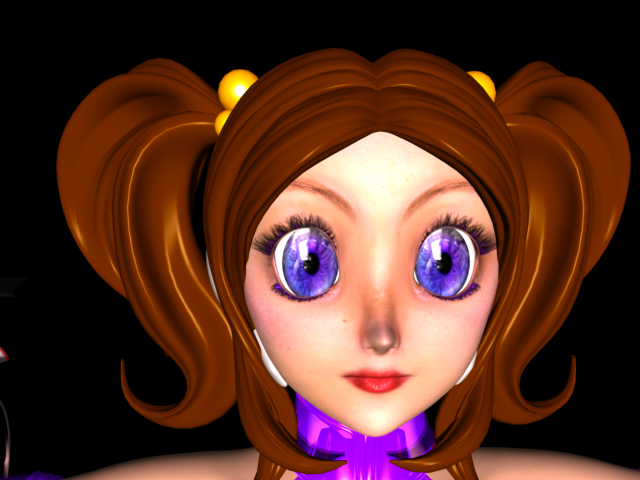
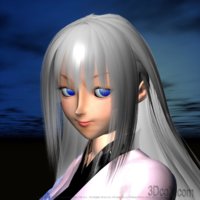
We will turn this
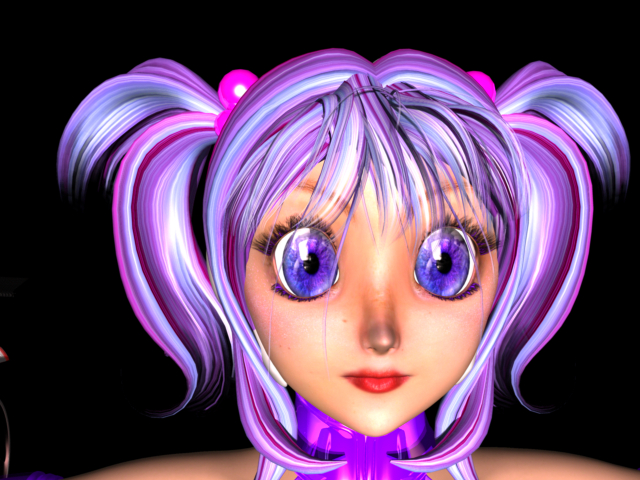
to this
Until next time...
If you have any question on this lesson feel free to ask
Be sure to have these
XinXin for Aiko 3 | 3D Models and 3D Software by Daz 3D
Dixie Hair | 3D Models and 3D Software by Daz 3D
Rainbow for Dixie hair by fantasiesrealm you need to go to Fantasy Realm Website to purchase this item google is your friend
Elfdance enchanted hair expansion probably need to contact Swam via renderosity sitemail to sell this items for you.
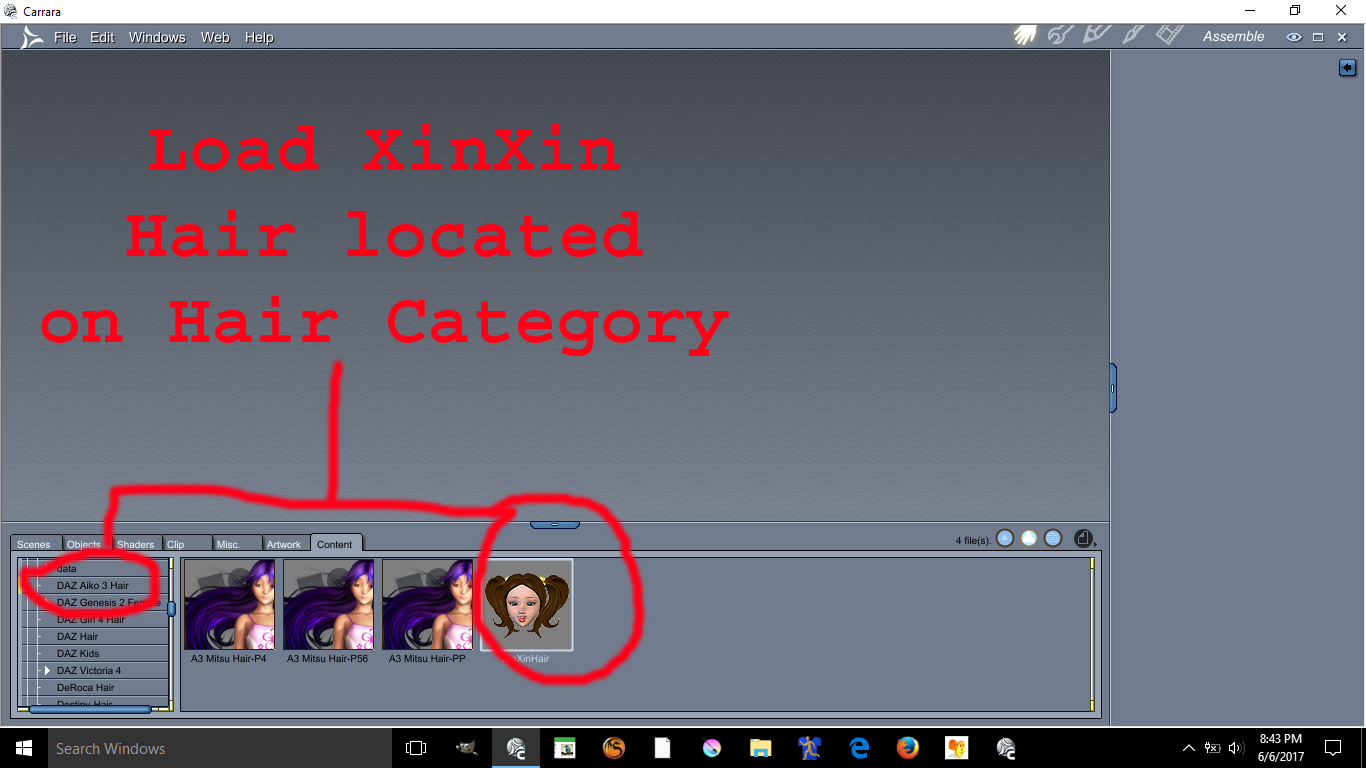
A) Load XinXin Hair in the hair category Daz Aiko 3Hair
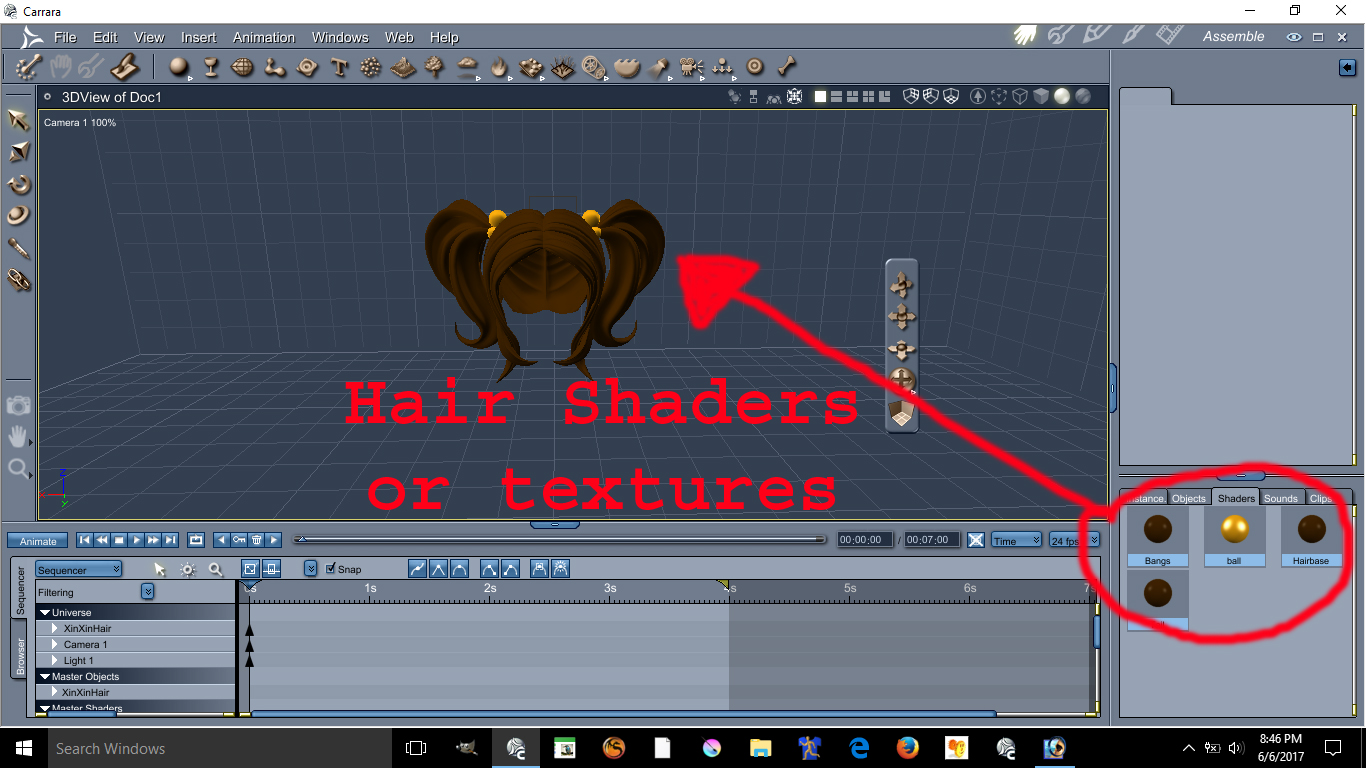
View the Hair Shaders or texture for this hair
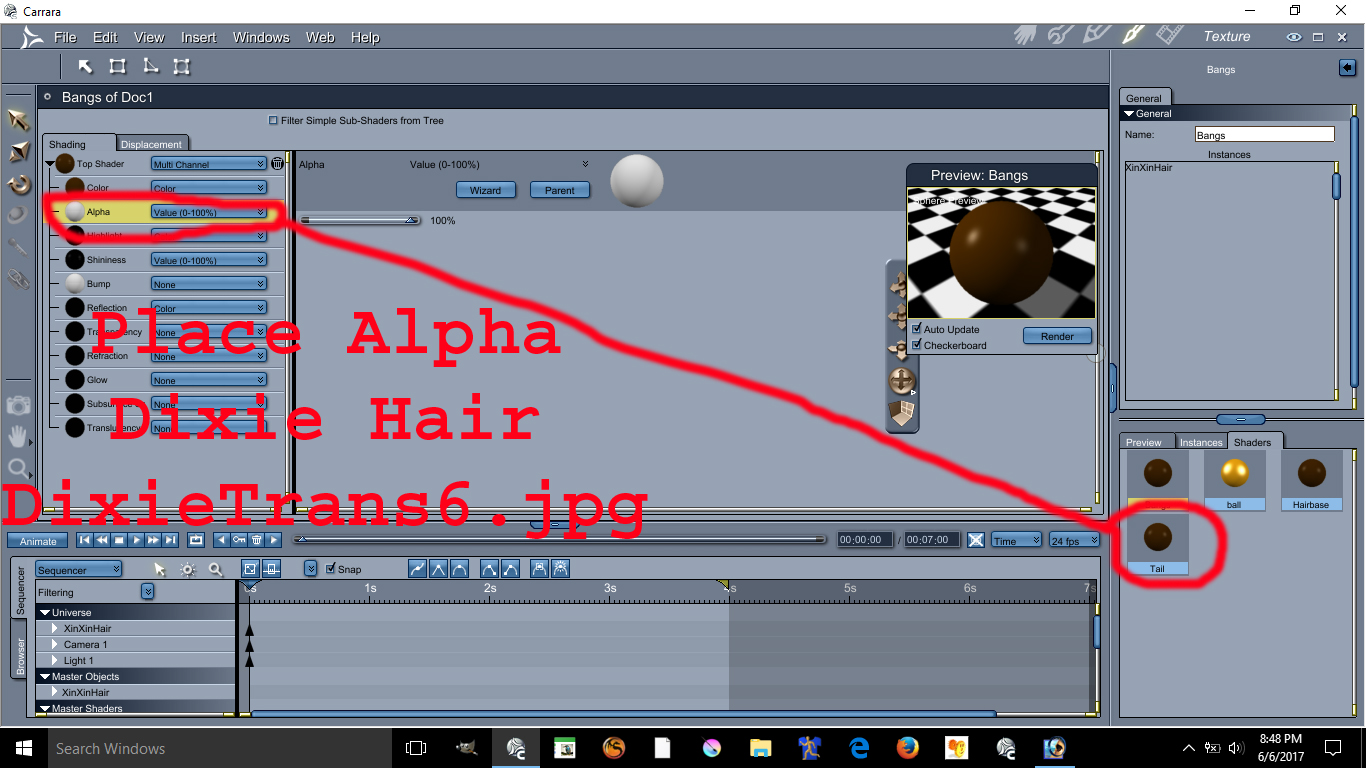
Double click the texture select DixieTrans6.jpg at littlefox texture folder Dixie hair and apply this alpha.
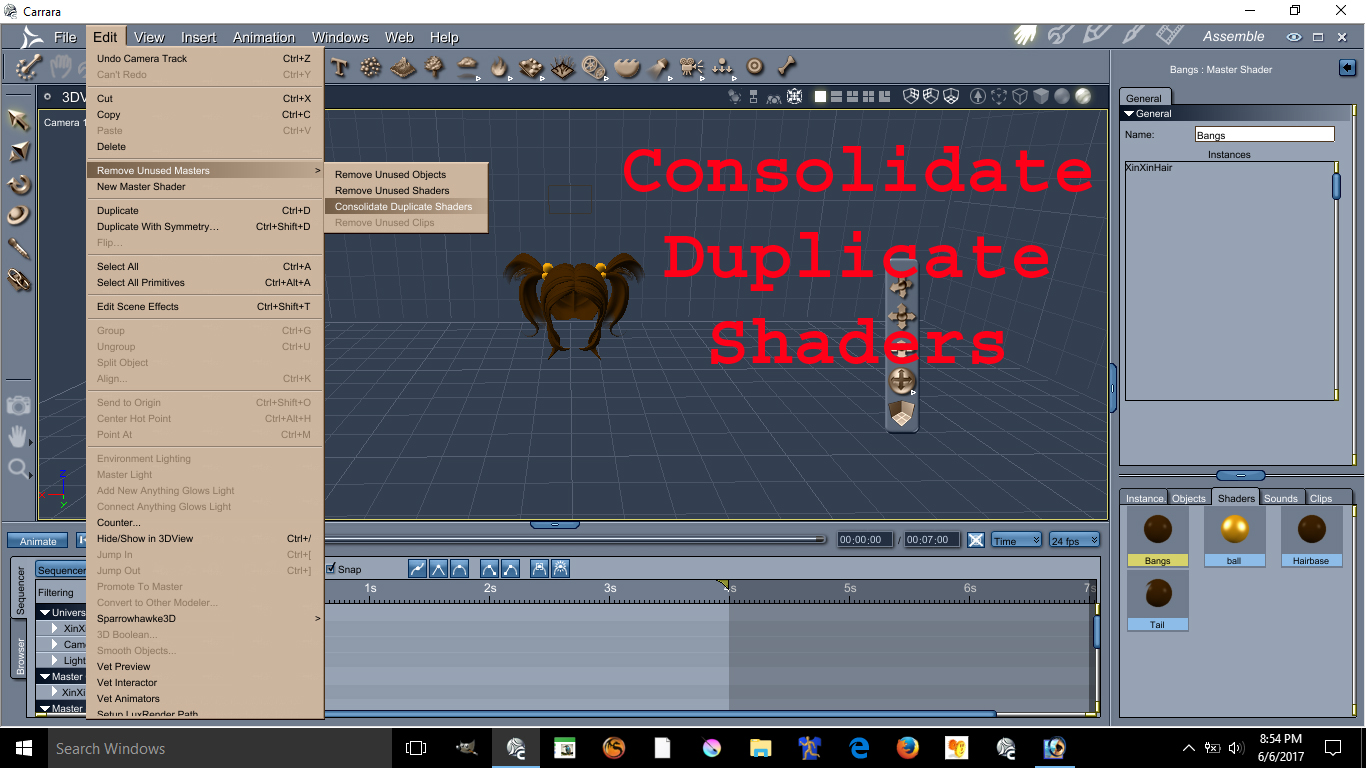
Consolidate the shaders
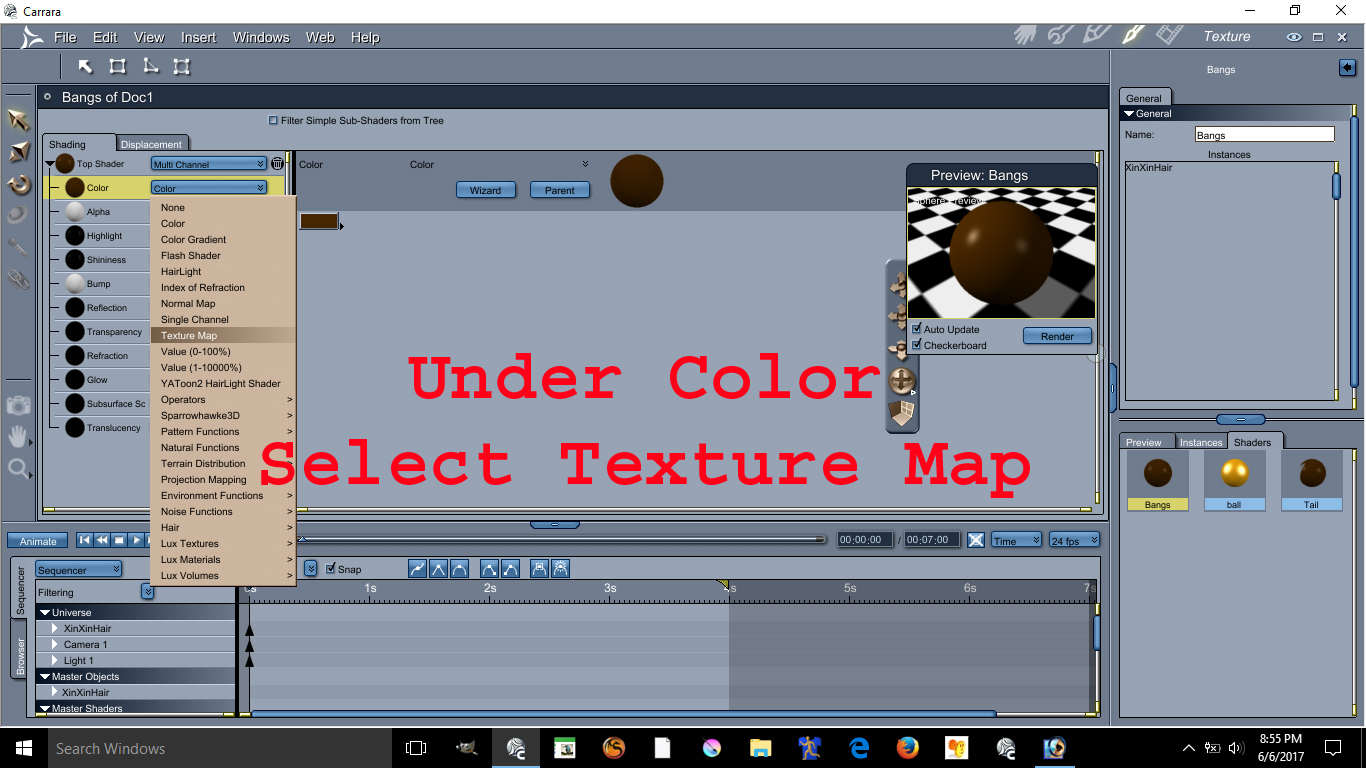
Under Color select the texture map
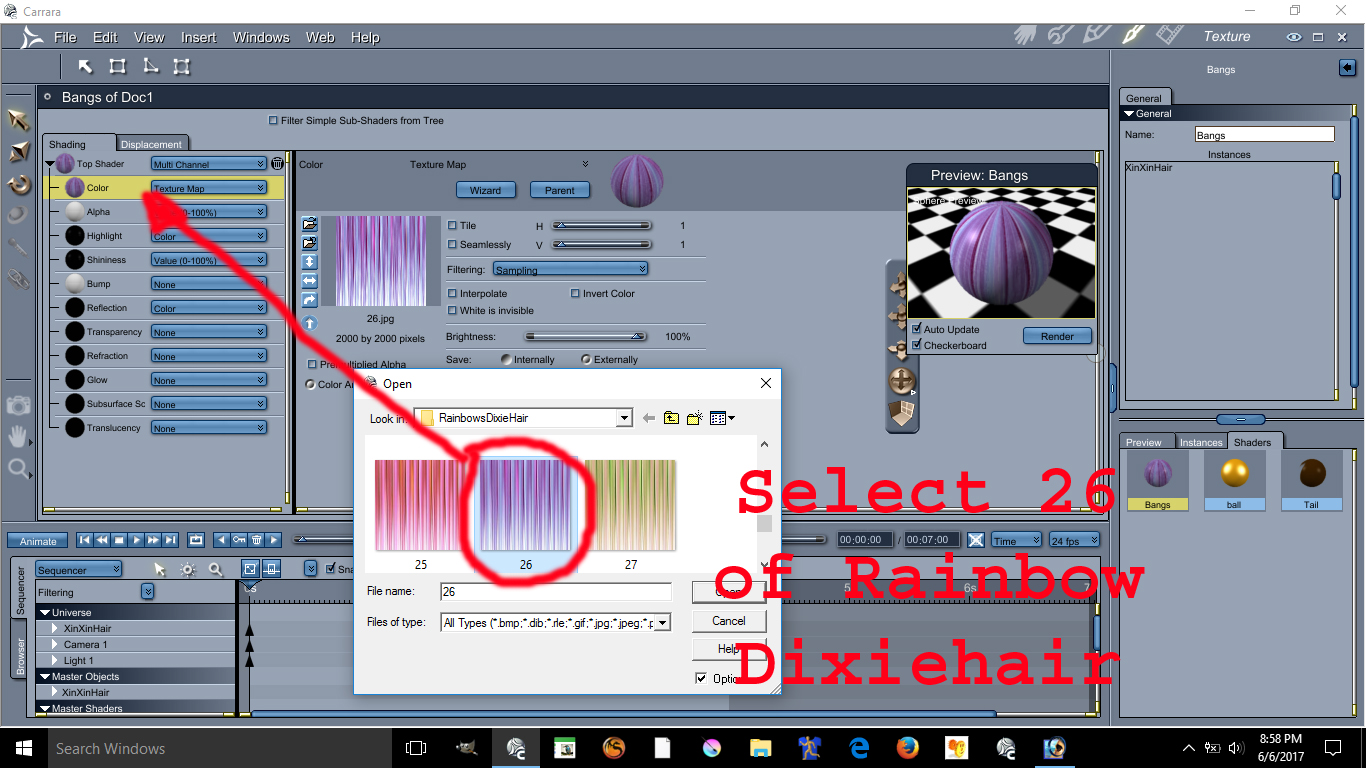
Select texture number 26 on the folder Rainbow Dixiehair and place it on the Color drop down
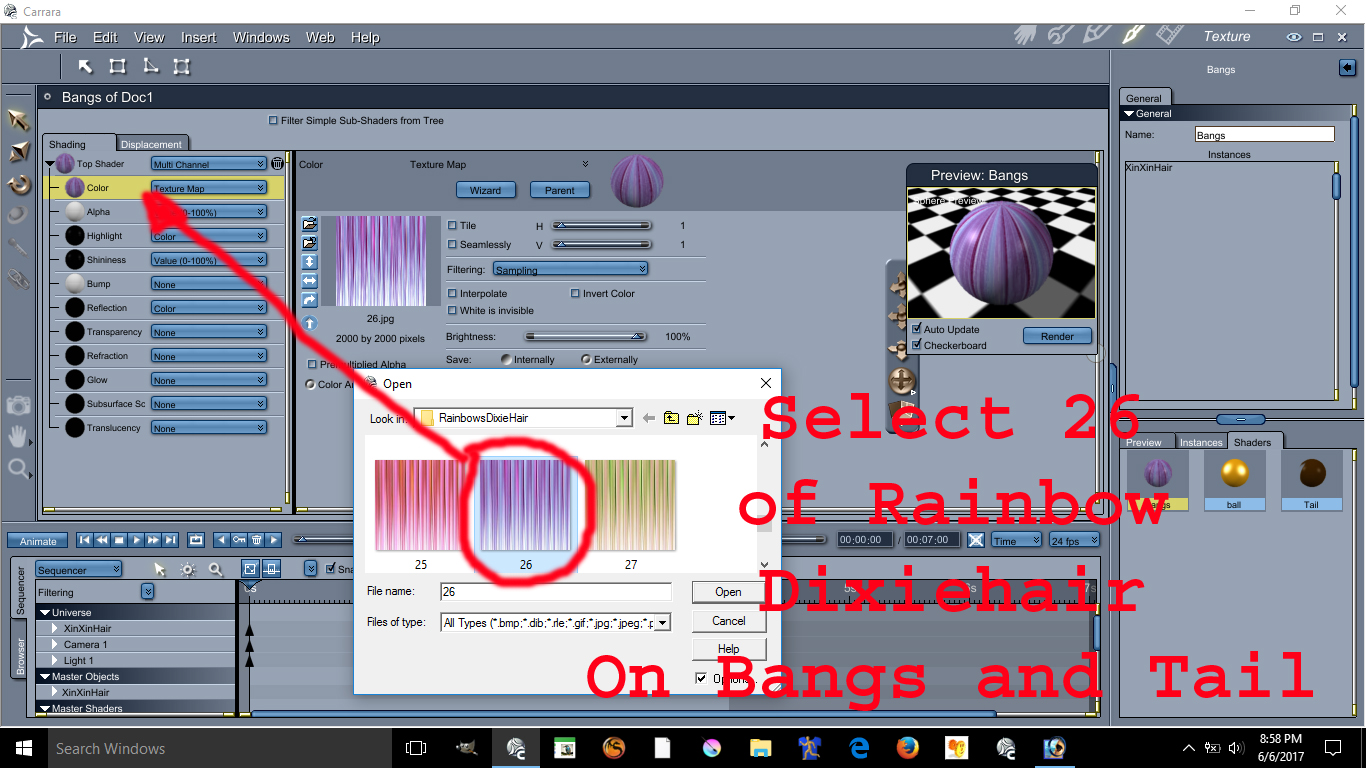
do the same for the bang and tails
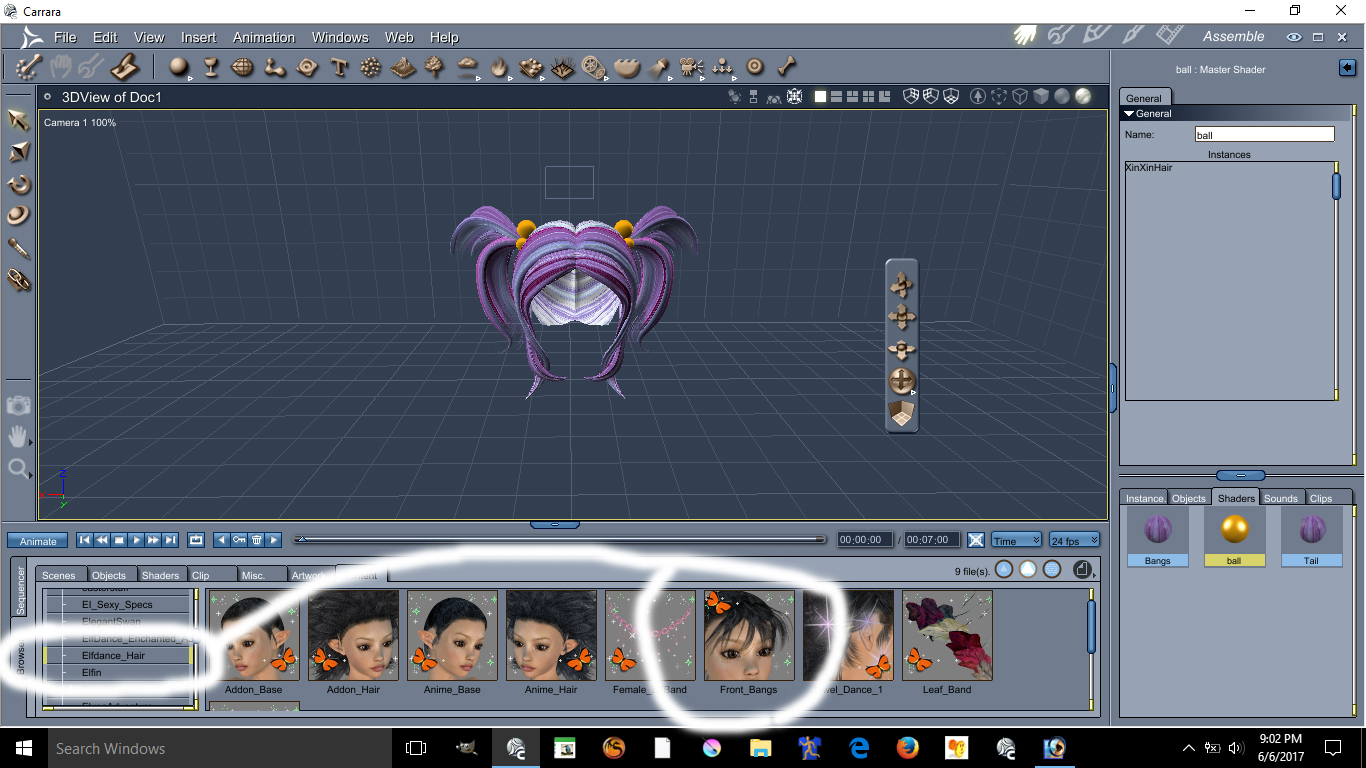
Go to the prop category and select the elfdance hair
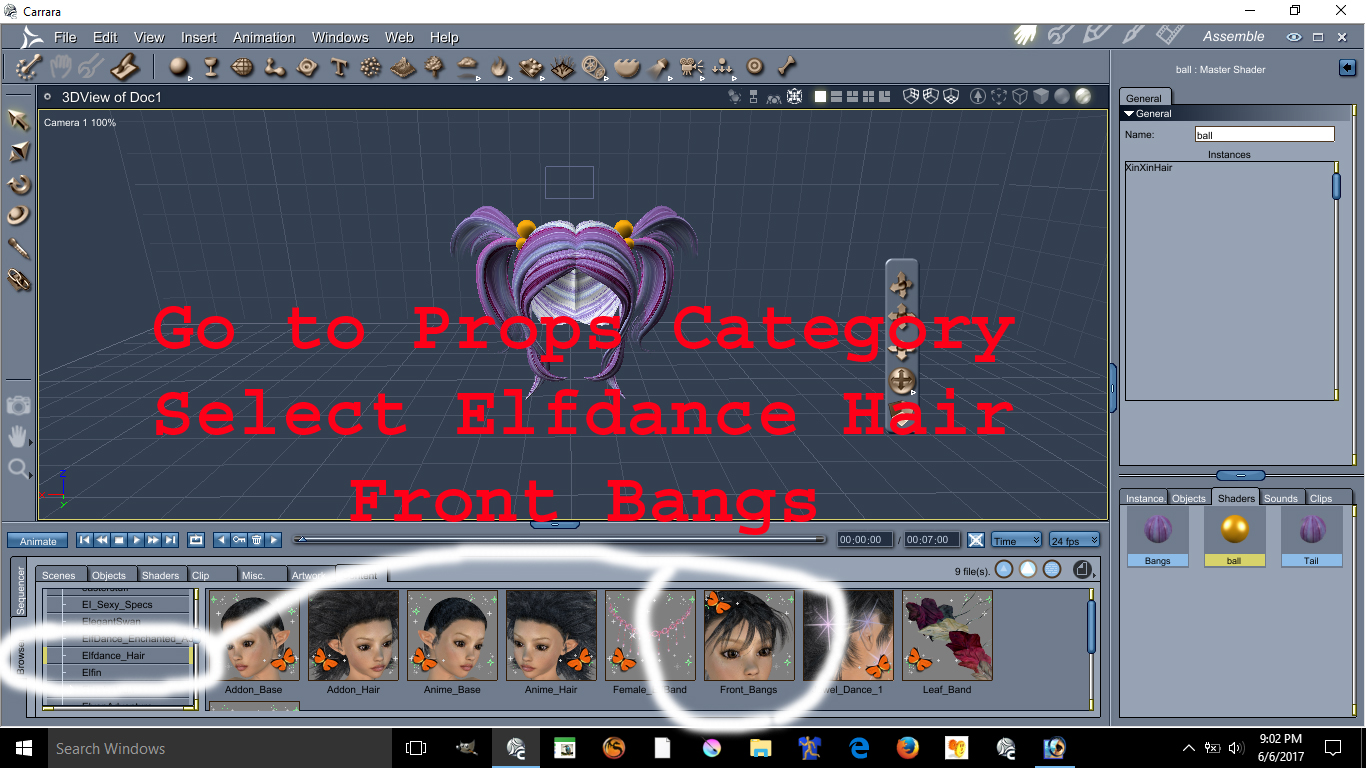
and apply it at the front of XinXin hair.
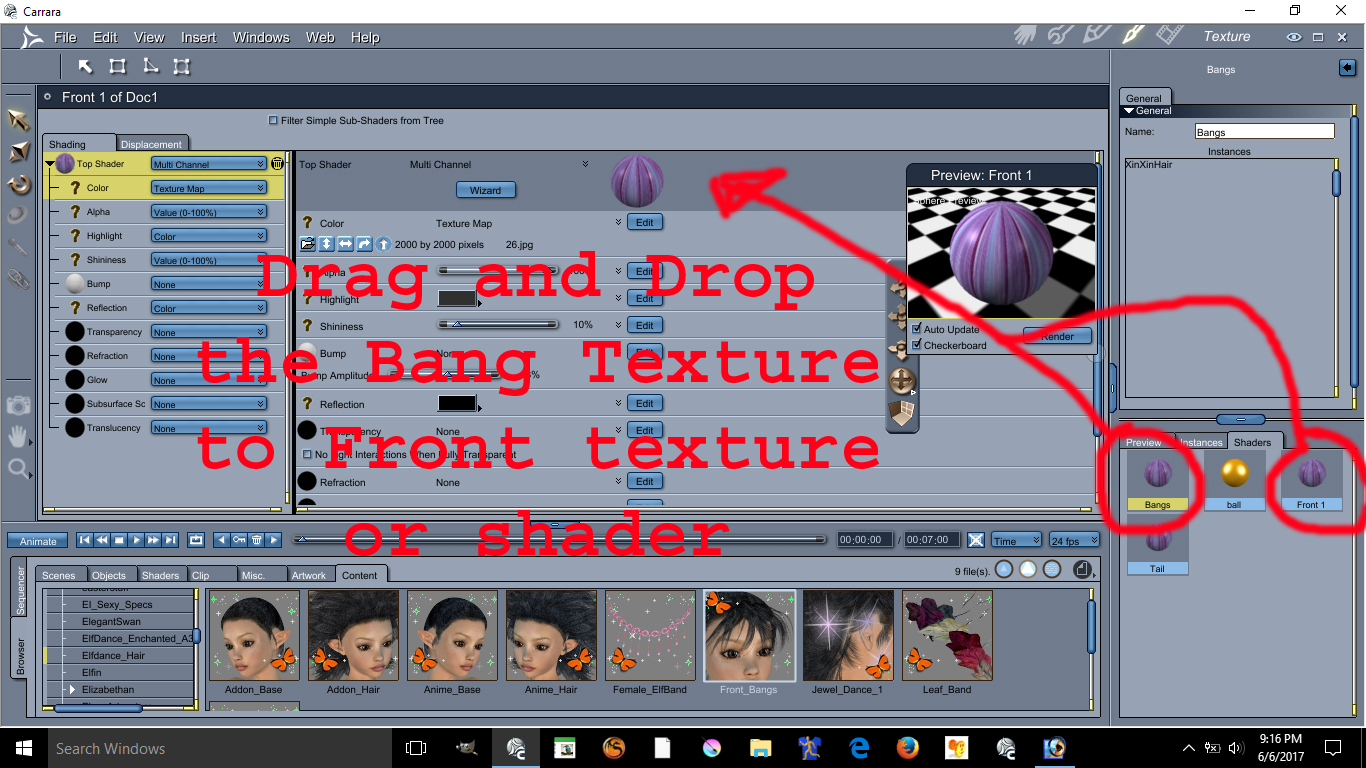
Drag and drop the shader for tail or bang and apply it on the Elfdance Bang
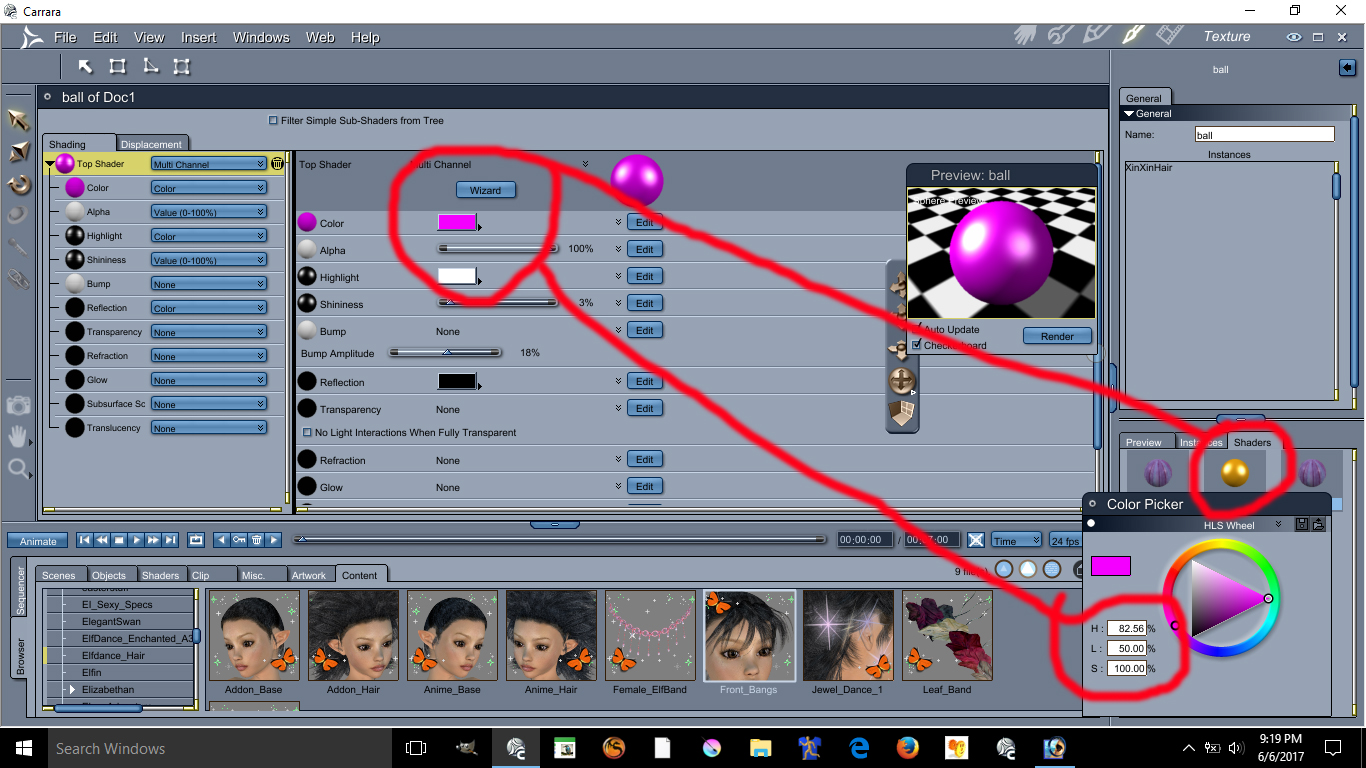
The Accessory needs the following colors basically purple
H=82
L=50
S=100
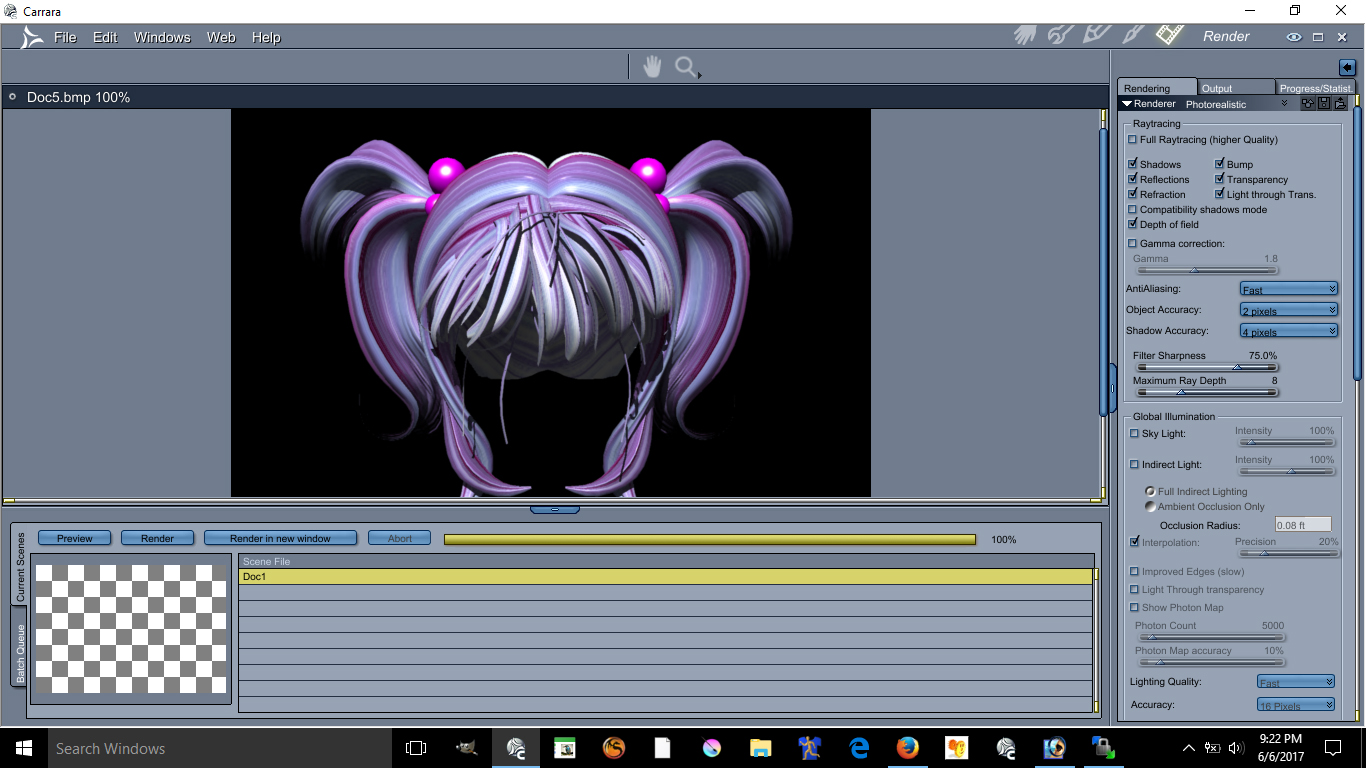
There is your Anime Hair !!
About the Cheek Lights and Skin will required some photoshop and some advance lighting in carrara. I am not going to discuss these here if you are still interested in those send me a email williamrivera@3dcgx.com
If you find this tutorial useful please donate via paypal at this link Pay william rivera rivera publishing using PayPal.Me
Please see the images below for better understanding.
This image has been resized to fit in the page. Click to enlarge.
This image has been resized to fit in the page. Click to enlarge.
Using the scale X and Y can make possible the flatten of a character you can make her as flat as you want.
Ear Pulled, Square big eyes, small mouth, unrealistic skin and light bulbs on the cheek are all anime features.
Lets start with lightings
See images below please:
Ok the Bulb is at 35% lighting at the color on the radial is
H= 96.50%
L=60.53%
S=29.99%
This bulb gives proper anime skin lighting unrealistic notice that the bulb is over by the edge the character is centered
Now we go for the Distant light settings see image below please:
Ok the Distant light is at 80% lighting at the color on the radial is
H= 95.77%
L=78.94%
S=37.48%
The location of the distant light can be seen on image 1. Both lights are set to best settings - raytraced under the effect tab
This conclude the lesson on the environmental light settings is more of a pinkish lights.
The following lesson will focus on the Ear Pulled a very important anime feature disregarded by many
We will place our lovely model facing forward for better teaching.

This model is Aiko 3 with kioki morph, This character has many morph and lots of clothes. Aiko 3 is widely supported in the Japanese Community including pixiv.net PoserClub.net.
In order to pull the ears on Aiko 3, see the images below:
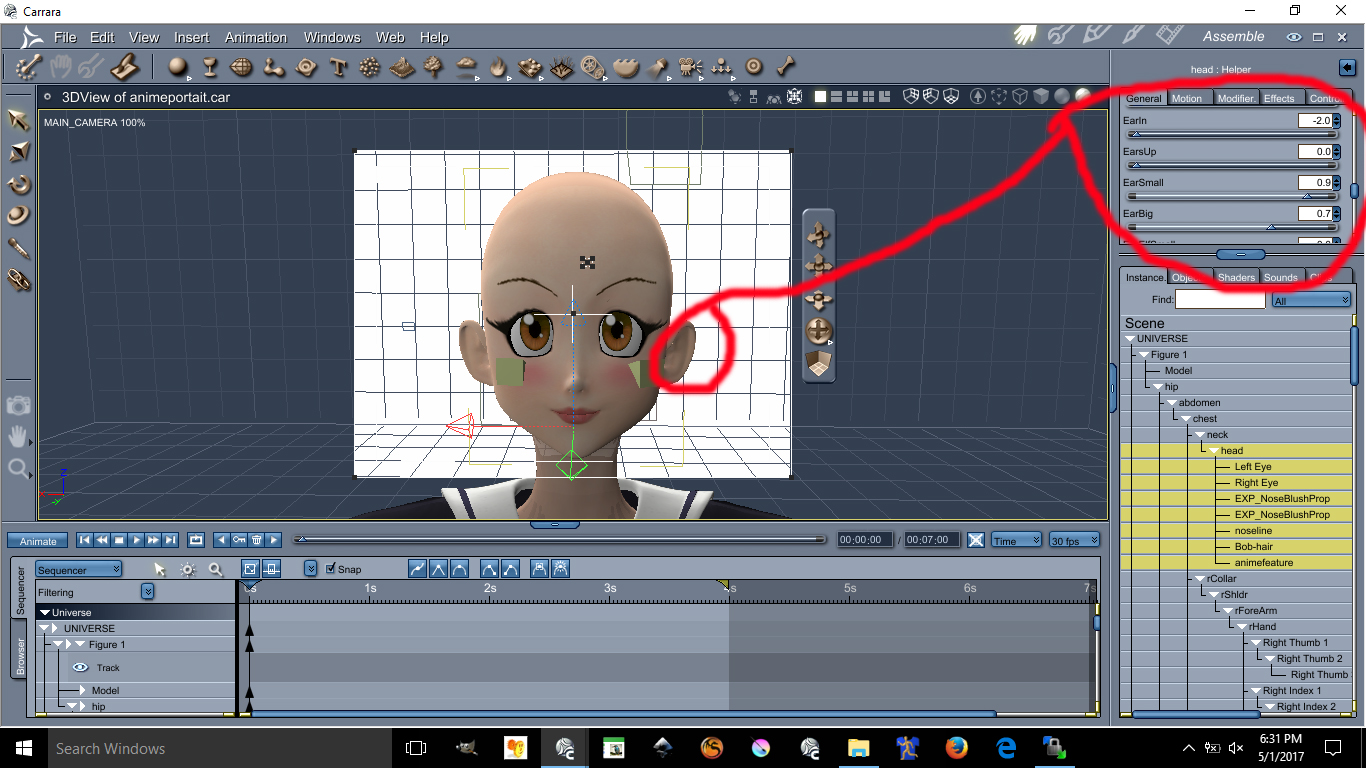
This image has been resized to fit in the page. Click to enlarge.
The values are as follow
Earin= -2.0 (thats minus 2.0)
EarBig= 0.7
EarSmall= 0.9
I doubt you can do these with Aiko 4 or up. I always recommened Aiko 3 for your anime needs.
Next Lesson we will talk about Triangular Chin
This next lesson focuses on her Triangular Chin. The triangular chin cannot be done using Aiko 3 alone. You need to have Kioki for Aiko 3 to make this triangular chin, without Kioki I do not think you can create such a perfected Anime Chin. Kioki by Capces can be purchased here at Daz. at Kioki | 3D Models and 3D Software by Daz 3D and Kioki Requires Aiko 3 morph and map located here Aiko 3 Morphs and Maps | 3D Models and 3D Software by Daz 3D now on to the lesson.

This image has been resized to fit in the page. Click to enlarge.
The values are as follow:
JawH=0.3
JawSquare= 0.9
Here are the eyes lesson, possibly the hardest and tedious part is morphing these eyes in an anime style shape. First you need to darken the eye socket materia, by making the eyes socket material dark it will create a dark outline all around the eyes. Again, the morph I used on these requires the Kioki Morph. Here are the values of the Anime Eyes Shapes along with links.
I recommend Dumb or Anime Eyes for Victoria 3 (Victoria 3 Eyes fits on Aiko 3) @ DOAnimEyes
The values for the eyes are as follow:
EyesScale 0.5
EyeSpace 0.5
EyeAngle Up 0.2
EyeGumDrop 0.3
EyeinSquare 0.3
Eyelwrflat 0.3
EyeOutDwn 0.4
EyeShape1 0.8
EyeUpFlat 0.1
EyeDepth -0.1
EyeHeight 0.1
EyeWidth 0.1
Eyelidshllw 0.1
Eyelidshvy 0.1
Lasheslong 1.0
Lashlofull -9.0
Headshape and nose is as follow:
HDstylized 0.8
ThroatThin 1.0
Nosepointed 0.4
MouthSmall 0.2
MouthNarrow 0.2
Doing the HDStylized will automatically make the nose small and will also give the head an anime style. This are the basics of making an anime head using Aiko 3 with Kioki morph in Daz Studios it may be possible to do all this but I am not 100% sure if Kioki will work in DazStudios, I assume it does because is sold here. The above was all done in Carrara.
This next lesson we will focus on Anime Hair we will need the following for this tutorial
XinXin for Aiko 3 | 3D Models and 3D Software by Daz 3D
Dixie Hair | 3D Models and 3D Software by Daz 3D
Rainbow for Dixie hair by fantasiesrealm
Elfdance enchanted hair expansion
We will turn this
to this
Until next time...
If you have any question on this lesson feel free to ask
Be sure to have these
XinXin for Aiko 3 | 3D Models and 3D Software by Daz 3D
Dixie Hair | 3D Models and 3D Software by Daz 3D
Rainbow for Dixie hair by fantasiesrealm you need to go to Fantasy Realm Website to purchase this item google is your friend
Elfdance enchanted hair expansion probably need to contact Swam via renderosity sitemail to sell this items for you.
A) Load XinXin Hair in the hair category Daz Aiko 3Hair
View the Hair Shaders or texture for this hair
Double click the texture select DixieTrans6.jpg at littlefox texture folder Dixie hair and apply this alpha.
Consolidate the shaders
Under Color select the texture map
Select texture number 26 on the folder Rainbow Dixiehair and place it on the Color drop down
do the same for the bang and tails
Go to the prop category and select the elfdance hair
and apply it at the front of XinXin hair.
Drag and drop the shader for tail or bang and apply it on the Elfdance Bang
The Accessory needs the following colors basically purple
H=82
L=50
S=100
There is your Anime Hair !!
About the Cheek Lights and Skin will required some photoshop and some advance lighting in carrara. I am not going to discuss these here if you are still interested in those send me a email williamrivera@3dcgx.com
If you find this tutorial useful please donate via paypal at this link Pay william rivera rivera publishing using PayPal.Me
-
 download.jpg