This is just a basic overview of distant light and spotlight functions for 3Delight in DS 4.8.
1.) Click on the LIGHTS tab. If your Lights tab is displaying the "PRESETS," then please click on "EDITOR" right next to that. On my screenshot here, you'll see the "Presets" and "Editor" right up above the top red circle.
3.) Now click the box directly underneath where "Presets" and "Editor" are shown (displayed in the red circle!).
4.) This will then open a drop-down box. At the bottom of this box is another box, labeled, "Add a light." Click on that.
5.) Yup. This will open another drop-down box. Now, from here you can choose to add a distant light, a point light, a spotlight, or a linear point light.
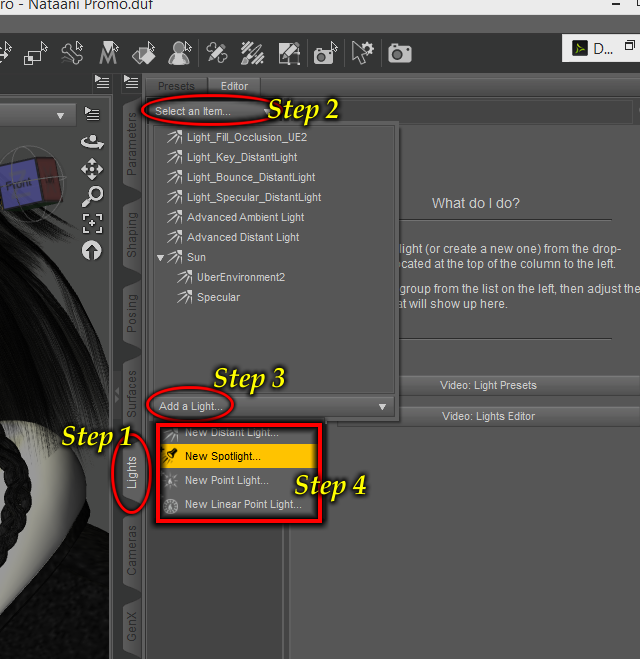
6.) These are your basic, default DazStudio light types. For a good "fill" light to start with, select the "Distant" light. This will now open another, floating box for you :
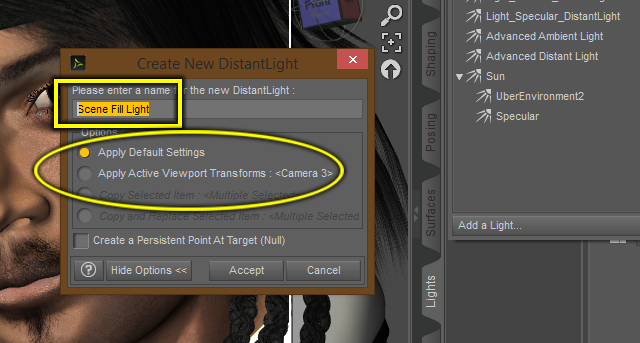
In this new box, the default name will be "DistantLight." If you already have a distant light in the scene, DS will put the number 2 at the end of the name, or 3, 4, in sequence as you add more of them to the scene. For now, just add ONE distant light to the scene.
You'll notice you can choose to change the name of the light at this point - I've chosen "Scene Fill Light" because we're going to use this as just the filler light. The next thing is you can choose to apply the default settings, or the active viewport transforms. For distant lights, I always apply the default settings. For spotlights, I will SOMETIMES apply the active viewport transforms, but normally I apply default here as well and just move the lights myself.
So. Type in a name for your new distant light. Then make sure "Apply Default Settings" is selected. Now click "Accept."
7.) Once you click the accept button, you should now have this in your Lights tab :
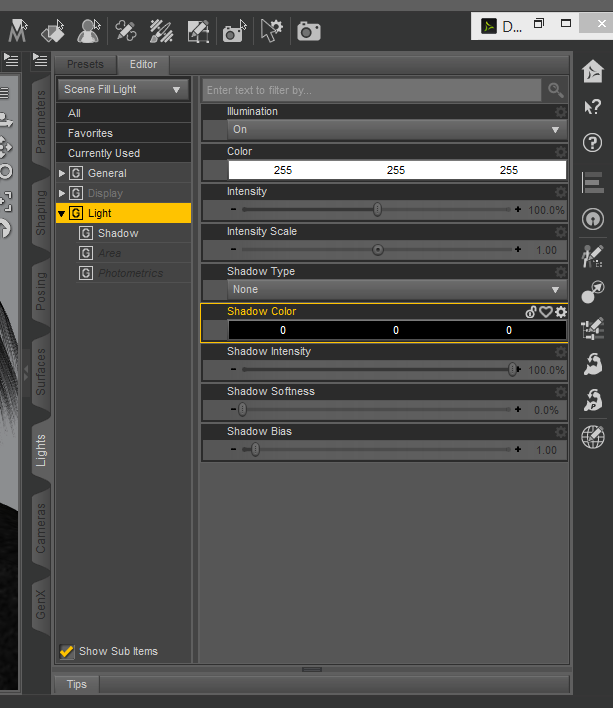
Familiarize yourself with the settings here. I'll go over each setting one at a time here.
Illumination :
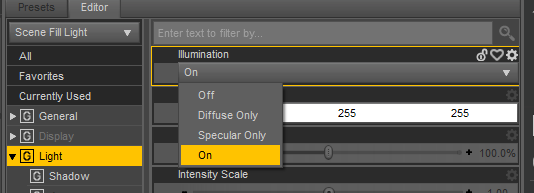
This is where you can decide if you want the light on, off, casting specular only, or diffuse only. By default, the light will be "On" when you first load it. Click the word "On" and it'll open a fly-down menu/list :
Color :
This is where you can choose the color that your light casts onto the scene. To use it, just click anywhere in the color swatch, and it will pop up your color palette to choose from.
Intensity :
This is where you set the strength of the light. You can turn it up or down to where you like it. A lot of this part is just playing around until you have what you like. For a basic, scene filler light, I usually set the Intensity down to about 45%, and usually with either the defaut white, or a light/medium grey in color. So go ahead and do that now.
Intensity Scale :
This is similar to Intensity, and basically allows you to further fine-tune and adjust how intense or how dark the lighting will be on the light. It might seem a little bit redundant, but you can play around with it on some primitives and see the effects by doing simple renders with it. It basically just allows for a little more control over the intensity of the light.
Shadow Type :
This is where you decide whether the light casts a shadow using raytracing or depth mapping. If you want to turn OFF the shadow for your light, you do it in this option as well. By default, the lights always load with shadows OFF when you add a new light to the scene. Clicking in the box under "Shadow Type" will open the fly-down list for you to choose your shadow options on the light.
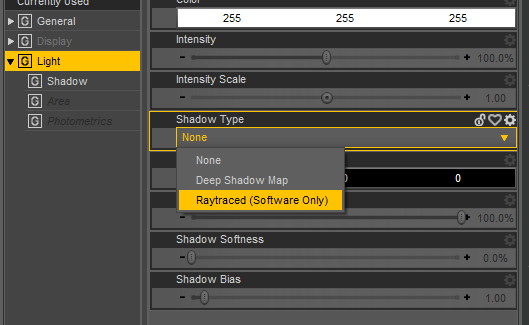
I want to issue a word of caution about the shadow types in DS. Deep Shadow Map takes less time to render, while Raytraced takes more time. However.... when using Deep Shadow Map as your shadow type, the program is VERY prone to rendering unwanted artifacts in your scene. Oddly colored pixels, and things of this nature. I only, ONLY render with "Raytraced" shadow types. It takes a little longer, but it looks better overall, and I don't get the graphic/pixel artifacts mucking up my renders. (And sometimes those pixelized artifacts can DESTROY a render!)
You don't have to do it this way, but I would strongly suggest to always render with Raytraced shadows.
Shadow Color :
Just like your "Color" box at the top, this is where you can set the color of your shadows. I normally leave my shadow color flat black (color 0, 0, 0). Sometimes you might want a lighter color, or maybe if you have strong colored lights, you might want the shadows to be a darker shade of the light color being cast on the scene. This is where you set the shadow's color.
Shadow Intensity :
Just like your Light Intensity, this is where you set how dark or how opaque your shadows are. For most renders, I will adjust my shadow intensity down to about 85%. If I'm rendering a scene that I want very dark, then I might use 90% to 100% here.
Shadow Softness :
This is where you set how much blur your shadows have. Again, this is something you have to play around with. If you have a scene where you want crisp, sharp shadows, then leave the Softness set to somewhere around 0-20%. If you have softer lighting in mind, and the shadows would be a bit more blurry than that, then you can increase the softness as much as you like.
The higher the value on this setting, the more blur your shadows will have. The higher the value on this setting, the longer it will take to render. It does increase render time a little bit as you add more blur, but it's usually not too bad on my machine. Also, a quick note, the more blurry your shadows are, the more likely they are to be a little bit grainy. If you do a spot render and find that the shadows are coming out really grainy, try turning the blur value down a bit.
Shadow Bias :
This is what tells the render engine how close to the objects in the scene the shadows should be cast. I usually set my lights to have a shadow bias of about 0.20. Again, play around with some primitive shapes and different values here to see what it does. By default, DS will apply a Shadow Bias value of 1.000 when you first add the new light to the scene.
8.) So those are the basic settings and what they do on a Distant Light. So for a scene fill light, you can set up a distant light with a white or light/medium grey color, intensity about 45-60%, shadow color black or a dark grey. I'd turn the shadows OFF for a fill light, as you aren't interested in shadow casting with this light, just providing ambient color to the scene.
If you DO want the light to cast shadows, then I'd suggest starting with a Shadow Intensity of around 85%, and a Shadow Bias of 0.20, and a Shadow Softness of somewhere between 0% and 20%, and set the Shadow Type to Raytracing.
--------------
That's the basics of a DS standard (default) distant light. I'll do a quick overview of the standard (default) DS spotlight in the next post.
1.) Click on the LIGHTS tab. If your Lights tab is displaying the "PRESETS," then please click on "EDITOR" right next to that. On my screenshot here, you'll see the "Presets" and "Editor" right up above the top red circle.
3.) Now click the box directly underneath where "Presets" and "Editor" are shown (displayed in the red circle!).
4.) This will then open a drop-down box. At the bottom of this box is another box, labeled, "Add a light." Click on that.
5.) Yup. This will open another drop-down box. Now, from here you can choose to add a distant light, a point light, a spotlight, or a linear point light.
6.) These are your basic, default DazStudio light types. For a good "fill" light to start with, select the "Distant" light. This will now open another, floating box for you :
In this new box, the default name will be "DistantLight." If you already have a distant light in the scene, DS will put the number 2 at the end of the name, or 3, 4, in sequence as you add more of them to the scene. For now, just add ONE distant light to the scene.
You'll notice you can choose to change the name of the light at this point - I've chosen "Scene Fill Light" because we're going to use this as just the filler light. The next thing is you can choose to apply the default settings, or the active viewport transforms. For distant lights, I always apply the default settings. For spotlights, I will SOMETIMES apply the active viewport transforms, but normally I apply default here as well and just move the lights myself.
So. Type in a name for your new distant light. Then make sure "Apply Default Settings" is selected. Now click "Accept."
7.) Once you click the accept button, you should now have this in your Lights tab :
Familiarize yourself with the settings here. I'll go over each setting one at a time here.
Illumination :
This is where you can decide if you want the light on, off, casting specular only, or diffuse only. By default, the light will be "On" when you first load it. Click the word "On" and it'll open a fly-down menu/list :
Color :
This is where you can choose the color that your light casts onto the scene. To use it, just click anywhere in the color swatch, and it will pop up your color palette to choose from.
Intensity :
This is where you set the strength of the light. You can turn it up or down to where you like it. A lot of this part is just playing around until you have what you like. For a basic, scene filler light, I usually set the Intensity down to about 45%, and usually with either the defaut white, or a light/medium grey in color. So go ahead and do that now.
Intensity Scale :
This is similar to Intensity, and basically allows you to further fine-tune and adjust how intense or how dark the lighting will be on the light. It might seem a little bit redundant, but you can play around with it on some primitives and see the effects by doing simple renders with it. It basically just allows for a little more control over the intensity of the light.
Shadow Type :
This is where you decide whether the light casts a shadow using raytracing or depth mapping. If you want to turn OFF the shadow for your light, you do it in this option as well. By default, the lights always load with shadows OFF when you add a new light to the scene. Clicking in the box under "Shadow Type" will open the fly-down list for you to choose your shadow options on the light.
I want to issue a word of caution about the shadow types in DS. Deep Shadow Map takes less time to render, while Raytraced takes more time. However.... when using Deep Shadow Map as your shadow type, the program is VERY prone to rendering unwanted artifacts in your scene. Oddly colored pixels, and things of this nature. I only, ONLY render with "Raytraced" shadow types. It takes a little longer, but it looks better overall, and I don't get the graphic/pixel artifacts mucking up my renders. (And sometimes those pixelized artifacts can DESTROY a render!)
You don't have to do it this way, but I would strongly suggest to always render with Raytraced shadows.
Shadow Color :
Just like your "Color" box at the top, this is where you can set the color of your shadows. I normally leave my shadow color flat black (color 0, 0, 0). Sometimes you might want a lighter color, or maybe if you have strong colored lights, you might want the shadows to be a darker shade of the light color being cast on the scene. This is where you set the shadow's color.
Shadow Intensity :
Just like your Light Intensity, this is where you set how dark or how opaque your shadows are. For most renders, I will adjust my shadow intensity down to about 85%. If I'm rendering a scene that I want very dark, then I might use 90% to 100% here.
Shadow Softness :
This is where you set how much blur your shadows have. Again, this is something you have to play around with. If you have a scene where you want crisp, sharp shadows, then leave the Softness set to somewhere around 0-20%. If you have softer lighting in mind, and the shadows would be a bit more blurry than that, then you can increase the softness as much as you like.
The higher the value on this setting, the more blur your shadows will have. The higher the value on this setting, the longer it will take to render. It does increase render time a little bit as you add more blur, but it's usually not too bad on my machine. Also, a quick note, the more blurry your shadows are, the more likely they are to be a little bit grainy. If you do a spot render and find that the shadows are coming out really grainy, try turning the blur value down a bit.
Shadow Bias :
This is what tells the render engine how close to the objects in the scene the shadows should be cast. I usually set my lights to have a shadow bias of about 0.20. Again, play around with some primitive shapes and different values here to see what it does. By default, DS will apply a Shadow Bias value of 1.000 when you first add the new light to the scene.
8.) So those are the basic settings and what they do on a Distant Light. So for a scene fill light, you can set up a distant light with a white or light/medium grey color, intensity about 45-60%, shadow color black or a dark grey. I'd turn the shadows OFF for a fill light, as you aren't interested in shadow casting with this light, just providing ambient color to the scene.
If you DO want the light to cast shadows, then I'd suggest starting with a Shadow Intensity of around 85%, and a Shadow Bias of 0.20, and a Shadow Softness of somewhere between 0% and 20%, and set the Shadow Type to Raytracing.
--------------
That's the basics of a DS standard (default) distant light. I'll do a quick overview of the standard (default) DS spotlight in the next post.
Last edited:
