• Welcome to the Community Forums at HiveWire 3D! Please note that the user name you choose for our forum will be displayed to the public. Our store was closed as January 4, 2021. You can find HiveWire 3D and Lisa's Botanicals products, as well as many of our Contributing Artists, at Renderosity. This thread lists where many are now selling their products. Renderosity is generously putting products which were purchased at HiveWire 3D and are now sold at their store into customer accounts by gifting them. This is not an overnight process so please be patient, if you have already emailed them about this. If you have NOT emailed them, please see the 2nd post in this thread for instructions on what you need to do

Painting paths

Dreamer

Dream Weaver Designs
Hi all I am wondering if some one can help me out here.
I have .png image of a feather that I want to tile along a path, so far I have tried making it a pattern and using the pattern stamp tool to stroke the path but that did not work.

I tried to do it in illustrator too but needed to convert the image to an object/shape before it would work and I can't work out how to do that either.
 

mininessie

Dances with Bees
Contributing Artist
not sure what you want to do...but i would paste the png in several layers to do it i think. :unsure:
 

Jay Versluis

Admirable
Hi Dreamer, you were thinking along the right lines: instead of using the pattern stamp tool, open your feather image and head over to Edit - Define Brush Preset. Now open the document that contains your path, create a new layer and select the Brush Tool. Your new brush shape will already be selected.

If you stroke the path now, it will probably look like a thick line - that's because the brush itself needs tweaking. To do that, open the Brush Palette (Window - Brush). This will give you a plethora of adjustment options. Play with the spacing to make your feather visible.

Good luck!
 

Dreamer

Dream Weaver Designs
Hi Dreamer, you were thinking along the right lines: instead of using the pattern stamp tool, open your feather image and head over to Edit - Define Brush Preset. Now open the document that contains your path, create a new layer and select the Brush Tool. Your new brush shape will already be selected.

If you stroke the path now, it will probably look like a thick line - that's because the brush itself needs tweaking. To do that, open the Brush Palette (Window - Brush). This will give you a plethora of adjustment options. Play with the spacing to make your feather visible.

Good luck!
Yeah that would work but by making the image a brush I no longer have the colours of the feather, just what ever block colour I have picked from the palette. I want to keep the colours and pattern of the feather as it looked really naff as just one solid shade
 

Pendraia

Sage
Contributing Artist
I was going to suggest what Jay said but if you need colour that isn't very useful for you. Which version of photoshop are you using? I'm on CS3 and maybe later versions have additional tools that I don't know about.
 

Miss B

Drawing Life 1 Pixel at a Time
CV-BEE
Yes, I have CS2, and one of the reasons I've been reticent to buy some nice "scene" brushes of say mountains, waterfalls and such is, I don't know how I would color them to look like mountains, waterfalls and such.

That would certainly be a nice feature if there was some way to colorize them with more than one color.
 

Rae134

Renowned
CV-BEE
Contributing Artist
Hi all I am wondering if some one can help me out here.
I have .png image of a feather that I want to tile along a path, so far I have tried making it a pattern and using the pattern stamp tool to stroke the path but that did not work.

I tried to do it in illustrator too but needed to convert the image to an object/shape before it would work and I can't work out how to do that either.
I've never done tiled along a path in illustrator before. But it sounds like you need to make the feather a Vector first? (I THINK that's what it means by object/shape). Making it a vector I know how to do but I couldn't help with the rest :p
 

Miss B

Drawing Life 1 Pixel at a Time
CV-BEE
Goodness, I haven't worked in Illustrator in years. In fact, I never reinstalled it on this computer, so I'm afraid I can't be of any help on how to do that either.
 

Dreamer

Dream Weaver Designs
I've never done tiled along a path in illustrator before. But it sounds like you need to make the feather a Vector first? (I THINK that's what it means by object/shape). Making it a vector I know how to do but I couldn't help with the rest :p
Yeah that sounds about right, there are plenty of tuts for how to tile the vector/shape to a path but none on converting to. If you could help me out with that it would be a big help
 

Rae134

Renowned
CV-BEE
Contributing Artist
Miss B, you need CS5 this is a simple tute to use this brush Photoshop in 60 Seconds: How to Create a Full Color Brush
This is a much better one to show what can be done (why didn't I know about this before arrrgggghhh!!!) How to Use Photoshop's Mixer Brush Tool for Digital Painting - Introduction

Other than that I've always hand painted under the brush. I couldn't quickly find a landscape one for a sample so here is a metallic object (same principle). The first B&W object is the brush with black paint, the one underneath is a very quick paint that goes under the brush (or over depending on the effect you want and of course you don't have to use black but its the one that works most of the time) and the rest are showing various blending modes. Under landscape brushes, take leaves for example you'd brush a few leafy type colours so its mottled like I've done with the red/yellow/orange on the right round bit.

test.jpg Click to view larger
A another way of hand painting: Multiple Colors with Photoshop Brushes Tutorial | Obsidian Dawn
 
Last edited:

Rae134

Renowned
CV-BEE
Contributing Artist
Cool, I have CS5 loaded on this computer so should be the same.

Make sure the outside of your area is truly white (that way you can select ignore white in "Tracing Options" in below steps and it be empty unlike my sample attached which has greys inbetween the "empty" areas :p)

Open or place your png (or any other raster file like Jpg etc), select it, go to "Object" (in top bar) and scroll almost to the bottom to "Live Trace", select " Tracing Options".

This will open up a dialogue box with many options. Depending on what you want to do will of course depend on the settings and also how big your photo is. Most of the time the stuff on the right doesn't need to be altered unless you need finer details. The stuff on the left is pretty self explanatory (if you don't know just ask and I'll try and help :p). Click Trace when you're ready. Expand when its finished tracing so you can access the different paths (you prob don't want this if you using 256 colours but its handy for limited colours)

The first sample attached, I made it 200% so you could see the details more and saved it as a jpg.
My settings on the left were changed so the colour was 256, and on the right I halved the default and ignored white.
Looks pretty much like a raster feather.
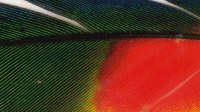
Feather.jpg (thumbnail, click to view details)

The second sample is the same except I made it 6 colours (which of course has less details, sometimes this is a good thing. Also sometimes you don't need 256, somewhere in between works, just a matter of playing).
Looks more cartoony

Feather2.jpg
 

Jay Versluis

Admirable
BTW, sometimes a rotating brush can be useful. Sadly Photoshop doesn't have that feature - but the excellent Clip Studio Paint does. Sample any picture as a Brush Material and start drawing with rotation:

Rotating Brush.gif
 
Top