• Welcome to the Community Forums at HiveWire 3D! Please note that the user name you choose for our forum will be displayed to the public. Our store was closed as January 4, 2021. You can find HiveWire 3D and Lisa's Botanicals products, as well as many of our Contributing Artists, at Renderosity. This thread lists where many are now selling their products. Renderosity is generously putting products which were purchased at HiveWire 3D and are now sold at their store into customer accounts by gifting them. This is not an overnight process so please be patient, if you have already emailed them about this. If you have NOT emailed them, please see the 2nd post in this thread for instructions on what you need to do

M4 turnned green!

Sunfire

One Busy Little Bee
QAV-BEE
Contributing Artist
Default definitions for the Gen 4 Daz figures in EZSkin 3 and this is what happened to M4...
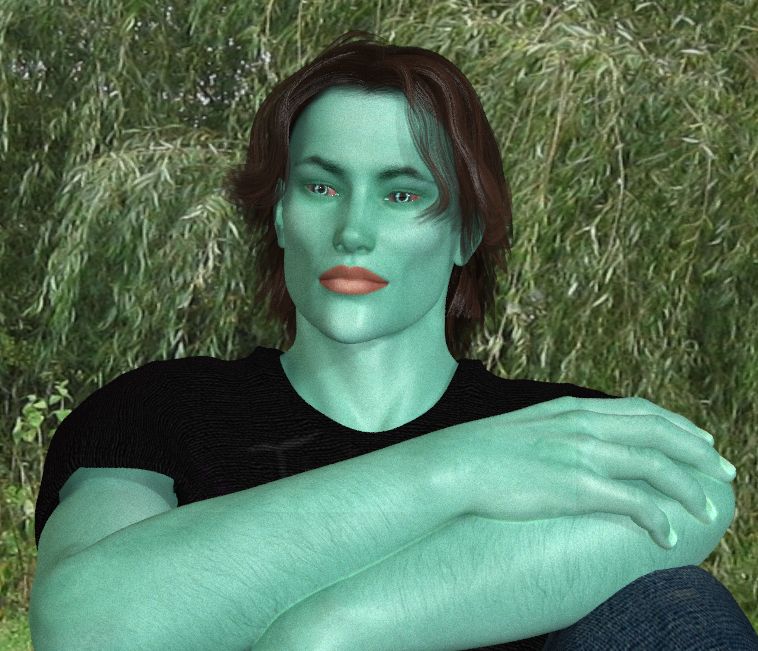
itsnoteasybeinggreen.jpg


The texture he's wearing is Kurann for M4.

I've also noticed Superfly likes to wash out little details like scars. But anyway...

How do I ungreen M4? I went in to the materials and tried to reset the diffuse to white, but that hasn't done anything the arms and neck are still, green... *sigh*
 

Miss B

Drawing Life 1 Pixel at a Time
CV-BEE
Unfortunately, I'm no expert when it comes to EZSkin 2 or 3 so hopefully someone with more experience will be able to give you some ideas.
 

Sunfire

One Busy Little Bee
QAV-BEE
Contributing Artist
It might make sense if I had green lights in my lights but I don't. I can't figure out what's going on for the life of me and I do hope one of our wise ones will come and share some wisdom.
 

Miss B

Drawing Life 1 Pixel at a Time
CV-BEE
OK, I'm finding this odd. I just loaded up M4 in PP11, applied SAV's Yannis skin, and rendered in FireFly and SuperFly, and I'm not getting that green you are, so I can't begin to guess what's causing that.


Yannis-EZS3Test-FireFly.jpg


For the SuperFly render, I used the Medium Quality Sub Surface render settings.

Yannis-EZS3Test-SuperFly.jpg
 

Gadget Girl

Extraordinary
Contributing Artist
So I think one of a few things might be happening. If you had wanted to make his skin green in EZSkin3 you would have used the HSV setting. You might want to go to Edit Skin, and choose HSV as the category from the drop down and check the color there.


You said that you tried to ungreen it? The tricky thing in Poser is that you have to adjust each material one at a time. Making a change to one won't change any of the others. That's why EZSkin is so nice, it makes changes to all the material zones without you having to change them one at a time. So if it is an HSV problem, once you change it and run EZSkin again, it will fix all the areas.

Probably that's not what happened though, because you would have had to there are set it. I looked up the skin you were taking about, and it looks like there may be some sort of green undertone to it. I would load the original material again, and see if you look in the material room you can find that slight greenish tint. Of course you might have to go through and edit one at a time to get rid of it, on this particular skin.

I've also noticed Superfly likes to wash out little details like scars. But anyway...

Is this before or after EZSkin? EZSkin adds it's own bumps maps so that might be part of it. The bigger reason that I just learned recently is that Superfly does much better with Normal maps than with Bump maps which is a newer thing.

Hope that helps. Also if you can post a shot of the material room I might be able to see what's wrong from there.
 

Sunfire

One Busy Little Bee
QAV-BEE
Contributing Artist
Yeah I know you have to edit each zone separately, I had tried removing the green from the diffuse from the neck and arms and torso, but as you can see the neck and arms are still green in that partial render.

I didn't change anything in the ezskin 3 defaults for the G4 Daz figures preset, so I don't know what's happening. I will go look and see if the green tint is part of the original texture and if so try removing it before using the ezskin to get me a good looking skin. The one thing I haven't done is try the superfly renderer without applying the ezskin first.
 

Miss B

Drawing Life 1 Pixel at a Time
CV-BEE
Oh I don't think you can do a SuperFly render without applying EZSkin first, at least not for human skin unless, of course, the character skin was created specifically for rendering with SuperFly. I tried the first couple of times, and everything came out solid black.
 

seachnasaigh

Energetic
Sunfire - post a screenshot of the skin material from the (advanced) material room, with all nodes fully expanded (both preview port and data fields) so that we can see all values and color blocks.
 

Gadget Girl

Extraordinary
Contributing Artist
Oh I don't think you can do a SuperFly render without applying EZSkin first, at least not for human skin unless, of course, the character skin was created specifically for rendering with SuperFly. I tried the first couple of times, and everything came out solid black.

It depends on how the skin was made. A lot of the really complex skins use shader nodes that turn skins funny colors in Superfly, usually solid black, white, or a kind of textured grey. If you connect the image map to Diffuse_Color and make sure the Diffuse_Color is set to white, you'll get pretty good results (assuming of course the skin has a good image map). But that's lots of work to reconnect by hand and you would have to go back and add SSS and the like.
 

Miss B

Drawing Life 1 Pixel at a Time
CV-BEE
Very true. I've often seen such involved/complex node setups, though I don't usually play much with them other than to add some shine to lips and nails of the female characters. ;)
 

Sunfire

One Busy Little Bee
QAV-BEE
Contributing Artist
Sunfire - post a screenshot of the skin material from the (advanced) material room, with all nodes fully expanded (both preview port and data fields) so that we can see all values and color blocks.
Okay, I shall try, I assume you mean after I've applied the EZSkin. It will end up being several screenshots actually.
 

Glitterati3D

Dances with Bees
Not having any trouble with M4 and EZSkin3 in P11 either. I believe your problem has something to do with GPU rendering, Sunfire, but since I only use CPU rendering I don't have any information on it. It's something to do with those presets in P11 and I don't use them at all either.

M4EZSkin3.jpg
 

Sunfire

One Busy Little Bee
QAV-BEE
Contributing Artist
I am using CPU rendering with superfly.

Here is the material settings for the Skin on the face, In two shots, with all those with color open. The ones that are closed don't even have a single white box among the settings.

materialroom1.jpg

materialroom2.jpg


This time instead of being green like above, he's more blue, with those very red lip that just want to jump out of the render at you, no matter how low a quality and grainy it is.
 

Sunfire

One Busy Little Bee
QAV-BEE
Contributing Artist
There is something I did find out, there are two Poser roots, and many of those go to the one that isn't visible. If I remove it then delete all the attached nodes things clean up, but I still can't find the source of strange coloring.
 
Did you import the mats into poser from Studio using their export for poser companion files? I did that on Genesis 3 when someone posted a way to G3 into poser and would get random colors for the skin when poser apparently could not find the right textures. It just seemed to find random colors to use although others reported no problems. Sometimes green, sometimes purple and even once orange. I didn't ever resolve the issue and just gave up because using G3 in poser was just a whim so I do not know how to resolve it.
 

Miss B

Drawing Life 1 Pixel at a Time
CV-BEE
Since you mention he's more blue now, I wondered if that Blinn_2 Specular_Color node was the culprit, but I just checked mine, and that's pretty much the same color blue on the same node, and neither of my renders look blue.
 

Sunfire

One Busy Little Bee
QAV-BEE
Contributing Artist
Did you import the mats into poser from Studio using their export for poser companion files? I did that on Genesis 3 when someone posted a way to G3 into poser and would get random colors for the skin when poser apparently could not find the right textures. It just seemed to find random colors to use although others reported no problems. Sometimes green, sometimes purple and even once orange. I didn't ever resolve the issue and just gave up because using G3 in poser was just a whim so I do not know how to resolve it.

The Kurann texture is a Poser texture, it came out shortly after M4 was released. He renders nicely in Firefly it's just Superfly where he changes color on me. The odd thing, the settings I made earlier before it was pointed out where to find the legacy figure presets and all, he was coming out fine.
 

seachnasaigh

Energetic
There are two Poser roots, and many of those go to the one that isn't visible.
Likely, one root is Firefly and the other root is Superfly.

Look for the root with the Superfly box ticked. Expand both its data palette and its preview window.
Tick its Firefly box also.
Delete the other root.
Now run the remove detached nodes Python script. That will simplify the nodework to only that which is relevant to Superfly.

Expand the picture of the HSV node (right under the face skin map) and the COMPonent node and the Proc. Specular Map node (both in the right side column).

I can't see which root Blinn_2 is plugged into, nor which socket and its associated color block and/or value. Hopefully a screenshot of the Superfly root will clear that up.
 
Top